


An HO scale layout plan is your railroad's blueprint. It’s the map that turns a vision in your head into a real, working model railroad, whether you’re planning a simple loop on a 4x8 sheet of plywood or a sprawling multi-level empire. Kicking things off with a solid plan is the single most important step you can take.
Why a Great Plan Is Your Most Important Tool
Trying to build a model railroad without a plan is a recipe for frustration. It’s like building a house without a blueprint—sure, you might end up with something standing, but it’ll be full of compromises, weird operational quirks, and costly mistakes you’ll have to fix later. A good HO scale layout plan is your guide, translating big ideas into a practical design that actually works.
A well-thought-out plan forces you to get real about what you can achieve in your space. It makes you answer the tough questions before you cut any wood or lay a single piece of track. Honestly, this bit of foresight is the secret sauce behind every great model railroad you've ever admired.
The Enduring Appeal of HO Scale
There's a reason HO scale has been the world's favorite for decades. It just hits that perfect sweet spot between size and detail. At a 1:87 ratio, the models are big enough to show off incredible craftsmanship and are easy for most people to handle. At the same time, they're small enough to fit a believable railroad scene into a spare room, basement corner, or even a modest shelf.
This perfect balance is why HO scale took off after its introduction in the 1920s and continues to dominate the market today. If you're curious about the backstory, you can explore more about the history of HO scale's popularity and its market growth.
A layout plan does more than just show where the track goes. It defines the railroad's purpose, dictates operational flow, and sets the stage for immersive scenery. It's the story of your railroad, written before the first chapter is built.
Key Benefits of Detailed Planning
Spending a few hours with a pencil and paper (or some planning software) will save you countless headaches and rework down the line. It's an investment that pays off big time.
Here’s why you should never, ever skip the planning phase:
- Maximizes Your Space: A good plan helps you squeeze the most out of every inch, whether you're working with a tiny shelf or a massive basement.
- Prevents Operational Problems: You can design smooth curves, logical turnout placements, and functional yards right from the start, avoiding those frustrating derailments and operational dead-ends later.
- Defines Your Budget: By mapping everything out—track, structures, scenery materials—you can build a realistic budget and sidestep those nasty surprise expenses.
- Creates a Cohesive Vision: It ensures your layout has a clear identity and purpose. Is it a tricky switching puzzle? A scenic mainline for long trains? A gritty industrial district? Your plan makes it happen.
Choosing The Right Footprint For Your Space
The space you have is the blank canvas for your model railroad empire. Before you start dreaming about track configurations and mountain scenery, you have to decide on the layout's foundational shape—its footprint. Think of it like pouring the foundation for a new house; the size and shape you pick will dictate everything that comes after.
This is where your grand ambitions meet the reality of your room's dimensions. A long, skinny shape that’s perfect for a basement might be a total non-starter in a square spare bedroom. Getting familiar with the fundamental principles of space planning can be a huge help here, shifting your perspective from just seeing four walls to seeing a functional area you can truly maximize.
Picking the right footprint is the first real step in turning those abstract ho scale layout plans into a tangible project.
This decision tree infographic is a great way to match your main goal—whether it's packing in detail, using space efficiently, or running complex operations—with the right layout footprint.
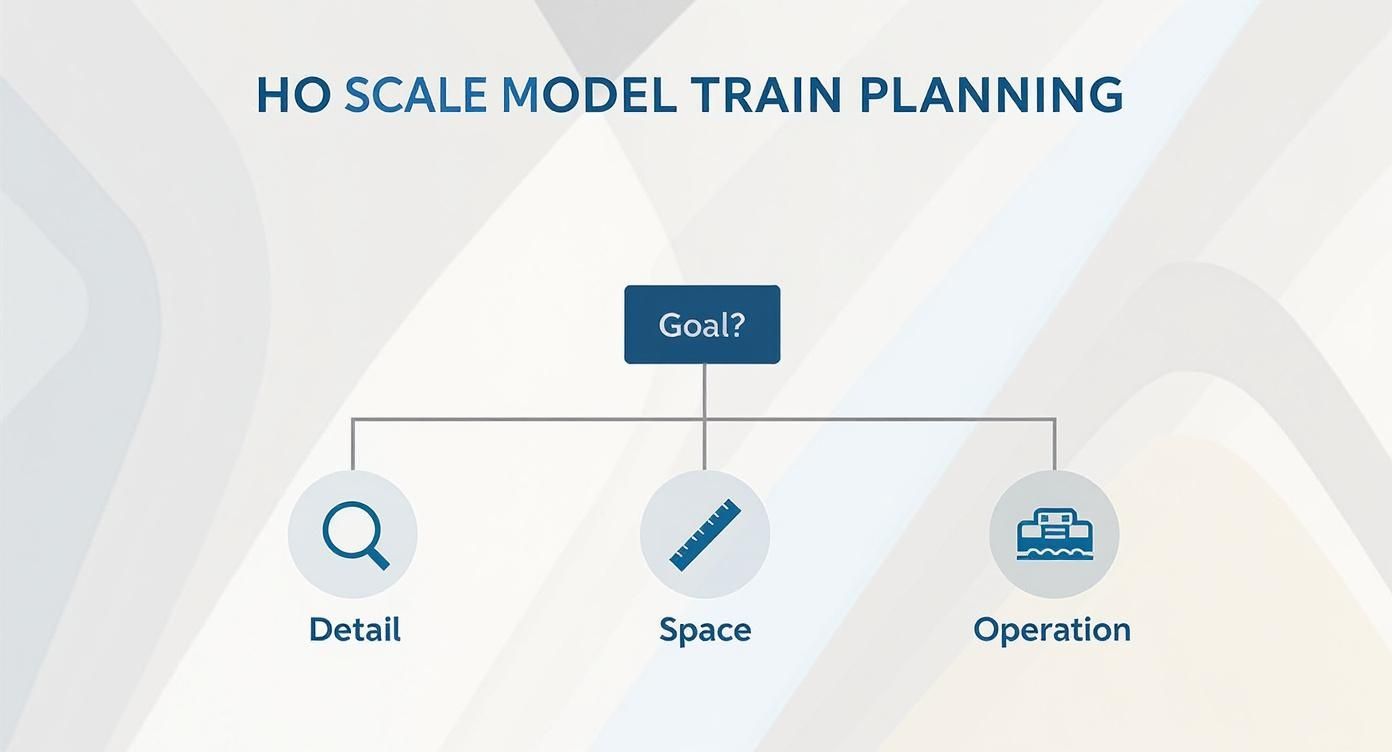
As you can see, what you value most directly points to an ideal layout shape. This helps guide you toward a design that will actually support the kind of model railroading you want to do.
Let's break down some of the most popular options to help you find the best fit for your space and modeling style.
Comparing Common HO Scale Layout Footprints
Choosing a footprint is one of the most critical decisions you'll make. The table below compares a few popular styles, laying out their pros, cons, and what kind of space they work best in. Use it as a quick reference to see how each option stacks up against your own room and operational goals.
| Layout Style | Typical Size | Pros | Cons | Best For |
|---|---|---|---|---|
| Island (4x8) | 4' x 8' | Self-contained, easy for beginners, great for continuous running. | Hogs floor space, "reach-in" issues to the center. | Beginners, garages, or dedicated rooms with ample floor space. |
| Shelf | 12"-24" deep, variable length | Extremely space-efficient, encourages realistic operations. | Continuous running is difficult to achieve. | Small rooms, apartments, or modelers focused on switching. |
| Around-the-Walls | Room perimeter, 18"-30" deep | Maximum mainline run, immersive feel, combines best of both worlds. | Requires a dedicated room, door access needs a bridge. | Serious hobbyists with a dedicated space for their layout. |
| L-Shape / U-Shape | Varies widely | Creates distinct scenes, good for operations, fits corners well. | Can have tight corners, requires more complex benchwork. | Medium-to-large rooms where you can dedicate a corner or wall section. |
Ultimately, this table is a starting point. The best design often borrows elements from different styles to create a custom solution that's perfect for your space.
The Classic 4x8 Island Layout
For decades, the humble 4x8 foot sheet of plywood has been the starting gate for countless model railroaders. When you place it in the middle of a room, this "island" creates a self-contained world you can walk all the way around.
It’s a fantastic choice for beginners because it's straightforward to build and easily supports a simple loop of track. More importantly, it allows for broad 18-inch or 22-inch radius curves, which are critical for getting most HO scale equipment to run smoothly. If you want to dive deeper into why this scale is so popular, our guide on everything you need to know about HO scale model trains has you covered.
But the 4x8 isn't without its downsides. The center of the board can be a real pain to reach—a classic problem hobbyists call the "4-foot reach." It also eats up a surprising amount of floor space, making it a tough sell for smaller rooms.
Key Takeaway: The 4x8 island is a solid, self-contained launchpad for newcomers, but be mindful of its large footprint and the challenge of reaching the middle, especially in tight quarters.
The Space-Saving Shelf Layout
When floor space is the most valuable commodity you have, the shelf layout is your answer. This design runs along one or more walls on narrow benchwork, usually between 12 to 24 inches deep. This clever approach keeps the middle of the room wide open and completely usable for other things.
Shelf layouts are perfect for point-to-point operations, where trains travel with purpose from one town or industry to the next instead of just chasing their own caboose. This focus on deliberate train movements often feels more engaging and true-to-life.
- Pros: Incredibly space-efficient, promotes realistic operations, and is easy to build in manageable sections over time.
- Cons: A continuous running loop is tricky to pull off without adding complex corner modules or a helix.
This footprint is the go-to choice for modeling a specific branch line, a bustling industrial switching area, or one beautifully detailed scene.
The Immersive Around-The-Walls Layout
If you're lucky enough to have a dedicated train room, the around-the-walls design is hard to beat for creating an immersive world. By lining the perimeter of the room, this layout gives you the longest possible mainline run, letting you operate impressive, full-length trains.
This setup makes you feel like you are inside the scene, not just looking at it from the outside. It gives you the long runs of a shelf layout but adds the possibility of continuous running by "bridging" the doorway with a lift-out section or a swing gate.
In the end, the right footprint is the one that fits your room, fuels your operational dreams, and, most importantly, gets you excited to start building. So, get out that tape measure, think hard about how you want to run your trains, and choose the foundation that will set your project up for success from day one.
Designing a Track Plan for Engaging Operation
A great track plan is what breathes life into a static model, turning it from a collection of miniature trains into a living, working railroad. It’s the difference between a simple loop where a train endlessly chases its own tail and a dynamic system with purpose.
Think of your track plan not just as a route, but as a script for a play; it needs destinations, challenges, and a reason for your trains to be on the move. This is where we go beyond basic ovals and get to the core of operations—designing a railroad that is as fun to run as it is to look at.
Building the Bones of Your Railroad
Every engaging layout is built on a few fundamental track elements. These are the building blocks that provide operational interest and visual realism. By thoughtfully combining them, you can create a layout that tells a story.
- The Mainline: This is the primary artery of your railroad, the major highway connecting different towns and scenes. It should be designed for smooth, reliable running, ideally with the broadest curves your space allows. A well-designed mainline makes long, impressive trains look their best.
- Passing Sidings: On single-track mainlines, a passing siding is essential. It’s a parallel track that allows two trains moving in opposite directions to pass each other safely. Strategic placement of sidings creates interesting operational puzzles for your crew.
- Industrial Spurs: These are the destinations that give your freight trains a job. A spur is a short track branching off the mainline or a siding that serves a specific industry—a grain elevator, a factory, or a coal mine. Adding industries is the easiest way to introduce purposeful switching operations.
- Classification Yards: A yard is the heart of a busy railroad. It's where incoming trains are broken down, cars are sorted by destination, and new outbound trains are assembled. Even a small yard with a few tracks adds a tremendous amount of operational potential.
Turnouts and Curves: The Keys to Fluid Motion
The two most critical components for reliable operation are your curves and your turnouts (also known as switches). Getting these right is non-negotiable if you want to avoid constant, frustrating derailments.
For curves, the rule is simple: broader is always better. While an 18-inch radius is often cited as a minimum for HO scale, pushing that to 22 inches or more will make a world of difference. Your locomotives and longer rolling stock will navigate them more smoothly and look far more realistic doing it.
Turnouts are the intersections of your railroad, and their placement dictates operational flow. A classic mistake is placing them at the start or end of a sharp curve, creating an "S-curve" that can cause couplers to fail and cars to derail.
A well-placed turnout should feel like a natural extension of the track, not an abrupt interruption. Plan your turnouts to create smooth, flowing routes into sidings and yards, ensuring your trains can navigate them without issue.
Thankfully, modern technology has made designing a layout much easier. Hobbyists now use digital tools to visualize their tracks and scenery before cutting any wood. This trend is part of a larger movement toward more interactive model railroading, which is also reflected in the growing popularity of DCC systems. The global model train market is even projected to grow at a CAGR of 5.5%, showing the hobby's strong and continued appeal. You can discover more insights about the model train market's growth and trends online.
Plan for Realism and Operation
Ultimately, designing for engaging operation means thinking like a real railroad manager. A layout with purpose is one that will hold your interest for years. It's about considering the "why" behind every piece of track you lay.
You can learn more about how Digital Command Control for model trains can completely change your operating sessions, allowing you to run multiple trains independently with realistic sound and lighting.
Ask yourself these questions during the planning stage:
- What is this railroad's job? Is it a busy mainline carrying transcontinental freight, or a sleepy branch line serving a few local industries?
- Where are trains coming from and going to? Even on a small layout, creating the illusion of a larger world is key. This is often achieved with staging tracks, which represent the "rest of the world" beyond your modeled scene.
- How will I operate it? Will you be a solo operator running one train at a time, or will you host sessions with friends? This will influence how many sidings and jobs you need to include.
By blending these core elements—mainlines, sidings, spurs, and yards—with smooth curves and thoughtfully placed turnouts, you can create HO scale layout plans that are not just visually impressive but also deeply rewarding to operate.
Three Proven HO Scale Layout Plans You Can Build
All that theory is great, but there's nothing like seeing a plan on paper to really get the gears turning. To help you get from dreaming to doing, we've sketched out three distinct and time-tested ho scale layout plans. Each one is designed for a common space and operating style, giving you a solid blueprint you can build as-is or tweak to fit your own vision.
Think of these as expertly crafted recipes from a seasoned chef. We’ve already balanced all the key ingredients—the track geometry, the operational flow, and the overall footprint—to make sure the final result is a blast to run. Whether you're a total newcomer with a single sheet of plywood or a veteran modeler with a whole room to fill, one of these plans is the perfect place to start your railroad empire.
Plan 1: The Classic 4x8 Gateway Pacific
This is the quintessential starting point for just about every model railroader, built right on a standard 4x8 foot sheet of plywood. The Gateway Pacific is all about delivering maximum fun in a compact, self-contained world. It's a classic island-style layout that gives you a taste of both mainline running and local switching without being overwhelming.
The heart of the design is a continuous loop of track using broad 22-inch radius curves, which means even your bigger locomotives will glide through them smoothly. Tucked inside that loop is a passing siding for meeting other trains, along with a couple of industrial spurs that give your freight cars a purpose. That simple addition transforms the layout from a simple "roundy-rounder" into an engaging operational puzzle.
Operational Concept:
Imagine the Gateway Pacific as a small but busy branch line terminal. One spur serves a local lumber yard, and the other goes to a small warehouse. Your job is to run the daily local freight, dropping off empty cars and picking up loaded ones before your train heads back "off-stage."
- Dimensions: 4 feet x 8 feet
- Minimum Curve Radius: 22 inches
- Turnouts: 6 x #4 or #5 turnouts
- Best For: Beginners, garage layouts, or any spot where you want a simple, all-in-one railroad.
Plan 2: The 10x12 Aberdeen Division Spare Room Shelf
If you've got a spare bedroom or a dedicated corner of the basement, this 10x12 foot around-the-walls shelf layout is a huge step up in operating potential. The Aberdeen Division uses narrow benchwork (only 18-24 inches deep) to keep the middle of the room wide open, creating an immersive, walk-in experience that puts you right in the action.
This plan focuses on point-to-point operation, where trains have a real origin and destination, though a simple lift-out section across the doorway can give you a continuous running option. The longer mainline gives you room for more realistic train lengths and lets you create distinct scenes, like a small town, an industrial park, and a modest yard. This design feels less like a model and more like a slice of a real railroad.
By building the layout around the perimeter of the room, you are physically placed inside the scene. This shift in perspective is incredibly powerful—it makes the model world feel far larger and more immersive than an island layout of a similar size.
Operational Concept:
The Aberdeen Division is a key junction on a busy regional railroad. Your crew is in charge of sorting incoming cars in the yard, building a local freight to serve the industries in town, and assembling outbound trains to continue their journey. That satisfyingly long run lets you actually watch your train travel through the world you've built.
- Dimensions: Fits a 10 foot x 12 foot room
- Benchwork Depth: 18 to 24 inches
- Turnouts: 10-12 x #6 turnouts for the mainline and yard
- Best For: Intermediate modelers, those with a dedicated spare room, and anyone who values realistic operations over simple loops.
Plan 3: The Heartland Industrial Multi-Deck
When you're ready to squeeze every last ounce of railroading out of your dedicated train room, a multi-deck layout is the ultimate answer. The Heartland Industrial plan is designed for a space roughly 12x16 feet or larger. It brilliantly stacks two completely different scenes on top of each other, connected by a helix (a spiral of track).
The lower deck is home to a large, visible staging yard that represents "the rest of the world"—it’s where your trains come from and where they're going. The upper deck is a highly detailed industrial switching district, packed with spurs, sidings, and challenging car-spotting puzzles. This advanced design literally doubles your railroad's footprint without taking up another square inch of floor space.
Key Features of This Advanced Plan:
- Staging Deck: The lower level is all business, built to store multiple complete trains so you can run varied and realistic operating sessions.
- Helix Connection: A carefully engineered helix gives your trains a gradual climb to move between the two levels without struggling.
- Operations-Focused Upper Deck: The top level is a railroader's playground, designed for complex switching that will keep one or more operators happily busy for hours.
Operational Concept:
You're the terminal manager for a bustling industrial zone in a big city. Full trains arrive from the staging yard below, and your job is to break them down, deliver each car to the correct industry, and build new outbound trains. This plan is all about purposeful, slow-speed switching and methodical work, offering nearly endless challenges. This is one of those ho scale layout plans that will keep you captivated for years to come.
With your HO scale layout plans perfected, it's time for the fun part: making it real. But before you cut a single piece of wood or lay any track, you need to get your workshop stocked and ready. A little prep work now saves a ton of headaches later and makes the whole building process a lot more enjoyable.
Think of it like getting all your ingredients prepped before you start cooking. When everything is within arm's reach, you can stay in the zone and focus on the craftsmanship. We'll break down the shopping list into a few key areas, starting with the very foundation of your railroad—the benchwork.
As you gather your essential tools and materials, having an efficient garage storage and workbench setup can significantly improve your building process and overall enjoyment of the hobby.
Building Solid Benchwork
The benchwork is the skeleton of your railroad. It's the stable, level base that everything else depends on, so don't cut corners here. Solid construction is absolutely critical for reliable, long-term operation. What you use will really depend on your layout's design and how comfortable you are with woodworking.
For a classic 4x8 layout, the materials list is pretty straightforward. You can find everything at your local home improvement store.
- Lumber: Most modelers use 1x4 or 2x4 pine boards for the frame and legs. They offer a great mix of strength without breaking the bank.
- Plywood: A sheet of 1/2-inch or 3/4-inch plywood creates a durable and perfectly flat surface for your layout to sit on.
- Foam Insulation Board: A lot of us prefer to add a layer of 1-inch or 2-inch rigid foam insulation on top of the plywood. It's incredibly lightweight, makes carving scenery a breeze, and helps quiet down the trains.
- Fasteners: You’ll want plenty of wood screws (usually 1 5/8-inch and 2 1/2-inch) and some good wood glue to make sure your joints are strong and built to last.
Track, Roadbed, and Wiring Essentials
Once the foundation is built, it's time to get to the heart of your railroad. The quality of your trackwork is everything—it directly impacts how well your trains run. Investing in good materials at this stage will pay you back every single time you have a smooth, trouble-free operating session.
Because HO scale is so popular, you have a massive selection of track systems and accessories to choose from. This is a huge advantage and a big reason HO remains the top choice for so many modelers.
Here are the key components you'll need:
- Track: Flextrack is easily the most versatile choice, as it lets you create smooth, flowing curves that look realistic. Sectional track is a bit easier for beginners but limits your design freedom.
- Roadbed: Cork roadbed is the undisputed industry standard. It lifts the track up, gives you that realistic shoulder for adding ballast later, and helps dampen track noise.
- Wiring: You'll need 14-gauge wire for your main power bus running under the layout and some smaller 20-22 gauge wire for the "feeder" connections that go up to the track itself.
- Track Joiners: These little metal pieces connect your track sections. For the most reliable electrical connection, seriously consider soldering them.
Must-Have Tools for Assembly
You definitely don't need a professional machine shop to build an amazing layout, but a core set of quality tools is non-negotiable. These are the workhorses you’ll be reaching for over and over again.
Pro Tip: Invest in the best tools you can afford, especially for cutting and electrical work. A quality tool not only produces better results but is often safer and more enjoyable to use.
This list covers the essentials you'll need to bring your HO scale layout plans to life.
- Measuring and Marking: A good 25-foot tape measure, a metal straightedge or framing square, and a few sharp pencils are fundamental. Accuracy starts here.
- Cutting Tools: You'll need a handsaw or circular saw for the benchwork. For the track itself, nothing beats a Xuron track cutter for making clean, flush cuts.
- Assembly Tools: A variable-speed drill with a good set of drill and driver bits is your best friend for putting the benchwork together.
- Soldering Iron: A 25-40 watt soldering iron is a must for reliable wiring. Don't forget the rosin-core solder and flux, either.
- Small Hand Tools: A set of needle-nose pliers, wire strippers, and a mix of screwdrivers will be in your hand constantly.
For those ready to think about scenery, our comprehensive diorama supplies guide is a great next step for learning how to bring your world to life.
Common Questions About HO Scale Layout Plans
Even the most detailed blueprint can leave you scratching your head. That's perfectly normal. When you're planning something as involved as a model railroad, questions are going to pop up, and getting good answers before you start cutting wood can save you a world of headaches and money.
Think of this as your planning FAQ. We've gathered the most common questions we hear from hobbyists and laid out some straightforward, practical answers to get you over those initial hurdles with confidence.
What Is the Minimum Space for an HO Scale Layout?
This is the big one, and thankfully, the answer is more flexible than you might think. While you can build a tiny switching layout on a shelf just a foot deep, most folks envision a train that can run in a continuous loop. For that, you’ll really want an area of at least 4x6 feet.
The classic 4x8 foot sheet of plywood is a staple for a reason. It gives you enough room for 18-inch radius curves, which is the magic number for making sure most standard HO equipment can run smoothly without looking like it's about to fly off the rails.
But don't get discouraged if you don't have a spare 4x8 space. An "around-the-walls" shelf layout can actually give you a much longer mainline run in the same overall room, making your operations feel much bigger than the footprint suggests. It's a clever way to maximize the fun when space is at a premium.
Should I Choose a DC or DCC Control System?
This is a huge decision that shapes the entire experience of running your trains. It's kind of like choosing between a manual or an automatic transmission for a car—both get you down the road, but in very different ways.
-
Direct Current (DC): This is the old-school, traditional way. You control the train's speed and direction by adjusting the voltage going to the track itself. It’s simple, reliable, and cheap, making it a perfectly fine choice if you only plan to run one train on a simple loop.
-
Digital Command Control (DCC): This is the modern standard. The track gets constant power, and you send digital commands directly to a decoder chip inside each locomotive. This lets you run multiple trains independently on the same piece of track, not to mention control lights, realistic sounds, and other cool features.
While DCC does cost more to get started, the operational freedom it gives you is incredible. If your plan involves running more than one train at a time or includes any kind of switching or complex operations, going with DCC from the beginning is a smart investment you won't regret.
What Are the Biggest Track Planning Mistakes to Avoid?
A few common missteps can turn a dream layout into a source of endless frustration. Steer clear of these, and you'll build a railroad that’s a joy to operate for years. Here are the top three rookie mistakes we see in HO scale layout plans.
-
Using Curves That Are Too Tight: Sure, an 18-inch radius is often quoted as the "minimum," but it will seriously limit what kind of engines and cars you can run. Longer equipment will look silly and might even derail. Whenever you can, push for a 22-inch radius or broader. Your trains will not only run better, but they'll look far more realistic navigating the curves.
-
Jamming Too Much Track In: It’s so tempting to cram every square inch with track. We've all been there. But this is a classic beginner mistake. A railroad needs space to breathe! Scenery, buildings, and roads are what make it feel like a real place, not just a plate of spaghetti. Remember the golden rule: less is more.
-
Designing Without a Purpose: A train running in a perfect circle gets boring in about five minutes. A great layout gives your trains a reason to exist. Add a few industries that need cars switched, a passing siding so trains can meet, or a small yard to sort freight. This creates purpose and turns a simple loop into an engaging operational puzzle.
How Can I Plan for Future Expansion?
Very few of us build our entire dream railroad in one shot. Life gets in the way! That's why thinking about expansion from day one is one of the smartest things you can do. It's easier than it sounds.
A simple trick is to include a "stub" track that runs right to the edge of your current benchwork. This track goes nowhere for now, but it's your designated connection point for the future. When you're ready to build the next section, you just extend it.
An even better approach is to build your layout in modules. Each section is a self-contained scene that physically bolts to its neighbors. This modular design not only makes expansion a breeze but has the incredible side benefit of making your layout portable if you ever need to move.
Ready to turn your plans into reality? Fusion Scale Hobbies has everything you need, from track and turnouts to DCC systems and scenery supplies. Explore our massive selection of over 50,000 products and start building your dream layout today at https://fusionscalehobbies.com.