


If you’ve ever run a traditional model train, you’re familiar with the old way of doing things: one train, one track, one controller. Turn the dial, and the whole track gets more power, making the train go faster. Simple, but limiting.
Digital Command Control, or DCC, completely rewrites that rulebook. It's a system that lets you run multiple locomotives independently, all on the same single section of track. Forget thinking of it as a simple electrical circuit; it’s more like a mini computer network for your railroad, where every engine has its own unique digital address and follows only your commands.
What Is Digital Command Control
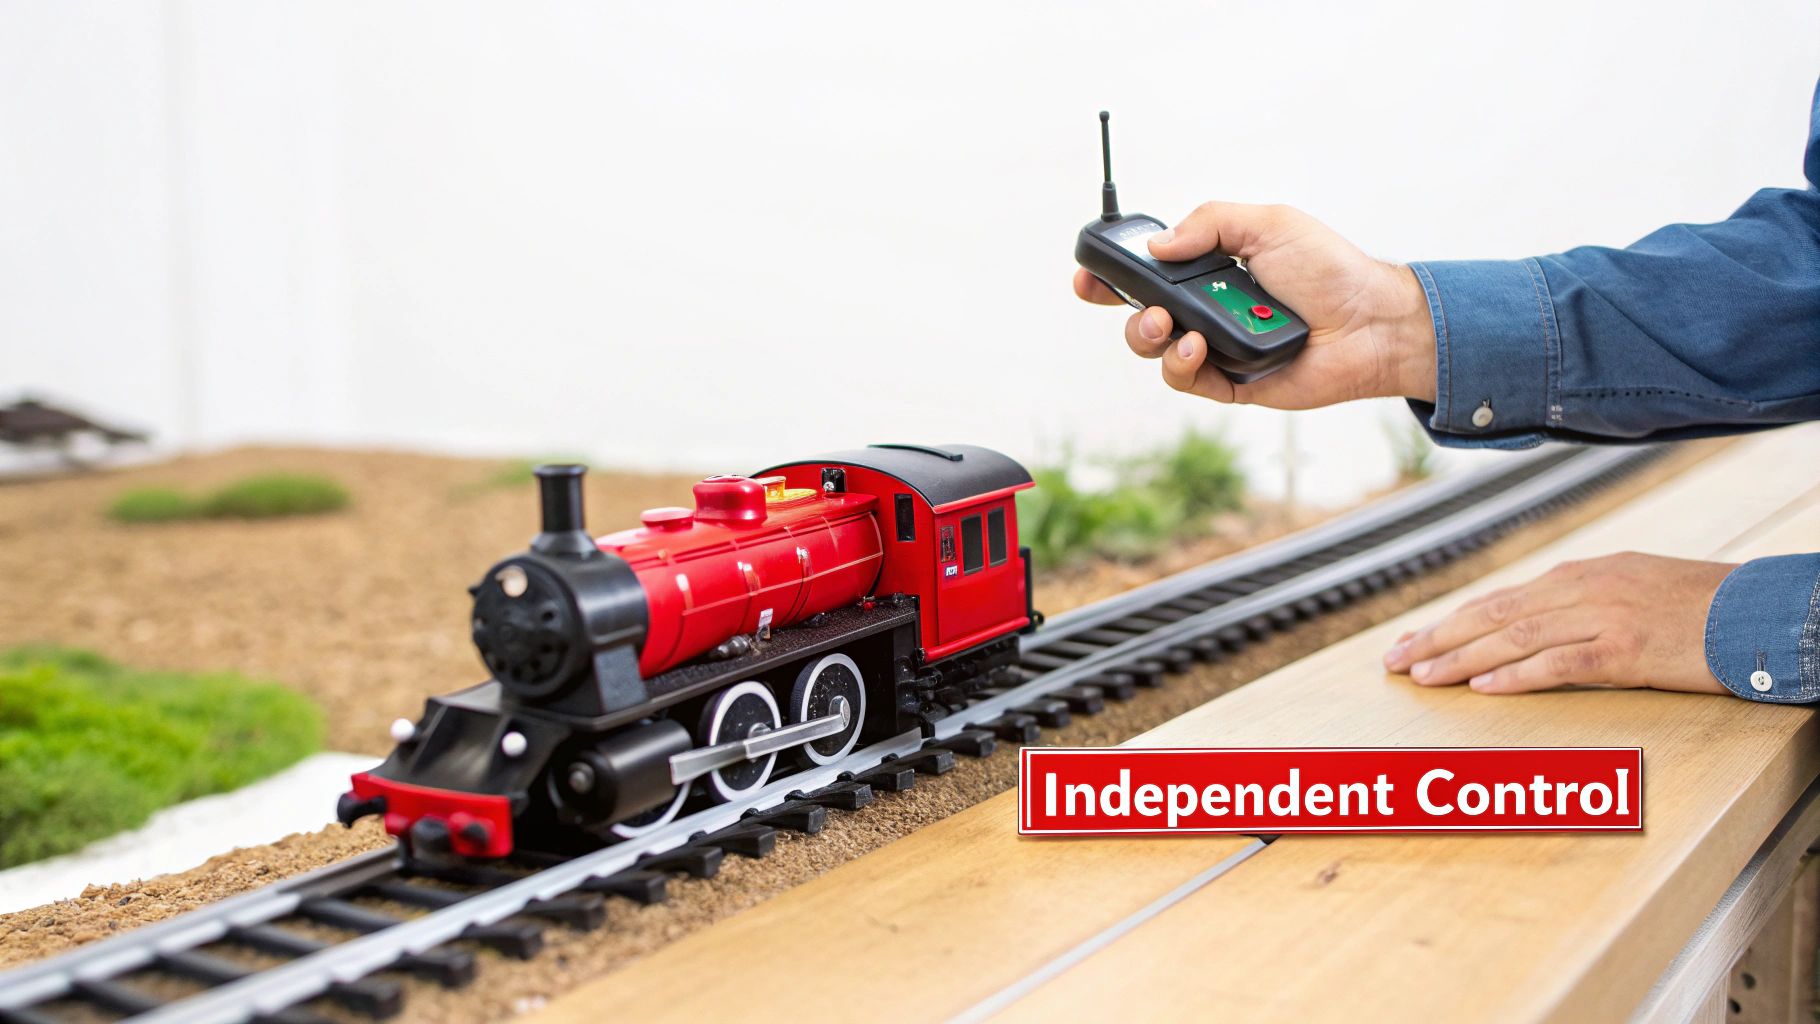
Imagine being the conductor of an orchestra. With one gesture, you can tell the violin section to play louder while signaling the trumpets to hold a soft, steady note. That's exactly the kind of individual control DCC brings to your layout. Instead of just powering up a block of track and hoping for the best, you’re sending specific digital instructions directly to each locomotive.
This is a game-changer. With old-school DC (Direct Current), cranking up the throttle makes every single train on that track section speed up. With DCC, you punch in a specific locomotive’s address on your controller and tell only that engine to accelerate, slow down, or switch on its lights, while everything else on the track stays put or does its own thing.
The Power of Individual Addresses
So how does it work? The magic is in two key components. First, a small electronic chip called a decoder is installed inside each locomotive. Then, your main DCC controller (the command station) sends a constant AC-like power signal through the rails, but here’s the clever part: it layers digital messages on top of that power.
This is the secret sauce of DCC. The track is always fully powered. The decoders inside each engine are constantly listening for digital packets flying down the rails, but they only respond to commands sent to their unique address. When a decoder "hears" a message meant for it, it executes the command—whether that’s turning the motor, blowing the horn, or flashing the ditch lights.
This setup gives you a level of freedom and realism that was once pure fantasy for model railroaders. It’s the difference between shouting into a crowded room and having a private conversation with each person individually.
More Than Just Movement
The benefits of a DCC system go way beyond just running two trains at once. It unlocks a whole new world of operational possibilities that add incredible depth and realism to your hobby.
- Independent Lighting Control: Turn headlights, ditch lights, and cab lights on or off for each engine, even when it’s sitting still.
- Realistic Sound Effects: Trigger authentic engine sounds, horns, bells, and coupler clanks with the press of a button, all specific to the locomotive you're controlling.
- Simplified Wiring: Say goodbye to the nightmare of block wiring, toggle switches, and multiple power packs needed for multi-train DC operation. One pair of wires can power the whole layout.
Whether you're looking at a brand-new engine or considering upgrading an old favorite, understanding the difference between DCC-equipped and DCC-ready trains is your first step. Knowing what each requires will help you plan your move to this powerful control system. That freedom and fine-tuned control are exactly why digital command control for model trains has become the gold standard for serious hobbyists everywhere.
From Analog Switches to Digital Signals
To really get why digital command control for model trains was such a huge deal, it helps to look back at how things used to be. For decades, running a model train meant using a simple direct-current (DC) power pack. You had one controller for one isolated block of track. The more voltage you dialed up, the faster the one engine on that block would go. Simple as that.
That straightforward approach worked just fine for basic layouts. But the moment you wanted to run multiple trains on the same track without them all doing the exact same thing, you hit a wall. This forced hobbyists into some seriously complex wiring, with panels full of toggle switches, multiple power packs, and tons of electrically isolated track sections. Trying to operate a busy railroad felt less like being an engineer and more like being an old-school switchboard operator.
The First Stabs at Multi-Train Control
The dream of running a railroad more realistically pushed manufacturers to experiment with new ideas long before computers were a household item. These early systems were clever, for sure, but they often created as many problems as they solved. Worse, every manufacturer cooked up their own proprietary method, creating a mess where nothing worked with anything else.
This created a "walled garden" for every brand. If you bought into one company's system, you were completely locked into their ecosystem of throttles and receivers. It was an innovative time, but also a deeply frustrating one for hobbyists who just wanted to mix and match the best gear from different companies.
The real problem was the lack of a universal language. Each system spoke its own dialect, meaning a locomotive from one brand couldn't understand commands from another. This incompatibility was holding the entire hobby back.
Finally, a Universal Standard is Born
The push for multi-train control actually started way back in the 1940s when Lionel introduced a simple frequency-based system. This was followed by more ambitious concepts like General Electric's ASTRAC in the 1960s and a handful of competing systems in the 1970s. They worked, but the hobby was still fractured.
The breakthrough finally came in the late 1980s. Realizing that this division was hurting everyone, the National Model Railroad Association (NMRA) stepped up. They formed a committee to hammer out a single, open standard, using a proposal from German engineer Bernd Lenz as the foundation. You can explore the detailed history of these early systems and the standard's development to see just how big of a turning point this was.
That effort led to the official NMRA DCC standard in the 1990s. For the first time ever, there was one common language that every manufacturer could build around.
This standardization changed everything, almost overnight:
- Interoperability: At last, you could buy a command station from one brand and a decoder from another, knowing they'd play nicely together.
- Innovation: With a stable platform to work from, manufacturers could stop reinventing the wheel and start adding incredible features like realistic sound and complex lighting effects.
- Accessibility: A single standard made the technology far easier for everyday modelers to understand and afford, opening the door for thousands to upgrade from old DC systems.
By tearing down the walls between brands, the NMRA's DCC standard created the vibrant, feature-rich, and accessible hobby we all get to enjoy today. It took model railroading from a collection of isolated islands into a unified community.
How a DCC System Communicates with Your Trains
To really get your head around digital command control for model trains, think of your layout as a private postal service. Instead of mail, it delivers commands, and the track acts as the road network. This is the magic that lets you run multiple trains on the same track with a level of precision that was just a dream with old DC systems.
The whole process is a constant, seamless flow of information. It starts the moment you touch your controller and ends with your locomotive responding instantly. Each part of the system has a specific job, and they all work together to turn a simple twist of a knob into a realistic railroad operation. This digital conversation never stops, ensuring your trains always have power and are ready for your next command.
The Command Station: The Brain of the Operation
The Command Station is the central post office for your entire model railroad. This is the device that creates the digital messages, or "packets," that carry all your instructions. When you turn a knob on your throttle to speed up locomotive #345, the Command Station instantly generates a digital packet that says, in essence, "Address 345, increase speed to 25%."
This is the fundamental difference from old-school DC power. Instead of changing the voltage on the track to control speed, the Command Station overlays these digital packets onto a constant AC electrical signal. This signal provides full, uninterrupted power to the whole layout, all the time. It's why your locomotive’s lights and sound can stay on even when it's sitting perfectly still.
The Booster: Amplifying the Message
For smaller layouts, the Command Station often has enough juice to handle everything on its own. But as your railroad empire grows, you might need a Booster. Think of a Booster as a regional distribution center for your postal service—it doesn't create new messages, it just takes the signal from the Command Station and gives it a powerful boost.
This makes sure the digital commands and the electrical power stay strong and clear across long runs of track. A Booster is essential for large layouts to fight off voltage drop and signal loss, guaranteeing that a locomotive at the far end of your basement gets its instructions just as clearly as one right next to the Command Station.
The infographic below shows just how far train control technology has come, moving from simple analog switches to the standardized digital system we use today.

This visual journey really drives home the critical shift from isolated, incompatible systems to the unified NMRA standard that made modern DCC a reality for everyone.
Throttles and Decoders: The Sender and Receiver
Finally, we have the two pieces that complete the communication loop: the Throttle and the Decoder.
-
The Throttle: This is your interface, the controller in your hand. It could be a classic handheld unit with knobs and buttons or even a slick app on your smartphone. When you pick an engine and issue a command, the throttle sends that request to the Command Station to be turned into a digital packet.
-
The Decoder: This is the most vital part of the whole setup—the local post office tucked inside each locomotive. This tiny circuit board is constantly listening to the digital signal buzzing through the rails. It ignores all the packets addressed to other locomotives, just waiting patiently until it "hears" one with its own unique address.
Once a decoder recognizes its address, it opens that digital letter and follows the instructions inside. It translates the command—"increase speed," "blow the horn," "turn on the headlight"—into real-world actions by controlling the locomotive's motor, lights, and sounds.
This whole sequence—from your throttle to the Command Station, down the rails, and to one specific decoder—happens hundreds of times every second. It's this rapid-fire, targeted communication that allows for the smooth, independent operation of every engine on your layout.
If you're interested in a deeper dive, our guide to various train control systems offers more detail on how this technology evolved. It’s this intricate yet totally reliable system that truly brings a modern model railroad to life.
Wiring Your Layout for Reliable DCC Operation
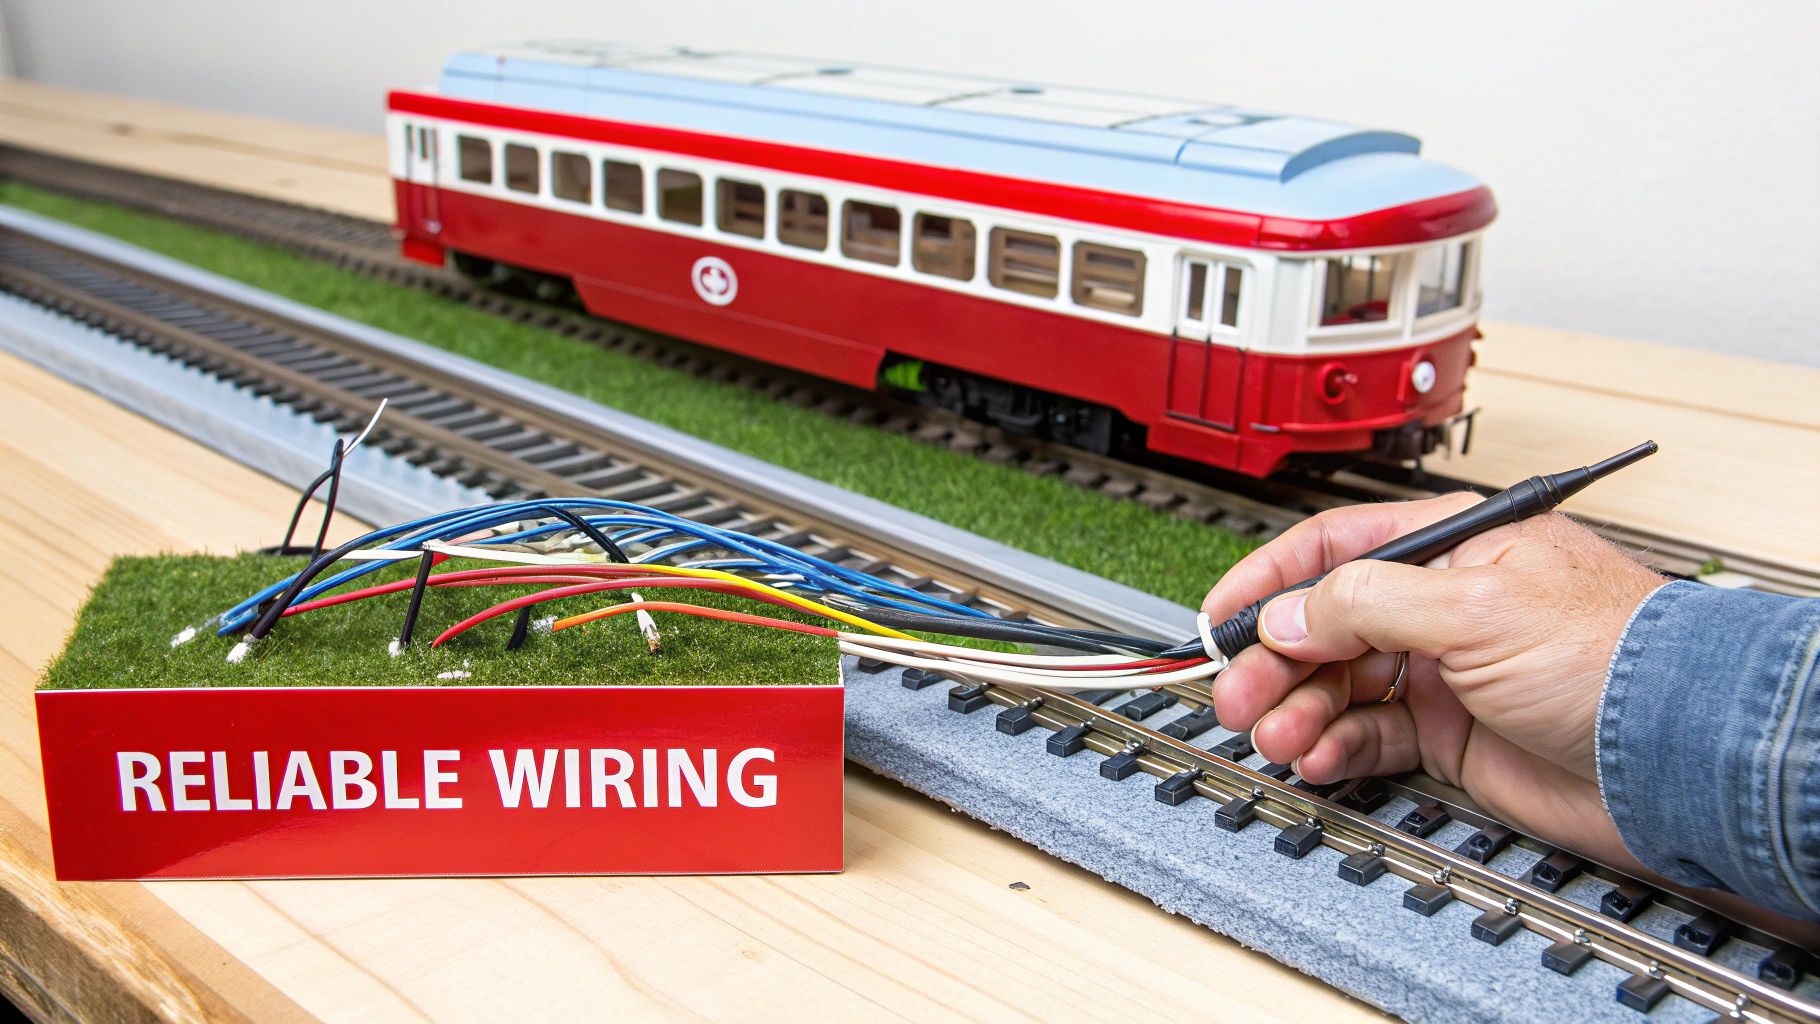
Let's be honest: for a lot of hobbyists, the word "wiring" conjures up images of a complex, intimidating mess of electronics. But here's the good news—wiring for digital command control for model trains is often way simpler and more logical than the old DC method of creating isolated blocks.
The goal isn't to build a confusing control panel with dozens of switches. It’s about creating a solid electrical foundation that delivers clean, consistent power and a clear digital signal to every inch of your layout. Forget the spaghetti bowl of wires needed for DC block control. DCC relies on a clean, efficient power delivery system that starves out dead spots and makes sure every locomotive responds instantly. This system is built on two key parts: the power bus and track feeders.
Building Your Power Bus
Think of your layout's wiring like a tree. The power bus is the main trunk—a pair of heavy-gauge wires running the length of your layout, usually right underneath the track. This bus is the main artery, carrying the full DCC signal and power straight from your command station or booster.
For most HO and N scale layouts, 12- or 14-gauge stranded wire is the perfect choice for the bus. Using a nice, thick wire like this minimizes voltage drop, which keeps the signal strong and reliable, even at the farthest corners of your railroad.
Connecting Feeders for Flawless Performance
If the power bus is the tree trunk, then feeders are the branches. These are much smaller wires (usually 22- or 24-gauge) that connect from the main bus up to the rails themselves. Their only job is to get that clean power and signal from the bus directly to the track.
It's tempting to think the metal rail joiners connecting your track sections will carry the power just fine. Don't fall into that trap. Rail joiners are notoriously unreliable; they loosen up, get dirty, or corrode over time, creating all sorts of frustrating dead spots that will drive you crazy.
The golden rule of DCC wiring is to solder a feeder wire to every single piece of track. It might sound like a lot of work up front, but it's the single best thing you can do to guarantee rock-solid performance and banish electrical gremlins for good. If you can't do every piece, at a bare minimum, you need to install feeders every three to six feet.
Managing Large Layouts with Power Districts
As your railroad empire grows, you might need to divide it into separate electrical zones called power districts. The easiest way to think about these is like the circuit breakers in your house. Each district gets its power from its own dedicated booster, but everything is still controlled by your one central command station.
This approach gives you two massive advantages:
- Better Power Management: It guarantees that every section of a big layout gets full, undiluted power.
- Fault Isolation: If a short circuit happens in one district—say, from a derailment—it only shuts down that one zone. The rest of your railroad keeps running like nothing happened.
This modular approach makes troubleshooting a thousand times easier and is an essential strategy for any ambitious layout.
Solving the Reverse Loop Problem
One of the most common wiring headaches for any model railroader is the reverse loop—a section of track that lets a train turn around and head the other way on the same mainline. The problem? It creates a guaranteed short circuit the moment the engine's wheels bridge the gap, as the left rail inevitably touches the right rail.
In the DCC world, this old problem has a brilliantly simple fix: an automatic reversing module. This clever little electronic device detects the short the instant a locomotive enters the loop and, in a fraction of a second, flips the polarity of the track inside the loop to match the mainline. The train just glides right on through without a hiccup. No buttons to press, no switches to flip—just smooth, hands-free operation.
By getting these basic wiring techniques right, you’ll build an electrical system that lets you focus on what's fun: running your trains, not chasing down electrical problems.
Choosing Your First DCC System and Decoder
Stepping into the world of digital command control for model trains is an exciting moment. It’s when you finally move from just reading about it to actually running trains. Your first big decision is picking a starter system, which will become the heart of your new digital railroad.
These systems are usually all-in-one packages that include a command station, a booster, and at least one throttle. They give you everything you need to get your first DCC-equipped locomotive up and running right out of the box. As you start comparing options, you'll see a few key specs that really define what a system can do.
Understanding DCC System Specifications
Don't worry, you don't need an engineering degree to pick the right one. Just focus on three main features that will directly affect how you run your trains and how much your layout can grow down the road.
- Booster Amperage: Think of this as pure power. A 2-amp system is perfect for a small N or HO scale layout, but a 5-amp system has the muscle for bigger layouts or power-hungry O scale trains. More amps let you run more locomotives with sound and lights at the same time without a hiccup.
- Throttle Type: How do you want to drive your trains? You’ve got options, from traditional tethered throttles that plug into the command station to wireless radio throttles that let you walk around your layout freely. There are even slick smartphone apps that give you a modern, intuitive interface.
- Locomotive Capacity: This number tells you how many locomotives the system can actively control at once. Most starter systems can handle a dozen or more engines, which is plenty to start, but it’s something to keep in mind as your collection grows.
This move to DCC isn't a new fad; it’s been the standard for decades. Since the technology was standardized in the early 1990s, it has completely taken over as the preferred control method. By the mid-2000s, market data showed that over 80% of new HO scale locomotives in major markets were sold as DCC-ready or already equipped. If you're curious about the backstory, you can find a great write-up on how DCC technology evolved into the industry standard and changed the hobby forever.
Comparing Popular DCC Starter Systems
To help you get a feel for what's out there, this table compares some popular entry-level DCC systems. It's a great way to see how they stack up against each other and figure out which one fits your needs and budget best.
| System Feature | NCE Power Cab | Digitrax Zephyr Express | Bachmann E-Z Command |
|---|---|---|---|
| Amperage | 2 Amps | 3 Amps | 1.5 Amps |
| Throttle Type | Tethered Handheld | Integrated Console | Integrated Console |
| Loco Capacity | 6 Recalled, 2 Active | 20 Active | 10 Active |
| Expandability | High (can become ProCab) | High (part of LocoNet) | Low (standalone system) |
| User Interface | LCD Screen, Keypad | LCD Screen, Knobs/Keys | Simple Button Interface |
| Best For | Small to medium layouts | Beginners wanting growth | Simple, small layouts |
Each of these systems is a solid entry point, but their features cater to different types of modelers. The NCE and Digitrax systems are built with expansion in mind, while the Bachmann is all about simplicity for getting started quickly.
Installing Your First Decoder
Once you have a system, it's time for the fun part: getting a decoder into a locomotive. The decoder is that tiny circuit board that listens for commands from the track and tells the engine’s motor and lights what to do. How you install it really depends on the locomotive you're working with.
A modern engine labeled "DCC Ready" is by far the easiest place to start. These models are designed for a simple plug-and-play install. You just pop the shell off, find the factory circuit board with a special socket (like a 9-pin JST or 21-pin MTC plug), and plug the decoder right in. The whole job can be done in less than ten minutes.
For older locomotives that aren't DCC Ready, the process is called a hardwire installation. This is a bit more involved because you have to manually solder the decoder's wires directly to the motor, track pickups, and lights. It definitely requires some basic soldering skills, but it's a rite of passage for bringing your classic, well-loved engines into the digital age.
For these more hands-on jobs, tools like decoder buddies can be a lifesaver. They give you a clean, organized board to solder everything to, which helps prevent a messy "rats nest" of wires. You can learn more about using NixTrainz Decoder Buddies to make your hardwire projects cleaner and more reliable. It's a fantastic way to upgrade your entire fleet, one engine at a time.
Programming Decoders to Customize Your Fleet
Unpacking your new DCC system is just the first step. The real fun begins when you start programming your decoders. This is where you get to turn a generic, fresh-out-of-the-box locomotive into a custom-tuned member of your fleet, complete with its own unique personality.
Programming is basically how you "talk" to the tiny computer inside your locomotive. You're changing its internal settings, which are stored in what we call Configuration Variables, or CVs for short. Think of CVs as a detailed setup menu for your engine. Each CV is just a numbered slot that controls a specific function, from something as simple as its address to the nitty-gritty of its motor performance.
Understanding Configuration Variables
The very first CV you'll almost always program is CV1, the locomotive's short address. Right from the factory, nearly every new engine is set to address 03. Changing this to a unique number—I like to use the locomotive's road number—is your first move toward building an organized, easy-to-run railroad.
But that's just scratching the surface. Once you move past the address, a whole world of customization opens up. You can tweak dozens of settings to make your locomotives feel more like the real thing.
- Acceleration and Deceleration: You can use CVs to add "momentum." This simulates the incredible weight of a real train, making it gradually build up speed and coast to a gentle stop instead of lurching around like a toy.
- Top Speed: Got a fast passenger engine that looks ridiculous flying past a slow freight switcher? You can dial back its maximum speed by adjusting a specific CV. It's perfect for making operations look more realistic.
- Motor Control: For the serious modeler, you can dive deep into CVs that fine-tune how the decoder "talks" to the motor. This helps smooth out any jerky movements at super-slow speeds, which is essential for switching.
Programming Track Versus Main Track
You've got two main ways to program these CVs: on a special programming track or right on your main layout, using a feature often called "Ops Mode" or "Programming on the Main."
A programming track is just a short, isolated piece of track wired directly to your command station. This is the safest and most reliable way to do your programming. Why? Because the command station can both send new CV values and read back the existing ones to make sure the changes stuck.
Programming on the Main is incredibly handy for making quick tweaks without having to pull the locomotive off the layout. The catch is that it can only write new CV values; it can’t read them back to you. For the initial setup or any major changes, the programming track is always your best bet.
Creating Consists and Custom Sounds
One of the most satisfying things you can do with digital command control for model trains is consisting—linking multiple locomotives together so they respond to a single address. By programming a few CVs, you can get two, three, or even more engines working in perfect harmony to pull a heavy freight train, just like the prototypes.
Sound decoders take that realism to a whole different level. You can program CVs to change the type of horn, adjust the bell volume, or even set up complex lighting like flashing ditch lights. The widespread adoption of DCC has completely changed model railroading, giving us programmable control over not just locomotives but turnouts and signals, too. You can discover more about DCC's impact and its official standards, which are what guarantee that equipment from dozens of different manufacturers can all work together. This system is what lets you orchestrate an entire, living railroad right from your throttle.
Common Questions About DCC
Stepping into the world of Digital Command Control for model trains always brings up a few key questions. Let's tackle the most common concerns hobbyists have when they're thinking about moving from traditional DC power to a modern DCC system.
Can I Run Old DC Trains on a DCC Layout?
Yes, but you really shouldn't. Most DCC command stations include a feature to run one non-decoder DC locomotive by selecting address "00". Think of it as a temporary workaround, not a long-term solution.
Here’s the problem: the DCC signal on the track is a type of AC power. When you run a standard DC motor on it, it will buzz loudly and generate a lot of heat. Over time, this can permanently cook the motor. The only safe and truly effective way to run your older locomotives is to install a DCC decoder, which makes them fully compatible and protects their motors from damage.
Is Converting to DCC an Expensive Process?
The initial jump into DCC is more manageable than you might think and can be scaled to fit your budget. A solid starter system—which gets you a command station, booster, and throttle—will typically run between $175 and $300. After that, the main cost is buying decoders for your locomotives, which you can add one by one as your budget allows.
Don't forget what you're not paying for anymore. DCC completely does away with the need for complex block wiring, dozens of toggle switches, and multiple power packs that are essential for running more than one train on a DC layout. For many modelers, the money saved on all that wiring complexity easily offsets the cost of the DCC system itself.
The real value of Digital Command Control isn't just in running multiple trains, but in simplifying your layout's infrastructure while dramatically expanding its operational potential.
Do I Need To Be an Electronics Expert?
Absolutely not. Modern DCC systems are designed for the hobbyist, not the electrical engineer. Setting up a basic starter system is often as simple as connecting two wires from the command station to the track. It's really that straightforward.
If you have locomotives that are marked "DCC Ready," installing a decoder is a plug-and-play job that takes less than five minutes. While the technology is deep enough for advanced users to customize everything imaginable, getting started is designed to be easy. DCC is built to be accessible to anyone, no matter their technical skill level.
Ready to unlock the full potential of your model railroad? Fusion Scale Hobbies has everything you need, from starter systems to sound decoders from top brands like SoundTraxx and NCE. Explore our complete collection of DCC products at https://fusionscalehobbies.com and start your digital journey today.
Article created using Outrank