


So, what exactly is a model fire engine kit? Think of it as a miniature, unassembled replica of a real-life emergency vehicle that you get to build and paint yourself. These kits are far more than just toys; they’re a fascinating blend of history, engineering, and art that lets you recreate iconic firefighting machines in incredible detail.
Your First Step into a Rewarding Hobby
Welcome to the detailed and engaging world of building model fire engine kits. If you’re a first-time builder curious about where to start or a seasoned modeler looking to sharpen your skills, this guide is your roadmap. Each project is like a miniature tribute to the heroes of firefighting and the amazing technology they rely on every day.
This hobby gives you a unique chance to mix creativity with a bit of mechanical skill. Every kit is a hands-on experience, transforming a box of plastic, resin, or metal parts into a realistic scale model. It’s a process that definitely requires patience, but the reward is a tangible piece of art you built from the ground up.
Why This Hobby Continues to Grow
The appeal of model fire engines has built a dedicated and growing community. In fact, the global market for model vehicle kits was valued at around $1.2 billion in 2022, with fire engine kits accounting for a solid $144 million of that. The United States and Germany are the biggest markets, which shows just how strong the hobby's roots are in North America and Europe. You can find more data on this trend over at Datainsightsmarket.com.
This growth really isn't surprising. Building models is a fantastic way to improve your focus and fine motor skills. Beyond the simple joy of creating something, it's an excellent way to sharpen your hands-on abilities, much like the benefits you get from delving into other practical skills. It's a journey of learning and improving with every single project you finish.
Building a scale model is about more than just following instructions; it’s about bringing a piece of history to life on your workbench. It connects you to the real-world vehicle in a way that simply owning a pre-built collectible cannot.
Our guide will walk you through everything you need to know, from understanding different scales and materials to mastering assembly and painting. If you're looking for a broader overview of the hobby, you might want to check out our general guide to getting started with any scale model kit. It covers the foundational knowledge for all kinds of projects. Now, let's get you started on your first build with confidence.
Choosing the Right Scale for Your Project
Your first big decision when picking out a model fire engine kit is the scale. This single choice will shape everything that follows, from the level of detail you can pack in to how much shelf space the finished rig will demand. Think of scale as a simple ratio: a 1:24 scale model just means that every 1 inch on your model represents 24 real-world inches.
The scale you land on really defines the building experience. Larger scales give you parts that are easier to see and handle—a huge plus for beginners or anyone whose fingers aren't quite as nimble as they used to be. On the other hand, smaller scales are perfect for creating entire scenes, like tucking a fire station into your model railroad layout.
Finding the Perfect Fit
The most common scales each have their own feel. A 1:24 scale fire engine is a hefty piece that feels substantial in your hands, kind of like a big coffee mug. Its size allows for an insane amount of detail, letting you recreate everything from tiny dashboard gauges to the intricate controls on a pump panel. This makes it a fantastic choice for a standalone display model that really grabs your attention.
Stepping down a bit, 1:43 scale hits a sweet spot. It’s still detailed enough to look impressive up close but small enough that you can build up a collection without needing a dedicated room for it. Then you have 1:87 scale, which model railroaders know and love as HO scale. A model this size is tiny—about the size of a car key fob—making it a perfect fit for a model railroad layout. If you want to dive deeper into how these scales mesh with the world of model trains, our guide to model railway scales explained is a great place to get more context.
This handy decision tree can help you figure out which path is best for your first (or next) build.

As you can see, the infographic really boils it down by focusing on your experience level. It gently points new hobbyists toward more forgiving starting points while nudging experienced builders toward more complex challenges.
To help you visualize these common scales and their applications, here’s a quick-reference chart. It breaks down the numbers and gives you a clear idea of what to expect from each.
Model Fire Engine Kit Scale Reference Guide
| Scale | Ratio | Typical Length | Level of Detail | Best For |
|---|---|---|---|---|
| 1:24 | 1:24 | 12-16 inches | Very High | Standalone display models, super-detailing |
| 1:43 | 1:43 | 6-8 inches | High | Diecast collections, small dioramas, O scale layouts |
| 1:50 | 1:50 | 5-7 inches | High | Construction/truck dioramas, O scale layouts |
| 1:64 | 1:64 | 4-5 inches | Medium | S scale layouts, collecting (like Matchbox) |
| 1:87 | 1:87 | 3-4 inches | Good | HO scale model railroad layouts |
| 1:160 | 1:160 | 1.5-2 inches | Low | N scale model railroad layouts, large scenes |
This guide should make it easier to match a kit's scale to your available space and layout needs. Whether you're building a single, show-stopping engine or an entire firehouse scene, there's a perfect scale waiting for you.
How Scale Affects Your Build
Your choice of scale has a real impact on your project beyond just its physical size. It directly influences the cost of the kit, its complexity, and even the tools you’ll need to assemble it.
- Cost and Detail: As a rule of thumb, bigger scales mean higher price tags. This is because they use more material and often come packed with far more intricate parts.
- Space Requirements: Don't forget to think about where your finished model will live. A 1:24 scale pumper can easily stretch over a foot long, while you could line up an entire fleet of 1:87 trucks on a single bookshelf.
Choosing a scale is really about matching the model to your goals. Are you aiming for a single, hyper-detailed showpiece? Or do you want to build out a whole fire station scene for a larger layout? Answering that question will point you straight to the perfect scale for your project.
Understanding Kit Materials and Types
Picking out a model fire engine kit is a lot like choosing lumber for a woodworking project. The material you start with—whether it's plastic, resin, or metal—defines everything that comes next. It dictates the tools you’ll need, the adhesives that will work, and the entire feel of the build from start to finish.
Your journey, like most modelers, will probably begin with injection-molded plastic. There’s a good reason it’s the most common and beginner-friendly material on the market. It's affordable, forgiving to work with, and modern kits pack an incredible amount of detail right out of the box.
The Go-To Material for Most Kits
Injection-molded plastic kits are the workhorses of the modeling world. The parts arrive attached to a frame called a "sprue," and you simply snip them off, clean up any rough spots, and glue them together. The plastic itself is easy to sand and bonds fast with standard modeling cement.
Think of a plastic kit as the perfect starting point. It gives you a clear, structured path to a fantastic-looking model. This lets you focus on building core skills like clean assembly and smooth painting without having to fight with a difficult material.
This accessibility has made plastic model fire engine kits a global phenomenon. The hobby is booming in new markets, especially in the Asia-Pacific region. By 2022, the area accounted for 28% of worldwide sales, with Japan leading the charge by selling over 450,000 fire engine kits that year alone. This market's obsession with precision really shows just how detailed and high-quality today's plastic kits have become. You can dig into the numbers on this market growth over at the Precedence Research website.
Stepping Up to More Advanced Materials
Once you’ve got a few builds under your belt, you might get the itch to try materials that offer even sharper detail—though they definitely demand more patience and skill.
- Resin Kits: These are known for their incredibly crisp, fine details and are often made by smaller, boutique companies. Resin is more brittle than plastic and requires super glue (cyanoacrylate) to assemble. You'll also need to give the parts a good wash with soap and water to remove any mold-release agent before the paint will stick.
- White Metal & Brass: For the ultimate level of realism, many expert modelers turn to white metal or photo-etched brass. White metal is great for heavy, intricate components like pump panels and chassis frames. Photo-etched brass, on the other hand, delivers incredibly fine, scale-thin parts like grilles, emblems, and windshield wipers that plastic just can't reproduce.
Working with these materials often means learning new tricks. You might need to solder brass parts or use small pins to securely attach heavy white metal components. While they have a steeper learning curve, the stunning, museum-quality detail you can achieve is second to none.
Setting Up Your Workspace and Toolkit
A great model fire engine kit deserves a great place to build it. Just like a real fire crew keeps their gear in top shape, a clean, well-lit workspace with the right tools makes the entire process smoother and a heck of a lot more fun. You don’t need a fancy workshop—just a dedicated corner where you can spread out and focus.
I like to think of a modeler's setup in two stages: the absolute essentials you need to get started, and the upgrades you can add later as your skills grow. Getting your space sorted is half the battle, and you can find some great tips on organizing craft supplies that work just as well for model building.
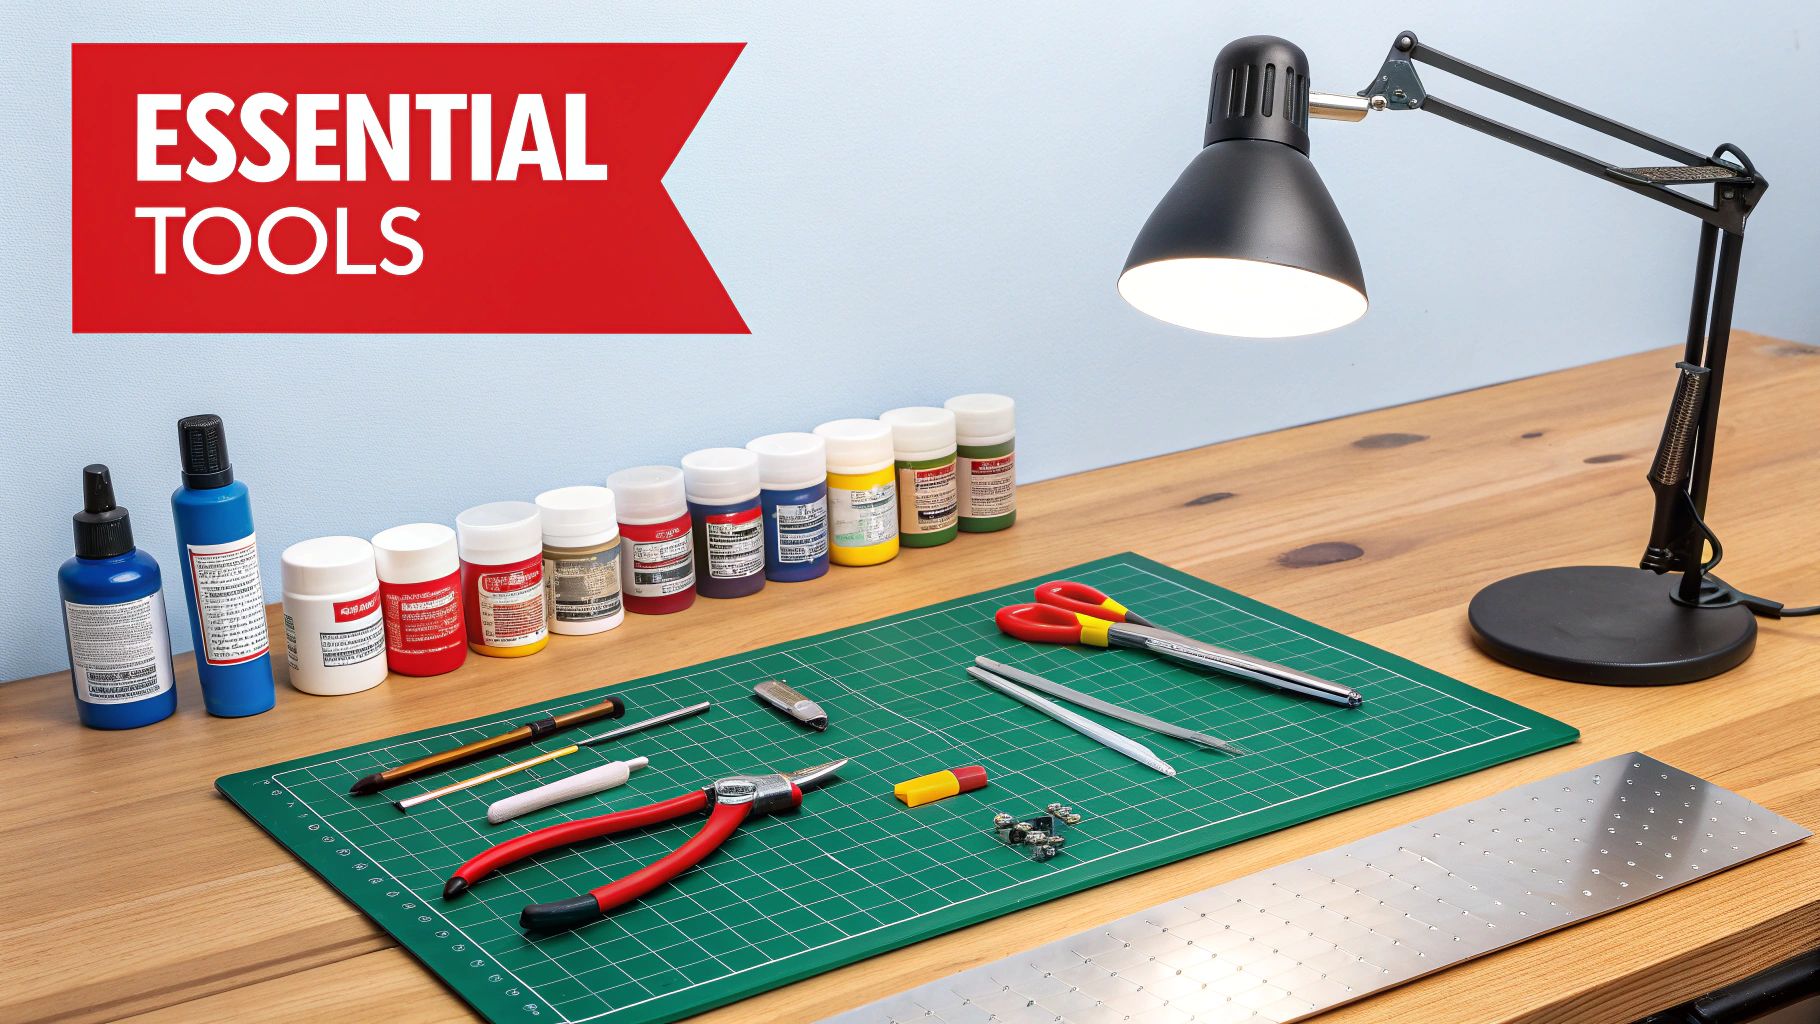
Beginner Essentials: The Must-Have Tools
For your first few model fire engine kits, you really only need a handful of core tools. These basics will easily handle about 90% of what's required for a standard plastic kit.
- Hobby Knife: This is your number one tool. A sharp knife with replaceable blades is non-negotiable for cutting parts free and shaving off tiny imperfections.
- Sprue Cutters: Think of these as specialized little pliers. They're designed to snip parts from the plastic frame (the "sprue") cleanly and with minimal damage.
- Modeling Glue: The right adhesive is everything. We've put together a whole guide on finding the best glue for plastic models that breaks down the different types, from thin cements that weld plastic to stronger gap-filling glues.
- Sanding Sticks/Files: A few fine-grit sanding sticks or a small set of files are perfect for smoothing away the little nubs left behind after cutting parts off the sprue.
A quick word of advice: your workspace needs two things above all else: good lighting and proper ventilation. A bright desk lamp saves you from eye strain and helps you see what you’re doing, while an open window or a small fan is a must for dealing with paint and glue fumes safely.
Intermediate Upgrades: Tools for the Next Level
Once you’ve got a couple of builds under your belt and you're feeling more confident, a few extra tools can make a huge difference in the final quality of your models. These are the things that take your work from "assembled" to "impressive."
For example, a pin vise is basically a tiny hand drill. It’s perfect for making precise little holes for things like adding custom antennas or wiring. And when it comes to painting, nothing beats an airbrush for that flawlessly smooth, high-gloss red finish that fire engines are famous for—a look that's almost impossible to get right with a brush.
These are the tools that help you transition from just following instructions to truly mastering the craft.
Bringing Your Model Fire Engine to Life
This is where the real fun begins—turning that box of plastic parts into a fire truck that looks like it could roll right off your workbench and onto the street. The assembly, painting, and weathering stages are where the magic happens, giving your model its soul.
It all starts with a clean, solid assembly. Before you even think about opening the glue, your most important tool is test-fitting. This is just a fancy term for putting parts together without adhesive to see how they line up.
Think of it as a dress rehearsal. You’ll spot gaps, alignment issues, or parts that need a little sanding before it's too late. It’s a simple habit that saves a ton of headaches and makes the final build look so much better. Once you do start gluing, focus on getting rid of any seam lines where two pieces meet—nothing ruins the illusion of a solid metal body faster.
Achieving That Perfect Fire Engine Red
There's nothing quite like the deep, glossy red of a fire engine. Getting that finish right is a rite of passage for modelers, and it's less about finding one magic paint and more about following a process. A flawless paint job is built in layers.
First up, primer. A light gray or even a white primer gives the red a bright, neutral base to stick to, making the final color pop. If you spray red directly onto dark plastic, it can look muddy and uneven.
Next, apply the red paint in several thin, even coats. Don't try to get full coverage in one go. Whether you're using a spray can or an airbrush, building up the color gradually is the secret to a smooth, professional finish without drips, runs, or buried details.
The final, game-changing step is the clear coat. After the red has fully cured, a couple of light layers of a gloss clear coat will protect the paint and give you that signature, mirror-like shine that makes a fire engine model truly stand out.
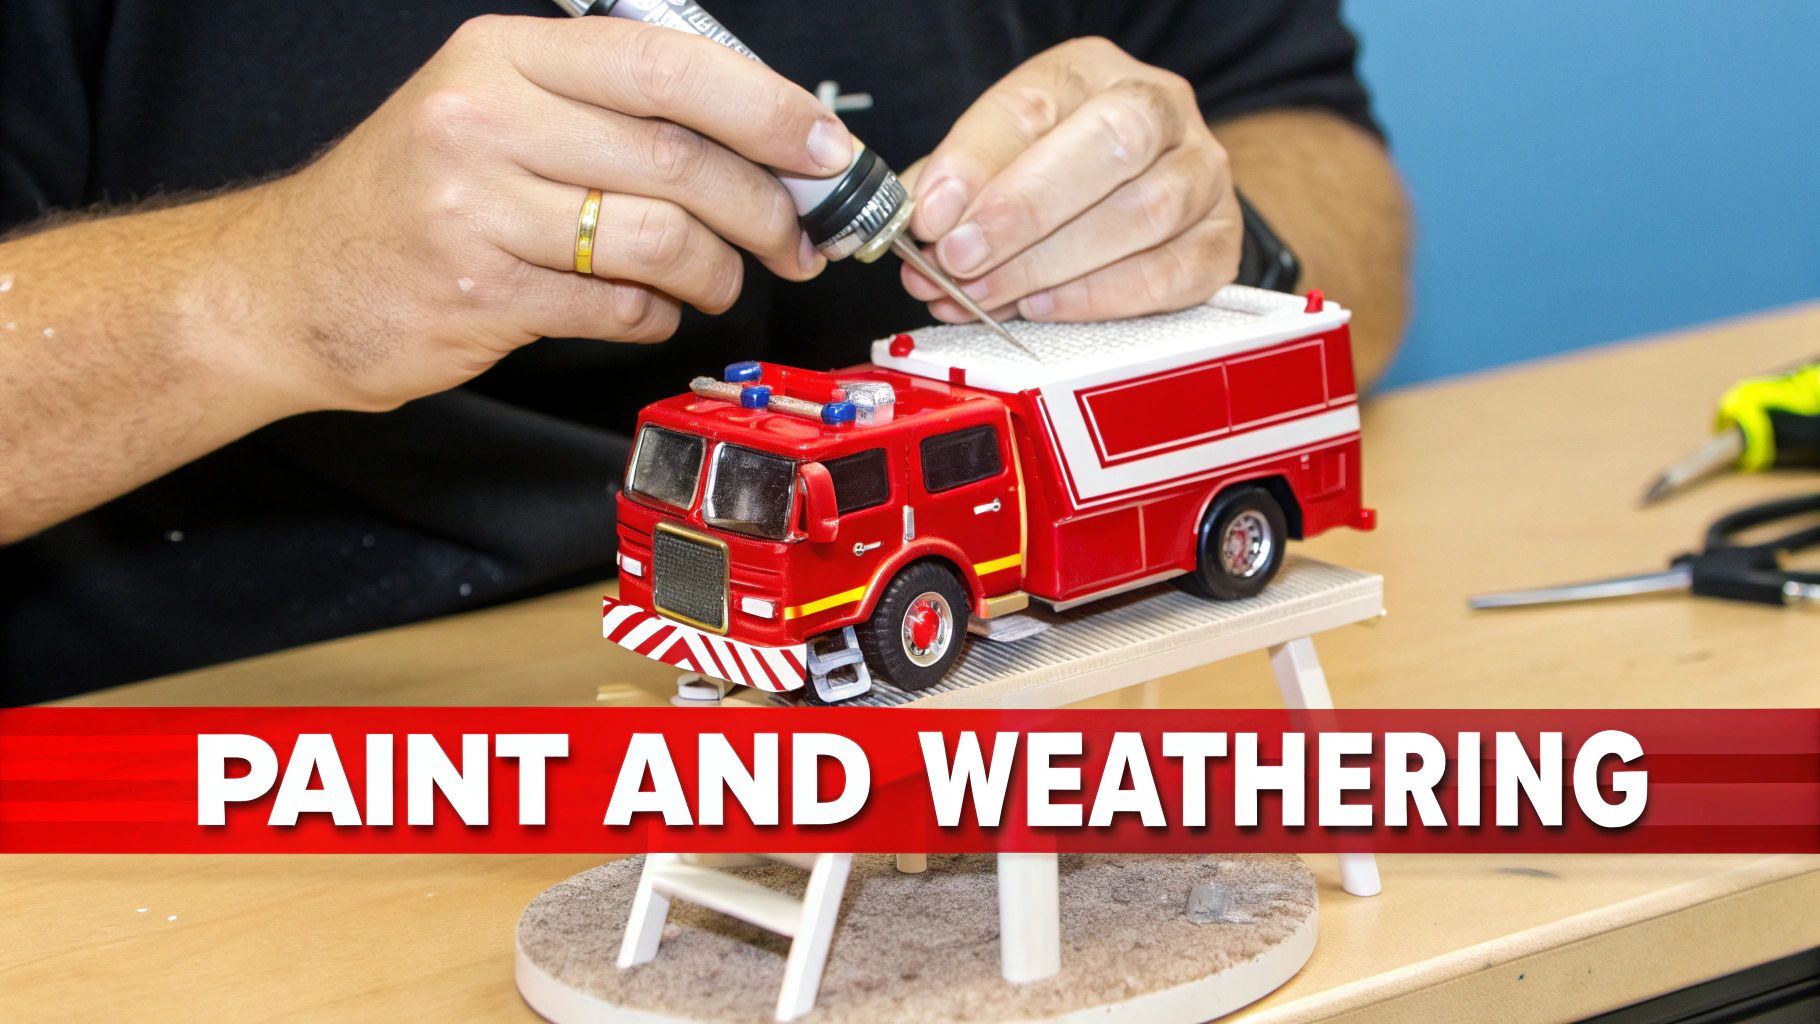
Adding Realism with Weathering
A factory-fresh model looks great, but a little weathering gives it a story. Weathering is the art of making a model look like it's been out in the world, doing its job. Even a few subtle touches can elevate your build from a toy-like object to a convincing miniature replica.
You don't need to be a master artist to get great results. A couple of simple techniques can make a huge difference:
- Applying a Wash: This is a fantastic trick. A "wash" is just heavily thinned black or brown paint. When you brush it over the model, it naturally flows into all the panel lines, vents, and recessed areas, making those details pop with incredible depth.
- Dry-Brushing: Perfect for simulating scuffs and wear. Dip a flat brush into some metallic or lighter-colored paint, then wipe almost all of it off on a paper towel. Gently dragging the nearly-dry brush over raised edges and details will highlight them, creating the look of worn paint on metal.
These little touches suggest a history—the fires it’s fought and the miles it’s traveled. It’s that final layer of authenticity that really brings your model fire engine to life.
Exploring Customization and Modern Kits
Once you get the hang of building a kit straight from the box, a whole new world of creativity opens up. This is where the real fun begins.
The world of model fire engine kits is always changing, with manufacturers adding features that bring an incredible level of realism to your workbench. It’s the point where you stop just following instructions and start making the model truly yours.
Modern kits are getting smarter. It’s now pretty common to find kits with built-in LED lighting for flashing emergency lights, headlights, and taillights. Some even come with tiny sound modules that can blast an authentic siren or mimic the rumble of a big diesel engine.
The Rise of High-Tech Kits
Technology has definitely made its mark on the hobby. Back in 2022, about 18% of all model fire engine kits sold had some kind of digital feature, like LEDs or sound.
These tricked-out kits had an average price of $45, a decent jump from the $25 average for a standard kit. It just goes to show that builders are willing to pay a little more for that extra dose of realism. You can read more about the growth in the fire apparatus market to see how this trend mirrors the real thing.
This shift lets you create dynamic, living scenes that capture the energy of a real emergency. It adds an interactive element that, not too long ago, you could only get by diving into complex, custom electronics work yourself.
Unleashing Creativity with Kitbashing
For the ultimate personal touch, a lot of advanced modelers get into kitbashing. This is the art of grabbing parts from a few different kits to create a unique vehicle that’s one-of-a-kind. Think of it like being a custom truck builder, but in miniature.
You might use the cab from one kit, the pump body from another, and the wheels from a third, all to perfectly replicate a specific fire engine from your hometown that no manufacturer makes.
Kitbashing is where your research and creativity truly shine. It challenges you to solve engineering puzzles on a small scale, transforming standard parts into a model that tells a completely unique story.
This process can also involve scratch-building, where you make your own parts from raw materials like sheet plastic or brass. From adding custom decals for your local fire department to building an entire diorama of a fire scene, customization is where your skills as a modeler can really take off.
Common Questions About Model Fire Engine Kits
As you dive deeper into the world of model fire engines, you're bound to run into a few questions. It happens to everyone. Here are some straightforward answers to the things modelers ask us most often, designed to get you past those hurdles and back to building with confidence.
What Is the Best Scale for a Beginner?
If you're just getting your feet wet, I almost always recommend starting with a 1:24 or 1:25 scale kit. The reason is simple: the parts are bigger.
Bigger parts are just plain easier to handle, glue, and paint. You won't be fumbling with tiny, delicate pieces right out of the gate, which can be a real frustration-saver. Most kits in this scale are injection-molded plastic and offer a fantastic balance of impressive detail without being overwhelmingly complex. It's the perfect entry point.
How Do I Get a Realistic Glossy Red Finish?
Ah, the classic fire engine red. Getting that deep, showroom shine is less about finding the "perfect" can of paint and more about the process. It really comes down to a few key steps.
- Start with Primer: Don't skip this. A light gray or white primer gives the red paint a neutral base to sit on, making the final color much more vibrant and true.
- Apply Thin Coats: The biggest mistake people make is trying to cover the model in one thick, heavy coat. Instead, spray several light, even coats of your red paint, letting each one flash off for a few minutes. This prevents drips and preserves all that fine detail you want to see.
- Finish with a Clear Coat: This is the secret sauce. Once the red is fully cured, apply two or three thin layers of a gloss clear coat. For a truly mirror-like finish, you can let it cure for a few days and then polish it with very fine modeling compounds.
Remember, patience is your best friend when painting. Rushing will only lead to headaches. Letting each layer of primer, color, and clear coat dry completely is the only way to get that smooth, professional finish that makes a model fire truck pop.
Can I Use Fire Truck Models with My HO Scale Train Layout?
Absolutely! But you’ve got to get the scale right, or it will look out of place. HO scale is 1:87, and thankfully, tons of manufacturers make beautiful, detailed fire apparatus specifically for model railroaders.
You have a little wiggle room—anything from 1:76 to 1:87 will generally look right at home on an HO layout. Just be sure to double-check the scale on the box before you buy to ensure it will look proportional next to your trains, buildings, and scenery.
Ready to start your next build? At Fusion Scale Hobbies, we carry a massive selection of kits, tools, and paints to bring your vision to life. Find everything you need for your next project at https://fusionscalehobbies.com.