


When it comes down to it, the difference between acrylic vs enamel model paint is pretty straightforward: acrylics are water-based, dry fast, and clean up easily, which makes them fantastic for beginners or anyone working on a quick project. On the other hand, enamels are solvent-based, incredibly durable, and cure to a harder, smoother finish—a quality many veteran modelers swear by for that professional look.
Your choice really boils down to what you value more: convenience and safety, or ultimate durability and a high-gloss sheen.
Choosing the Right Paint for Your Next Model
Picking between acrylic and enamel paint is one of the first big decisions every modeler makes, and it sets the stage for the entire building and finishing process. This isn't just about picking a color; it's about chemistry, technique, and the final look you're trying to achieve. There's no single "best" paint—it all depends on your project goals, your working style, and what you want that finished model to look like.
This choice impacts everything from how long you wait between coats to how you clean your brushes. It even affects how you'll tackle advanced techniques like weathering and applying clear coats. Getting a handle on the core trade-offs from the get-go will save you a ton of time, prevent a lot of frustration, and help you get that professional-quality finish you're picturing.
Acrylic vs Enamel Key Differences at a Glance
For a quick side-by-side, this table breaks down the essential characteristics separating acrylic and enamel model paints. It's a great starting point to help you make a faster initial decision.
| Characteristic | Acrylic Paint | Enamel Paint |
|---|---|---|
| Base | Water-Based | Solvent-Based (Oil) |
| Drying Time | Fast (15-30 minutes) | Slow (6-24 hours to cure) |
| Cleanup | Simple (Water, mild cleaner) | Requires Solvents (Mineral spirits) |
| Odor/Fumes | Low to None | Strong, requires ventilation |
| Durability | Good, flexible film | Excellent, hard shell-like finish |
| Best For | Beginners, layering, indoor use | High-gloss finishes, ultimate durability |
These preferences are reflected in the broader paint market, too. Acrylic resins have taken over the decorative paints world, commanding a 45.2% market share in 2023 largely due to their convenience. That popularity mirrors what we see in the hobby, where a lot of modelers reach for acrylics because they're just easier and safer to work with.
But enamels still have a dedicated following, especially among builders who won't compromise on that exceptionally hard, glossy finish and superior durability needed for precision work. If you're interested in the tech, you can explore more about these market dynamics to see how the technology has evolved.
The core decision is a trade-off: Do you want the speed and safety of acrylics, or the rock-hard, flawless finish of enamels? Answering that question will guide you to the right choice for your current project.
Understanding How Each Paint Actually Works
To really settle the acrylic vs. enamel debate for your own workbench, you need to look past the label and understand what’s happening on a chemical level. Every paint is a simple system of three parts: pigment (the color), a binder (the glue), and a carrier (the liquid that makes it flow). The way these parts work together defines everything from drying time to the final finish.
The pigment is just colored powder, and it's pretty much the same in both paints. The real magic—and the source of all their differences—is in the binder and the carrier.
The Chemistry of Acrylic Model Paint
Acrylic paint is a marvel of modern chemistry. Its binder is an acrylic polymer emulsion, which is a fancy way of saying microscopic plastic particles suspended in water. And that’s the key: its carrier is just plain water.
When you brush or spray acrylics onto a model, the water starts to evaporate. As it leaves, those tiny plastic particles get forced closer together until they fuse into a single, continuous, and somewhat flexible plastic film. This process is called coalescence.
- Drying: The water evaporates. It’s a physical process, not a chemical one.
- Film Formation: The binder particles lock together to create a cohesive, plastic-like layer.
- The Result: You get a paint that’s dry to the touch in minutes but remains slightly soft and flexible.
This water-based system is why acrylics are low-odor and so easy to clean up. You're just washing away a water-based solution before the plastic binder fully locks into place.
Key Takeaway: Think of acrylic paint as liquid plastic. It hardens into a "skin" as its water carrier disappears. This is why it can sometimes peel or lift if you don't use a good primer to give it something to grip.
The Chemistry of Enamel Model Paint
Enamel paint is a totally different beast. Its binder is usually an alkyd resin—a type of oil-based polymer—and the carrier is a chemical solvent like mineral spirits. This is what gives enamels their signature strong smell.
Unlike acrylics that just dry, enamels go through a two-stage process: drying, then curing.
First, the harsh solvents evaporate, which makes the paint feel dry to the touch. But that’s just step one. The real work happens during the curing phase, where the alkyd resin binder actually reacts with oxygen in the air. This chemical reaction is called oxidation.
This reaction cross-links the polymer chains, forming a tightly woven, incredibly hard shell. It’s not just a film sitting on the surface; it’s a brand-new, solid chemical structure. This is why enamels can take up to 24 hours or more to fully harden.
Why This Chemical Difference Matters
Grasping this core distinction—evaporation vs. oxidation—is the key to mastering both paints. It explains nearly every practical difference you'll encounter at your workbench.
- Acrylics Layer Well: Since they dry fast through simple evaporation, you can lay down new coats in minutes without messing up the layer underneath. Perfect for detail work and multi-color schemes.
- Enamels Self-Level: The slow, deliberate curing process gives the paint plenty of time to spread out and flatten. This is why enamels are legendary for eliminating brush strokes and creating an almost sprayed-on look.
- Durability and Hardness: The cross-linked, oxidized shell of a cured enamel is just fundamentally harder and more resistant to chipping than the flexible film of an acrylic. It's a true protective coat.
Ultimately, choosing the right paint isn't about which one is "better." It's about knowing how to leverage these chemical behaviors for the specific job at hand.
Comparing Real-World Application and Performance
Knowing the chemistry behind acrylic and enamel paints is one thing, but seeing how that science plays out at the workbench is where the rubber meets the road. The real differences pop up the moment you pick up a brush or load an airbrush. These paints don’t just behave differently; they demand different techniques, mindsets, and workflows to get the best results.
This is where we move from theory to practice, focusing on the nitty-gritty details that actually impact your modeling projects day-to-day. We'll dig into how their unique properties affect everything from drying times and adhesion to thinning ratios and application methods.
This decision tree infographic is a great way to visualize the core choice based on what your project needs most.
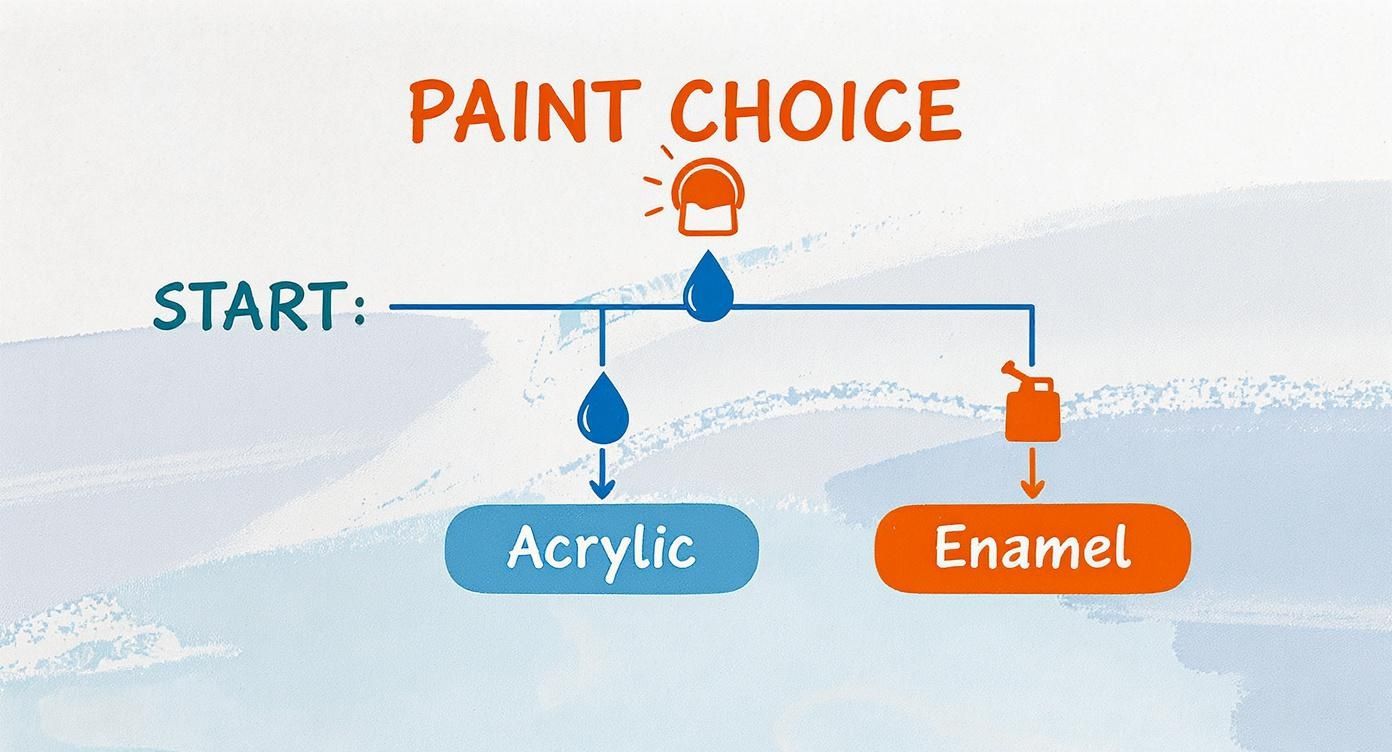
As you can see, factors like the need for speed, safety concerns, and the final finish you're aiming for will steer you toward either an acrylic or an enamel solution.
Drying and Curing Times In Practice
The first thing you'll notice—and I mean, immediately—is the drying time. Acrylics are often touch-dry in just a few minutes, a trait that can seriously speed up your entire painting process. It’s a game-changer for complex camouflage schemes or multi-color paint jobs. You can lay down a base coat of acrylic and be ready to mask over it in less than an hour without worrying about lifting the paint.
But that speed can be a double-edged sword, especially for brush painters. Acrylics can start drying right on your brush or palette, quickly getting "gummy" and leaving behind pesky brush strokes. To get around this, a lot of modelers swear by a wet palette or add a few drops of acrylic retarder to give themselves a bit more working time.
Enamels, on the other hand, are the definition of "slow and steady." Their cure time is much longer—we're talking 6 to 8 hours to be touch-dry and a full 24 hours or more to completely harden. This gives the paint plenty of time to "self-level," a process where it naturally smooths out any brush strokes for an incredibly flat, uniform finish that's tough to replicate with a brush-painted acrylic.
Key Differentiator: Acrylics are all about speed and fast layering, while enamels are built for a flawless, self-leveled finish. For modelers chasing that glass-smooth surface, the slow cure of enamels is a feature, not a bug.
Thinning for Airbrush vs Brush Techniques
Both paint types need to be thinned for the best results, but how you do it—and what you use—are completely different. Honestly, this is a critical step where a lot of modelers run into trouble.
Acrylics:
- Airbrushing: You'll need to thin them quite a bit, usually to the consistency of skim milk. I strongly recommend using a dedicated acrylic thinner instead of just water. These thinners have flow improvers and retarders that help prevent tip-dry—that super frustrating clog you get at the airbrush nozzle.
- Brush Painting: You might just need a drop or two of water or a flow improver to get rid of brush marks. Be careful not to over-thin, though, or the pigment can break down and go on streaky and transparent.
Enamels:
- Airbrushing: You absolutely have to use their specific solvent or a high-quality mineral spirit. The good news is that enamels are much less prone to tip-dry than acrylics, which makes them a favorite for fine-line work and laying down large, even coats.
- Brush Painting: Thinning is usually minimal. The paint is designed to flow nicely right out of the bottle. A tiny bit of thinner can help when you're blending colors or feathering edges.
If you really want to nail this step, our in-depth guide offers specific advice on how to thin acrylic paint for various applications. Getting the thinning ratio right is absolutely fundamental to a professional finish.
Substrate Adhesion Plastic, Resin, and Metal
How well your paint sticks to the model is obviously critical. While both paints work on common modeling materials, their performance really changes depending on your surface prep.
A primer is a good idea for both, but for acrylics, it's pretty much non-negotiable. Acrylics create a film that sits right on top of the surface, so they need a "toothy" primer to grab onto, especially on slick styrene plastic or smooth resin. Without that primer, you can sometimes peel or scratch off acrylic paint with just a fingernail.
Enamels have a bit of an edge here thanks to their "hotter" solvents. These solvents can ever-so-slightly etch the plastic surface, creating a much stronger chemical bond. This built-in "bite" helps them stick tenaciously, even on unprimed surfaces. This is a huge plus when you're working on tricky materials like photo-etched metal parts, where acrylics can really struggle to get a solid grip.
Ultimately, the choice between acrylic and enamel paint boils down to balancing these practical pros and cons against what your specific project needs and how you like to work.
Advanced Finishing and Weathering Techniques
This is where a model truly comes to life. The finishing and weathering stages are what separate a painted kit from a realistic replica, telling the story of its history, use, and environment. And this is precisely where a solid grasp of the acrylic vs. enamel dynamic pays off big time.
Layering different paint chemistries isn't just a fancy trick for the pros; it's the secret to building up complex, believable effects without destroying hours of hard work. The entire process hinges on a simple principle: work from the "mildest" chemistry to the "harshest." Put another way, always use weathering products with solvents that won't attack the paint layers underneath.
The Power of Layering Different Paint Chemistries
The go-to technique for weathering, especially for armor and aircraft modelers, involves applying enamel-based washes and filters over a fully cured acrylic base coat. There's a critical reason this method is so popular: the mineral spirits or odorless thinners used for enamel products are completely inert to cured acrylic paint.
This chemical incompatibility is your single greatest weapon. It means you can slather on an enamel wash, let it pool in panel lines and recesses, and then use a clean brush dampened with mineral spirits to wipe away the excess. You get precise control and sharp details without any fear of stripping or smudging the acrylic color beneath.
The reverse also works beautifully. Applying acrylic weathering products over a fully cured enamel base is just as effective. Once an enamel coat has had 24-48 hours to fully oxidize and harden, it becomes a tough, non-reactive shell. You can then safely apply water-based acrylic washes, chipping fluids, or dust effects right over the top.
The Golden Rule of Layering: Never apply a "hotter" solvent over a "weaker" one. An enamel-based product can safely go over a cured acrylic, but applying an aggressive lacquer thinner over either could result in a melted, sticky disaster.
Navigating Clear Coats for Ultimate Protection
A clear coat, or varnish, is your safety net. It’s the essential barrier that protects your base paint and creates the ideal surface for weathering. The type of clear coat you choose is absolutely critical to preventing nasty chemical reactions between your paint layers.
-
Protecting an Acrylic Base: After your acrylic colors are down, seal them with an acrylic clear coat. A gloss varnish works best before applying decals and washes because it gives them a slick surface to flow across. To lock everything in and unify the final look, a high-quality product like AK Interactive Matt Acrylic Varnish is an excellent choice.
-
Protecting an Enamel Base: An enamel base should also be sealed before you start weathering, and an acrylic clear coat is the perfect tool for the job. This creates a bulletproof inert barrier, giving you total freedom to use enamel or oil-based weathering products on top without risking any reaction with the underlying enamel paint.
This deliberate layering of different clear coat types is the bedrock of successful multi-media finishing.
Evolving Paint Technologies
The lines between paint types are starting to blur as technology pushes forward. Water-based enamel paints, which often use acrylic resins as a binder, are a growing segment in the coatings industry. This market was valued at about $13.5 billion in 2023 and is projected to hit nearly $19.8 billion by 2032. These hybrid paints try to give you the best of both worlds—the toughness of enamels with the low odor and easy cleanup of acrylics.
This industry trend just proves that understanding the underlying chemistry is more important than ever. For modelers who want to replicate truly authentic metallic finishes, it can even be helpful to look at the complex methods used in creating bronze sculptures. The principles of layering and chemical reactions are universal, and digging into real-world patination and finishing processes for sculptures can offer some incredible insights.
Whether you're working on a bronze statue or a scale model tank, mastering these interactions is what will elevate your finishing from simple coloring to true artistry.
Choosing the Best Paint for Your Modeling Niche
The endless debate over acrylics versus enamels often misses the most important point: your specific modeling niche. General advice is fine, but the best paint is always the one that’s right for the job at hand. A diorama builder needs something completely different from an automotive modeler, and their paint choices should reflect that.
The real key is connecting the technical specs of each paint type to what you’re actually trying to build. This practical approach helps you move beyond a simple pro-and-con list and pick the right tool for the job, every single time.
For Military and Aircraft Modelers
For decades, enamel paints have been the undisputed champ in military and aircraft modeling, and for good reason. These kits often feature large, flat surfaces—think the wings of a bomber or the hull of a tank—that demand an exceptionally smooth, uniform finish. Enamel's slow curing time and self-leveling properties are a huge advantage here, as they naturally erase brush strokes and create a flawless coat that’s tough to replicate with fast-drying acrylics.
On top of that, the durability of a cured enamel finish is legendary. Military models are frequently hit with intensive weathering techniques, including aggressive enamel washes and solvent-based filters.
An enamel base coat provides a rock-solid, chemically resistant foundation that can withstand these harsh weathering processes without lifting or stripping. This resilience is exactly why it remains the traditional choice for serious armor and aviation builders.
For Automotive Modelers
When you’re building a car model, the goal is almost always a flawless, high-gloss, almost liquid-like shine. This is where enamels, and their even more potent cousins, lacquers, truly dominate. The very chemistry of enamel paint is engineered to produce a hard, glossy shell that perfectly mimics the deep, polished look of a factory car finish.
Their slow drying time allows the paint to settle perfectly, creating a mirror-smooth surface free of tiny imperfections. While you can get a gloss finish with acrylics using mediums and clear coats, it often takes more steps and may not achieve the same depth and hardness as a properly applied enamel. For that authentic, deep-shine showroom look, enamels are still the go-to.
For Figure and Diorama Creators
The needs of a figure painter or diorama creator are a world apart. Here, the focus shifts to blending, layering, and creating subtle tonal shifts on complex, organic surfaces. This is where acrylics have a clear and decisive edge.
The fast-drying nature of acrylics is a feature, not a bug, for this kind of work. It allows for quick layering of thin, translucent glazes to build up rich skin tones or create realistic shadows and highlights on terrain. Key techniques in this niche include:
- Wet Blending: Acrylics can be blended right on the model for smooth transitions, but you have to work fast before they set.
- Layering: Applying multiple thin coats of different colors is a breeze, since each layer is dry in just minutes.
- Washes and Filters: Water-based acrylic washes are perfect for adding depth to uniforms, scenery, and miniatures without the harsh fumes of enamel thinners.
The easy cleanup and low odor also make acrylics the better choice for the often long and intricate painting sessions required for detailed figures and expansive dioramas.
Your Guide to Safe Painting and Cleanup
Let’s be honest: safety and cleanup aren’t the most glamorous parts of model building. But this is where the differences between acrylic and enamel paints become crystal clear. Your choice directly impacts your workspace, the protective gear you need, and how you deal with spills or wash your brushes.
Enamel paints are solvent-based, and that means they demand a bit more respect. Their formulas contain Volatile Organic Compounds (VOCs), which release fumes as the paint cures. These fumes have a strong odor and can be harmful if you’re breathing them in for long stretches.
When you're working with enamels—especially when airbrushing—a respirator fitted with an organic vapor cartridge isn't just a good idea, it's essential for your long-term health. You'll also need solid ventilation, like an exhaust fan in an open window or a dedicated spray booth, to pull those fumes safely out of your workspace.
Personal Protective Equipment Breakdown
The safety gear you’ll need is completely different depending on which paint you’re using. Getting this right is key to keeping your hobby safe and enjoyable.
-
For Enamel Paints:
- Respirator: This is non-negotiable for airbrushing. It's the only way to filter out those harmful organic vapors.
- Gloves: Nitrile gloves are your best friend here. They protect your skin from the harsh solvents used for both painting and cleanup.
- Eye Protection: A simple pair of safety glasses will prevent any accidental splashes of paint or thinner from reaching your eyes.
-
For Acrylic Paints:
- Dust Mask: While acrylics are non-toxic, it’s still smart to wear a simple dust mask when airbrushing. You don't want to be inhaling fine, atomized paint particles.
- Gloves: These are optional but are always good practice for keeping your hands clean.
- Ventilation: Good airflow is still important to clear out overspray when airbrushing, even though the health risks are significantly lower.
Cleanup and Environmental Considerations
This is where acrylics really shine. Since they're water-based, wet acrylic paint cleans up with nothing more than soap and water. If the paint has already dried, a little isopropyl alcohol will usually get the job done. For a really stubborn, cured-on mess, a specialized plastic model paint remover can strip parts without damaging the plastic underneath.
Cleaning up enamels is a different story. You'll need mineral spirits or a proprietary enamel thinner. These solvents work great, but you have to handle them with care and dispose of them properly—never pour them down the drain.
This ease of use and lower environmental impact are huge reasons why acrylics have become so popular. Their user-friendly nature has fueled massive growth in the market, a trend we're seeing across the hobby world as modelers increasingly choose safety and simplicity.
At the end of the day, both paint types are perfectly safe to use. The trick is to understand what you're working with and take the right precautions. Do that, and you can enjoy your hobby responsibly for years to come.
Frequently Asked Questions About Model Paints
Jumping into the acrylic vs. enamel debate always brings up a few key questions. Getting solid answers to these common hang-ups can save you a ton of time, prevent some frustrating mistakes, and help you get the most out of your paints.
Let's clear up some of the most frequent challenges and uncertainties modelers run into.
Can You Mix Acrylic and Enamel Paints Together?
Absolutely not. You should never mix acrylic and enamel paints together in the same cup or jar. Their chemistries are polar opposites—one is water-based, the other is solvent-based. If you try to combine them, you'll just end up with a lumpy, useless sludge that will ruin both paints and instantly clog an airbrush.
You can, however, layer them successfully. A tried-and-true technique is to lay down an acrylic base coat, let it fully cure, and then seal it with a clear acrylic varnish. Once that's dry, you can safely apply enamel-based washes and weathering effects on top without any issues. The secret is making sure each layer is completely cured before adding the next one.
Which Paint Is Better for Beginners?
Acrylics get the nod for beginners, hands down. The two biggest reasons are safety and simplicity. Cleanup is a breeze, usually just requiring water and maybe a little mild cleaner, which means you don't have to deal with harsh, smelly solvents.
Their non-toxic, low-odor nature makes them perfect for working at the kitchen table or in a shared space where you can't set up a dedicated spray booth. Plus, the fast drying time helps new modelers see progress quickly and dramatically cuts down the risk of smudging wet paint—making the whole learning process a lot more forgiving.
Is a Primer Always Necessary for Both Paint Types?
While you can sometimes get away without it, using a primer is a best practice for both paint types that pays off big time. A good primer creates a consistent, uniform surface that gives the paint something to really bite into, which is especially important on the slick plastic of a new kit or on mixed-media models with resin and photo-etched metal parts.
It also acts as a "truth-teller," revealing any surface flaws like seam lines or sanding scratches that you missed. For enamels, a primer provides an essential protective barrier, preventing the aggressive solvents from potentially crazing or melting the plastic underneath.
Why Does My Acrylic Paint Dry So Fast on the Brush?
This is probably the most common headache when hand-painting with acrylics. Because they are water-based, the water in the paint starts evaporating the second it hits the air. This causes the paint to thicken and dry right on your brush bristles, often mid-stroke.
To fight this, get yourself a wet palette. This simple tool uses a damp sponge under a sheet of parchment paper to keep your paints hydrated and workable for hours. You can also mix a few drops of an acrylic retarder into your paint; it's a medium designed specifically to slow that evaporation process down, giving you a smoother flow and more working time.
Whether you're just learning the ropes with acrylics or you're an expert chasing that perfect gloss finish with enamels, Fusion Scale Hobbies has the paints, tools, and supplies you need. Explore our huge collection from the best brands to find exactly what you need for your next project at https://fusionscalehobbies.com.