


If you're looking for the best all-around airbrush for scale modeling, the answer is pretty clear-cut: a dual-action, gravity-feed model with a nozzle between 0.3mm and 0.5mm. This setup hits the sweet spot between fine-detail control and broader coverage, which is why it’s the go-to choice for both newcomers and seasoned builders alike. It gives you the flexibility to handle everything from tiny cockpit instruments to the smooth base coat on a tank hull.
Your First Airbrush for Scale Modeling
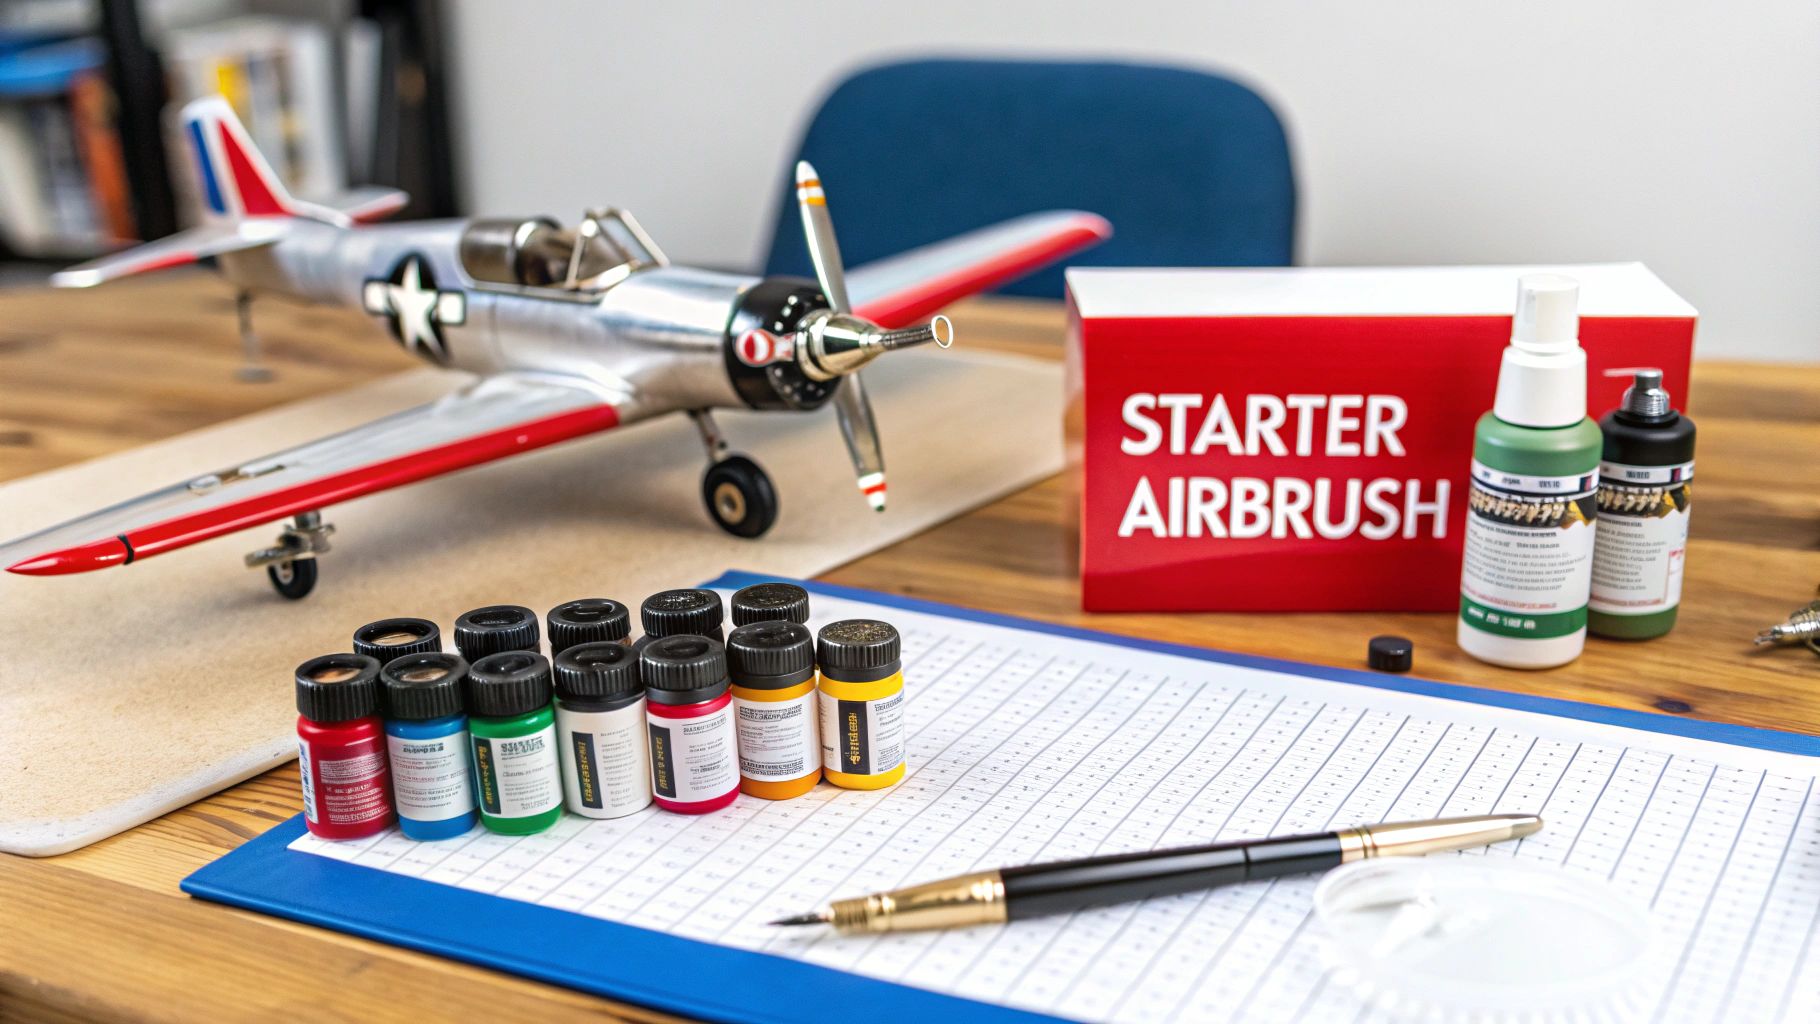
Picking your first airbrush is a huge step in taking your modeling projects to the next level. Making the jump from hand-brushing unlocks a professional finish, letting you create smooth gradients, realistic weathering, and those flawless base coats that are nearly impossible to get with a brush.
But let's be honest, the market is flooded with options, and it's easy to get confused. A common mistake newcomers make is buying a tool that's either way too complex or just not suited for the fine work scale modeling demands. From what I've seen in the community, a lot of first-time airbrush purchases end up gathering dust because they have unnecessary features or just aren't built to last. Your goal should be to invest in a reliable, versatile tool that will grow with your skills, not hold you back.
Key Features for Your First Airbrush
To make the right choice, you really only need to focus on a few core features that deliver the best performance for model building. A dual-action trigger is non-negotiable; it gives you precise, independent control over both air and paint flow. This is absolutely essential for techniques like pre-shading and freehanding camouflage patterns.
The gravity-feed design is also a must-have. It’s far more efficient for the small amounts of paint we typically use in modeling, requires less air pressure to operate, and makes cleanup between colors much, much easier.
The right airbrush isn't about having the most features; it's about having the right features. Versatility and reliability will always outperform complexity, especially when you're just getting started.
This combination is the foundation of a solid airbrushing setup. And before you start spraying your next project, you might also want to check out our guide on how to choose the right scale model kit for your skill level.
To simplify things, here's a quick rundown of what to look for when you're ready to buy your first airbrush. Think of this as your cheat sheet for making a smart investment that will serve you well for years of building.
Recommended Airbrush Features for Scale Modelers
| Feature | Recommended Specification | Why It's Ideal for Modelers |
|---|---|---|
| Action Type | Dual-Action | Gives you independent control over air and paint for ultimate precision. Essential for fading, mottling, and fine lines. |
| Feed System | Gravity-Feed | Perfect for the small paint quantities used in modeling. It's also much easier to clean between color changes. |
| Nozzle Size | 0.3mm to 0.5mm | This is the "do-it-all" range. Small enough for fine detail work but large enough for efficient base coating and clear coats. |
| Build Quality | All-Metal Construction | You need something that can stand up to harsh cleaning solvents. A solid metal body ensures durability and a long lifespan. |
Ultimately, focusing on these core features will ensure you get a tool that’s capable, reliable, and ready to handle just about any modeling task you can throw at it.
Airbrush Mechanics: What Modelers Need to Know
Picking the right airbrush is about more than just a list of features. It’s about understanding how the tool’s mechanics will actually perform on your workbench. The two biggest decisions you'll face are the trigger action and the paint feed system, and these choices directly impact everything from laying down a primer on a 1/35 scale tank to weathering subtle exhaust stains on a 1/72 scale fighter.
The difference isn't just in how the tools operate, but in the results they deliver. A single-action trigger offers straightforward simplicity, while a dual-action trigger gives you the nuanced control that brings a model to life. In the same way, a gravity-feed system is king for small, precise jobs, whereas a siphon-feed system is built for covering big surfaces without stopping. Let's dig into these mechanics with real-world modeling scenarios in mind.
Dual-Action vs. Single-Action Triggers
A single-action airbrush is simplicity itself. When you press the trigger, it sprays a fixed ratio of air and paint. Your only real control over the spray pattern comes from changing the distance to your model or twisting a separate knob on the handle. This makes it a great choice for jobs where you just need consistent, even coverage—think applying a single-color base coat, spraying primer, or laying down a uniform clear coat over an entire model. If you need to paint the hull of a ship or the body of a 1/24 scale car one solid color, a single-action airbrush gets it done with minimal fuss.
In contrast, a dual-action airbrush offers a world of control, which is exactly why it has become the standard for most scale modelers. The trigger does two things: pressing down releases air, and pulling back meters the flow of paint. This independent control is what makes advanced techniques possible.
- Pre-shading Panel Lines: You can start with just air (press down), get your aim perfect over a panel line, and then gently pull back to release a whisper-thin line of paint.
- Mottled Camouflage: Creating the soft, random spots on a German WWII aircraft requires you to constantly adjust the paint flow on the fly—something only a dual-action trigger can do.
- Feathering Edges: When you're spraying a multi-color camo scheme, you can create beautifully soft, feathered edges by carefully controlling how much paint you release as you spray.
For scale modeling, the choice is pretty clear. While a single-action airbrush is fine for basic coverage, a dual-action model is the best airbrush for scale modeling because it unlocks the precision needed for realistic weathering, camouflage, and fine details.
Gravity-Feed vs. Siphon-Feed Systems
The next big decision is how paint gets from its cup to the nozzle. This comes down to the feed system—either gravity or siphon.
A gravity-feed airbrush has a small color cup mounted right on top. Just like the name implies, gravity helps pull the paint down into the airbrush. This design is incredibly efficient and works well with much lower air pressure, often around 15-20 PSI, to atomize the paint. This makes it perfect for the fine, detailed work that defines scale modeling.
Imagine you're painting the tiny instrument dials in the cockpit of a 1/48 scale aircraft or adding highlights to a 1/72 scale figure. You’re only using a few drops of paint at a time. The gravity-feed system is ideal here, as there's almost no paint waste and cleanup is as easy as wiping out the small cup.
A siphon-feed airbrush, on the other hand, pulls paint up from a larger jar attached underneath. This setup is built for covering large areas without having to stop and refill constantly. If your project is base-coating multiple 1/35 scale tanks or applying a gloss coat to a huge 1/350 scale battleship, the siphon feed's capacity is a massive advantage. The tradeoff is that this system needs higher air pressure to create the suction to pull the paint up, and cleaning the jar and long feed tube is a bigger job.
Here’s a quick look at which feed system works best for common modeling tasks:
| Modeling Scenario | Best Feed System | Why It Works |
|---|---|---|
| Painting cockpit details | Gravity-Feed | Uses tiny amounts of paint efficiently; low PSI allows for fine control. |
| Base-coating a large tank | Siphon-Feed | The large paint jar avoids constant refilling for uninterrupted coverage. |
| Freehand camouflage | Gravity-Feed | Superior trigger response at low pressure is essential for soft edges. |
| Applying primer to multiple models | Siphon-Feed | Holds enough primer to spray several kits in one session, saving time. |
Choosing the Right Air Compressor
An airbrush is a precision tool, but it’s nothing without a good power source. Your air compressor is the heart and soul of the entire setup, and picking the right one is just as critical as choosing the perfect airbrush. The compressor is what gives you control over your airflow, and that control directly defines the quality of your paint finish.
A classic rookie mistake is to spend a fortune on a high-end airbrush and then skimp on the compressor. But an inconsistent or choppy air supply will ruin even the best paint job, leading to splatters, grainy finishes, and a whole lot of frustration. Getting a handle on a few key specs will make sure you end up with a reliable, quiet machine that actually helps your modeling, not hinders it.
Mastering Air Pressure (PSI)
Air pressure, measured in pounds per square inch (PSI), is the force that pushes paint out of your airbrush. Different tasks in scale modeling demand different pressures, so having precise control isn't just a "nice-to-have"—it's essential.
- Low Pressure (15-20 PSI): This is your sweet spot for fine detail work. Think weathering effects, subtle exhaust stains, soft-edge camouflage patterns, and post-shading panel lines. A gentle, controlled airflow is what you need to minimize overspray and build up effects gradually.
- High Pressure (25-30 PSI): When you're laying down a primer or a smooth base coat, you need more muscle. Higher pressure ensures thicker paints atomize correctly, giving you a flawless, even finish across the entire model.
An adjustable pressure regulator is an absolute must. It’s the dial that lets you fine-tune your PSI. Without one, you’re stuck with a single pressure setting, which severely cripples what your airbrush can do. A built-in pressure gauge is just as important, as it lets you see exactly what pressure you're spraying at in real-time.
The Great Compressor Tank Debate
When you're shopping for a compressor, the biggest decision you'll face is whether to get one with an air tank. The difference it makes to your painting sessions is night and day.
A compressor with a tank is the professional standard for a reason. It stores compressed air, delivering a perfectly smooth, pulse-free stream to your airbrush. The motor only kicks on to refill the tank when the pressure drops, which means it’s quiet for most of the time you’re actually painting. This is the setup you want for the best possible results in a dedicated workspace.
A tankless compressor, on the other hand, is built for portability and small spaces. The motor runs constantly while you're spraying, which can introduce tiny fluctuations—or "pulsing"—in the airflow. Modern tankless models have gotten much better, but they still can't quite match the silky-smooth delivery of a tanked compressor. Still, if you have limited space or need to pack up your gear after every session, it’s a solid, practical choice.
For the most consistent and professional finish, a compressor with an air tank is the superior choice. The pulse-free airflow it delivers is critical for achieving smooth gradients and fine lines without any sputtering.
Must-Have Compressor Features
Beyond the tank, a couple of other features are non-negotiable for a hassle-free airbrushing experience. Make sure any compressor you're considering has these.
A moisture trap (also called a water separator) is absolutely critical. When air gets compressed, water vapor from the atmosphere condenses into tiny droplets. Without a trap, that water gets pushed right down your air hose and into your paint, causing sputtering and ruining your finish. A moisture trap catches this water before it ever reaches your airbrush.
Finally, pay attention to the noise level, which is measured in decibels (dB). A loud, rattling compressor can make what should be a relaxing hobby feel like a chore. Many modern "silent" compressors run in the 40-60 dB range—about the same volume as a normal conversation. They're a godsend for anyone modeling in an apartment or during late-night sessions when the family is asleep.
Matching Nozzle Size to Modeling Tasks
The needle and nozzle assembly is the heart of your airbrush. It’s the final point where air and paint meet, and it’s where true precision is born. Picking the right nozzle size isn’t just a technical choice; it’s a strategic one that directly impacts your finish, determining whether you can lay down a razor-sharp camouflage line or a flawlessly smooth base coat.
Choosing the best airbrush often comes down to matching its capabilities to what you build. A nozzle that excels at weathering a tiny 1/72 scale tank might be completely wrong for priming a 1/24 scale car body. Understanding the relationship between nozzle diameter, paint viscosity, and the job at hand is what separates frustrating painting sessions from pro-level results.
The global airbrush market, valued at around USD 32.69 million in 2024, has grown steadily thanks to hobbies like ours where such precision is a must. This trend is especially clear in the scale modeling community, where we demand versatile tools for intricate work. You can dig deeper into these market trends in this detailed report on the global airbrush market from Research and Markets.
Fine Detail Nozzles for Precision Work
Nozzles in the 0.15mm to 0.2mm range are specialized tools for extreme precision. These are what you grab when working on the smallest details, where absolute control is everything. Think about painting tiny dials in a 1/48 scale cockpit or adding subtle weathering streaks to a 1/72 scale tank.
Because of their tiny opening, these nozzles need heavily thinned paints and low air pressure, usually around 10-15 PSI. Try to run thick paint through them, and you’ll get instant clogs and a headache. Their spray pattern is incredibly narrow, making them useless for large areas but perfect for tasks that require surgical accuracy.
Use a fine nozzle for tasks where you are essentially drawing with the airbrush. They excel at freehand mottling, fine squiggles for camouflage, and applying highlights to miniature figures.
The All-Rounder Nozzles for General Tasks
For most of us, the 0.3mm to 0.4mm range is the workhorse. If an airbrush comes with only one nozzle, it’s probably this size, and for good reason. It strikes an excellent balance between fine detail and decent coverage, making it a true jack-of-all-trades.
With a 0.35mm nozzle, you can still pull relatively fine lines for camo on a 1/48 scale fighter, but you can also efficiently lay down a base coat on a 1/35 scale tank. This size is more forgiving with paint thickness and works well in the 15-25 PSI range. It’s the perfect starting point and the size many of us use for the bulk of our work.
To get the most out of any nozzle, you need a solid system behind it. This diagram shows the key components: an air tank for pulse-free flow, a regulator for precise pressure control, and a filter to keep moisture out of your airline.
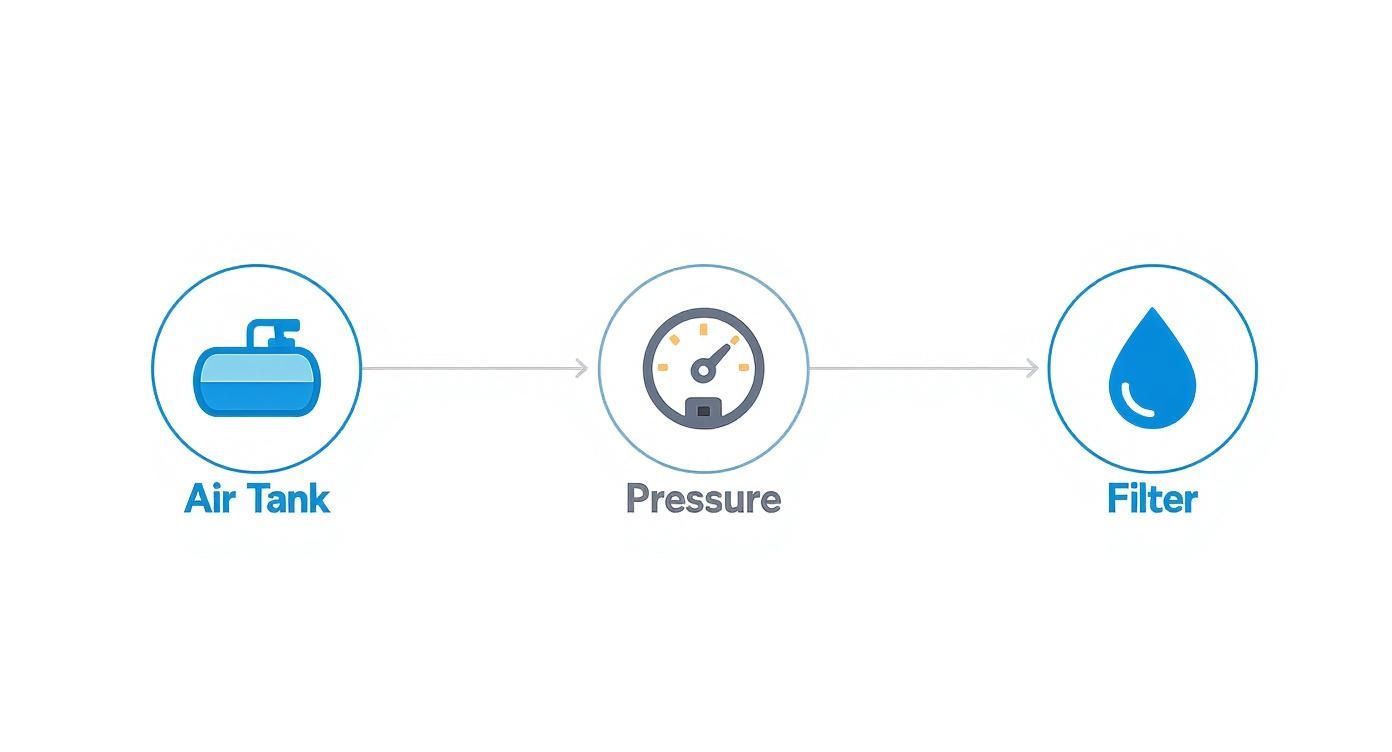
Each part is crucial for ensuring your nozzle can do its job effectively, turning compressed air into a flawless finish.
Large Nozzles for Broad Coverage
When you need to cover big surfaces quickly and evenly, a nozzle of 0.5mm or larger is the right tool. These are built for high paint flow and are ideal for spraying thicker stuff like primers, heavy-bodied acrylics, and gloss varnishes.
Imagine laying down a uniform coat of primer on a 1/24 scale car body or a massive 1/350 scale ship hull. A larger nozzle lets you work at higher pressure (20-30 PSI) and cover the model in fewer passes, which helps avoid a blotchy, uneven finish. They aren't meant for detail work, but for base coating and sealing, their efficiency is unmatched.
To make things easier, here’s a quick guide matching nozzle sizes to common modeling tasks and scales.
Needle and Nozzle Size Application Guide for Scale Modelers
| Nozzle Size | Optimal PSI Range | Best For (Tasks) | Ideal Scales |
|---|---|---|---|
| 0.15mm | 10-15 PSI | Ultra-fine lines, mottling, weathering streaks, cockpit details | 1/72, 1/48, N & Z Scale |
| 0.2mm | 10-18 PSI | Fine camouflage patterns, pre-shading, figure painting, panel lines | 1/72, 1/48, HO Scale |
| 0.3mm | 15-25 PSI | General purpose camouflage, small area base coats, shading | 1/48, 1/35, 1/24, HO Scale |
| 0.4mm | 15-25 PSI | All-purpose base coating, medium area coverage, applying metallics | 1/35, 1/24, O Scale |
| 0.5mm+ | 20-30+ PSI | Priming, clear coats (gloss/matte), large surface base coating, scenery | 1/24, 1/12, Large Scale, G Scale |
This table should give you a great starting point. Remember that paint thinning and your own technique will play a huge role, so don't be afraid to experiment to find what works best for your setup.
Mastering Paints and Thinning Ratios
Even the best airbrush on your workbench is only as good as the paint you run through it. Getting that perfect, butter-smooth finish all comes down to one thing: mastering paint consistency. This is where the real craft of airbrushing starts—it's less about the tool and more about the medium you’re spraying.
Modelers generally stick to three main types of paint: acrylics, lacquers, and enamels. Each one has its own personality, affecting how you thin it, spray it, and clean up after it. If you know how they behave, you can predict exactly how they'll atomize when they hit the air.
Comparing Paint Types for Airbrushing
Acrylics are easily the most popular choice for most modelers today. They’re water-based, don't stink up the house, and clean up easily with water or a dedicated acrylic cleaner. The biggest headache with acrylics is their tendency to dry fast, which leads to the dreaded "tip dry"—paint drying on the needle and causing frustrating sputters and clogs.
Lacquers are the go-to for an incredibly durable, fine finish. The pigment is exceptionally fine, letting you lay down glass-smooth coats. They also "bite" into the plastic for a super strong bond and dry almost instantly. The trade-off? The fumes are seriously potent and toxic, making a high-quality respirator and a good spray booth non-negotiable.
Enamels are the old-school workhorse, famous for a tough, resilient finish and a leisurely drying time. That extra working time is fantastic for blending colors, but it also means you’ll be waiting a lot longer before you can handle your model or add another coat. Cleanup requires mineral spirits or a brand-specific thinner.
The Art of Thinning Your Paint
You’ve probably heard the old advice to thin your paint to the consistency of "skim milk." While that’s a decent starting point, it's far from a golden rule. Every paint, every color, and even the humidity in your room can change the thinning equation. The real goal is simple: find the viscosity that lets the paint atomize perfectly at your chosen air pressure.
A much better approach is the "run-off" test. It’s simple and reliable.
- Add just a few drops of thinner to your paint cup and give it a good mix.
- Use a stirrer or paintbrush to pull some of the mixed paint up the side of the cup.
- Now, watch how it runs back down. If it leaves a thick, blobby line, it’s still too thick. If it zips down like water without leaving any color behind, you've gone too far.
- What you’re looking for is a thin, slightly see-through film of color that flows smoothly down the side.
Getting this right takes a little practice, but once you nail it, your airbrushing will improve dramatically. We have a complete guide that goes deeper into this crucial skill, covering specific ratios and techniques for different brands right here: how to thin acrylic paint.
Think of your thinning ratio as a moving target, not a fixed recipe. It changes based on your nozzle size, air pressure, and what you’re trying to do. A tiny 0.2mm nozzle needs much thinner paint than a big 0.5mm nozzle you'd use for priming.
Thinners and Additives
When you can, always start with the manufacturer's thinner for their specific paint line. They're chemically formulated to work perfectly with their own binders and pigments. That said, there are alternatives out there—isopropyl alcohol and even distilled water can work for certain acrylics in a pinch.
Beyond basic thinners, a few additives can really improve your paint's performance.
- Flow Improver: Just a drop or two breaks the surface tension of acrylic paint, helping it flow much more smoothly and drastically reducing tip dry.
- Retarder: This does exactly what it sounds like—it slows down the drying time for acrylics. This is another fantastic weapon against tip dry, especially during longer painting sessions.
The growing demand for these specialized products shows how serious hobbyists are about getting professional results. In fact, the global airbrush paint market was valued at USD 84.9 million in 2024, driven by modelers just like us. You can see more on the growth in the airbrush paint market on intelmarketresearch.com. By understanding how these materials work, you can turn just about any paint into the perfect medium for your airbrush.
Essential Airbrush Maintenance and Troubleshooting
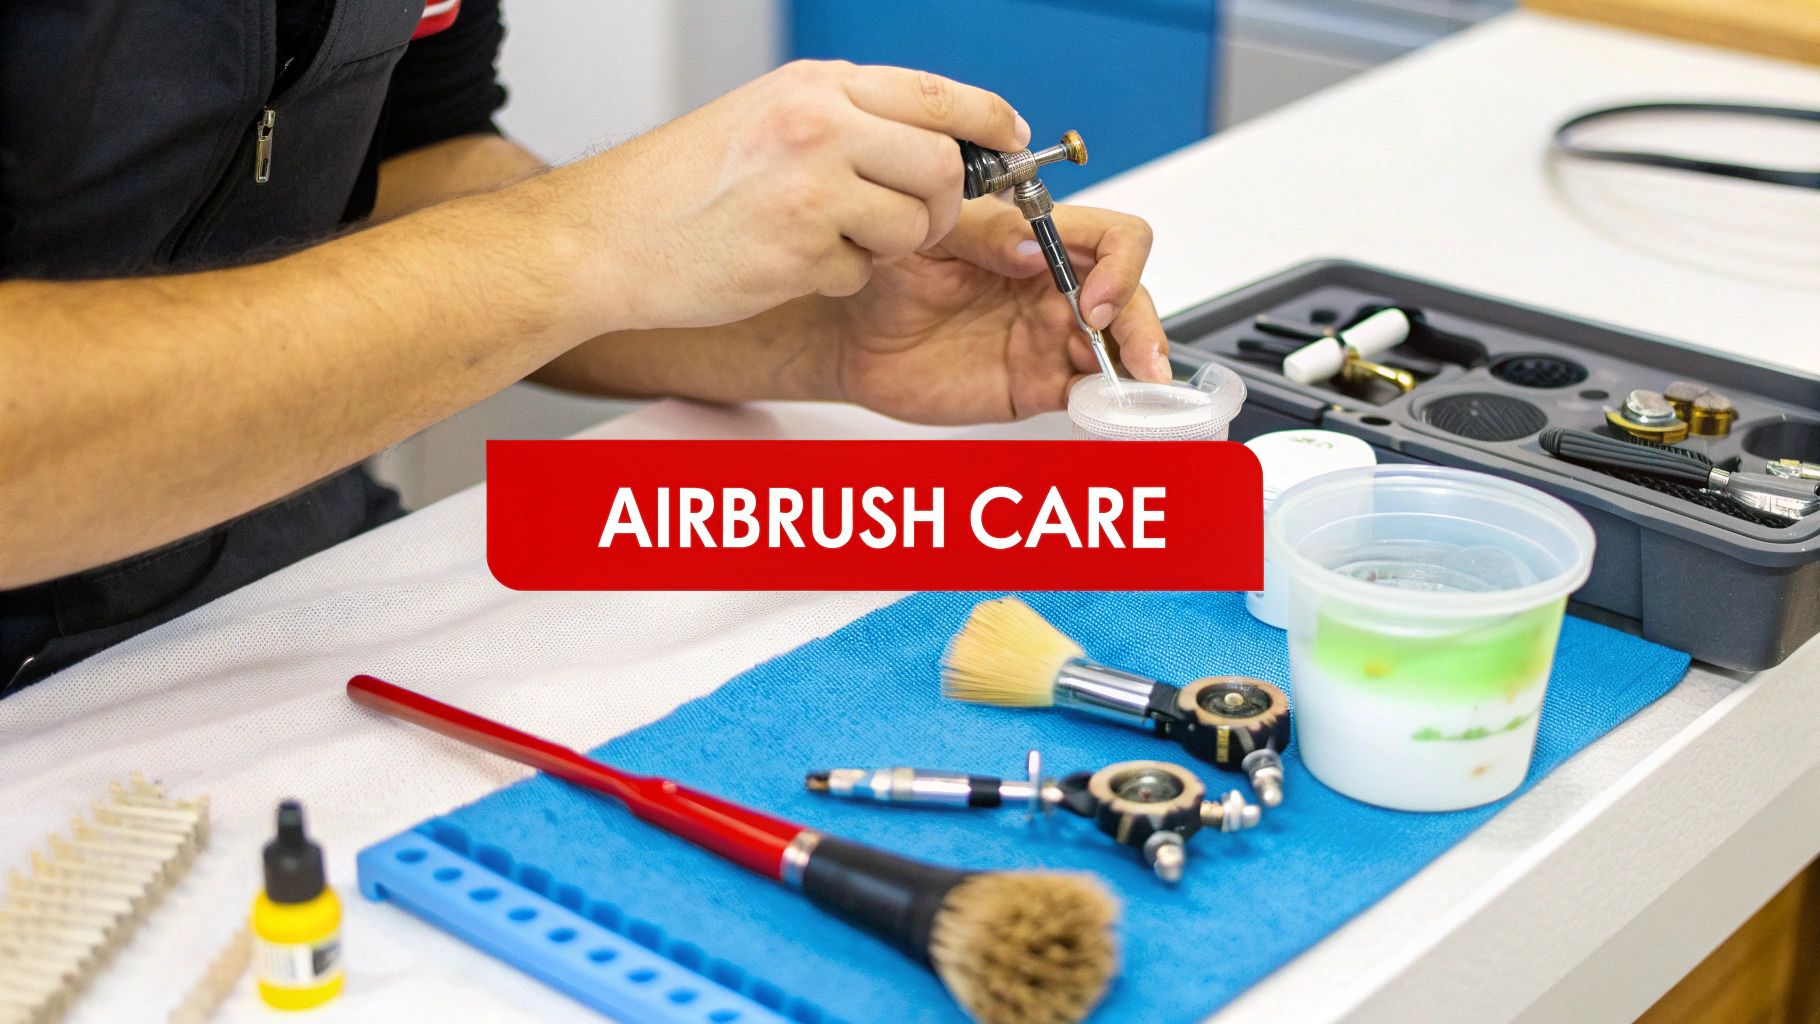
Here’s a simple truth in scale modeling: a clean airbrush is a reliable airbrush. Consistent maintenance is the single most important habit you can build to get flawless paint jobs and protect your most valuable tool. Neglecting it is a surefire recipe for clogs, sputtering, and endless frustration.
Proper care isn't complicated, but it does demand discipline. Building a quick cleaning routine after every single painting session will prevent 90% of common airbrush problems before they even start. It means you spend more time building and painting, and far less time trying to fix a clogged-up tool.
Your Daily Cleaning Routine
This quick flush-out is something you should do every single time you finish painting or even just switch colors. It takes less than two minutes and is your best defense against dried paint building up inside the nozzle.
- Empty the Cup: First, dump any leftover paint into a waste container.
- Initial Wipe: Grab a paper towel and wipe out the remaining paint residue from the cup.
- Add Cleaner: Fill the cup partway with a good airbrush cleaner. If you need help choosing one, this Scalecoat airbrush cleaner guide offers a great overview of a popular option.
- Backflush Gently: Loosen the needle chuck at the back, then block the nozzle cap with your finger and gently press the trigger. You'll see bubbles as this forces air and cleaner back into the cup, dislodging stubborn paint from inside the nozzle.
- Spray Through: Finally, tighten the needle chuck back up and spray the cleaner through the airbrush onto a paper towel until it comes out perfectly clear.
This simple process ensures your airbrush is ready to go for your next session without any nasty surprises. For a more thorough job, a deep clean is necessary every few weeks or so.
Diagnosing Common Airbrush Problems
Even with perfect maintenance, things can still go wrong. Knowing how to diagnose and fix issues on the fly will save your paint job and your sanity. Here’s a quick guide for troubleshooting the most common airbrush headaches.
An airbrush rarely "breaks." Most performance issues are simply the result of a clog, an incorrect setting, or a loose part. Learning to troubleshoot is a core skill for any serious modeler.
Use this problem-solution format to quickly figure out what's wrong and get back to painting.
Problem: My Airbrush is Sputtering
Sputtering is when your airbrush sprays an inconsistent mix of paint and air, creating a speckled or blotchy pattern instead of a smooth cone.
-
Cause: The most common culprit is paint that's too thick or hasn't been thinned properly.
-
Solution: Add a few more drops of thinner to your paint mixture and test on a scrap piece of plastic or cardboard.
-
Cause: Your air pressure is too low to properly atomize the paint.
-
Solution: Increase your PSI slightly. Go up in small increments of 2-3 PSI at a time until the spray becomes smooth.
-
Cause: A loose nozzle cap or head assembly is allowing air to leak, disrupting the flow.
-
Solution: Make sure the nozzle cap is hand-tightened securely. Whatever you do, don't overtighten it with a wrench.
Problem: No Paint is Coming Out
This is one of the most frustrating things that can happen, but it's usually an easy fix.
-
Cause: The needle is stuck due to dried paint or isn't being pulled back far enough.
-
Solution: Loosen the needle chuck at the very back of the airbrush and gently slide the needle back and forth to ensure it moves freely.
-
Cause: You have a complete clog right inside the nozzle, blocking any paint from getting through.
-
Solution: This calls for a deep clean. You'll need to disassemble the front end of the airbrush, soak the nozzle and nozzle cap in cleaner, then use a tiny cleaning brush to gently remove the blockage.
Common Airbrushing Questions Answered
Even after you’ve got a handle on the hardware, new questions always pop up on the journey to mastering your airbrush. This section tackles some of the most frequent queries we see from the modeling community, with direct answers to help you get better results, faster.
What Is the Best All-Around Setup for a Beginner?
If you're just starting out, the most versatile and forgiving setup is a dual-action, gravity-feed airbrush with a 0.3mm or 0.35mm nozzle. This combination gives you the fine control needed for detail work while still being perfectly capable of base-coating models efficiently. For the best experience, pair it with a compressor that has a small air tank, an adjustable pressure regulator, and a moisture trap.
This configuration is the gold standard because it forces you to learn proper trigger discipline right from the start. The gravity-feed design is also far easier to clean and needs less air pressure to operate, which helps you sidestep a lot of the frustrating issues that trip up newcomers. It's the standard for a reason—it just works for almost any task you can throw at it.
Do I Really Need a Spray Booth?
While you might get away without one when using water-based acrylics in a very well-ventilated space, a spray booth is highly recommended for safety and cleanliness. It becomes non-negotiable if you plan to work with lacquers or enamels, as their solvent vapors are seriously harmful to inhale.
A good spray booth does two critical jobs: it protects your health by venting fumes outside, and it contains overspray to keep your workspace from being coated in a fine layer of paint dust. Even a simple DIY box with a fan can make a huge difference in air quality.
How Do I Stop the Spiderweb Effect?
That dreaded "spiderweb" or splattering effect is almost always caused by two things working together: paint that is too thin and air pressure that is too high. When watery paint hits the model's surface with too much force, it splatters outward from the center of your spray pattern.
To fix this, first try lowering your compressor's PSI in small increments. If the problem hangs around, your paint mixture is the culprit. Add a few drops of unthinned paint back into your cup to thicken it up slightly. Nailing that perfect balance between paint consistency and air pressure is the secret to a buttery-smooth finish.
Can I Use One Airbrush for Primer and Details?
Absolutely, which is exactly why a versatile airbrush is such a smart investment. The key is to either get an airbrush that supports interchangeable needle and nozzle sets or to choose a good middle-ground size like 0.3mm to 0.5mm from the get-go.
You can use a larger nozzle (like a 0.5mm) for spraying thick primers and broad base coats, which allows for better paint flow and quicker coverage. When you're ready for the fine stuff, swap to a smaller nozzle (0.2mm or 0.3mm) for camo patterns and weathering. Just be absolutely sure you thoroughly clean the airbrush between switching from primer to your color coats to avoid any contamination.
Whether you're looking for your first airbrush setup or upgrading to a more advanced system, Fusion Scale Hobbies has the tools, paints, and accessories you need to bring your vision to life. Explore our extensive collection and find the perfect gear for your next project at https://fusionscalehobbies.com.