


If you're looking for the best airbrush for scale models, the answer for most people is a gravity-feed, dual-action airbrush with a 0.3mm nozzle. It's the sweet spot. This setup gives you the perfect balance of fine detail control and efficient coverage for almost any project, from a 1/72 scale fighter jet to a detailed HO scale locomotive. You get the precision needed for tricky camouflage patterns while still being able to lay down a smooth base coat.
Choosing Your First Airbrush for Scale Models
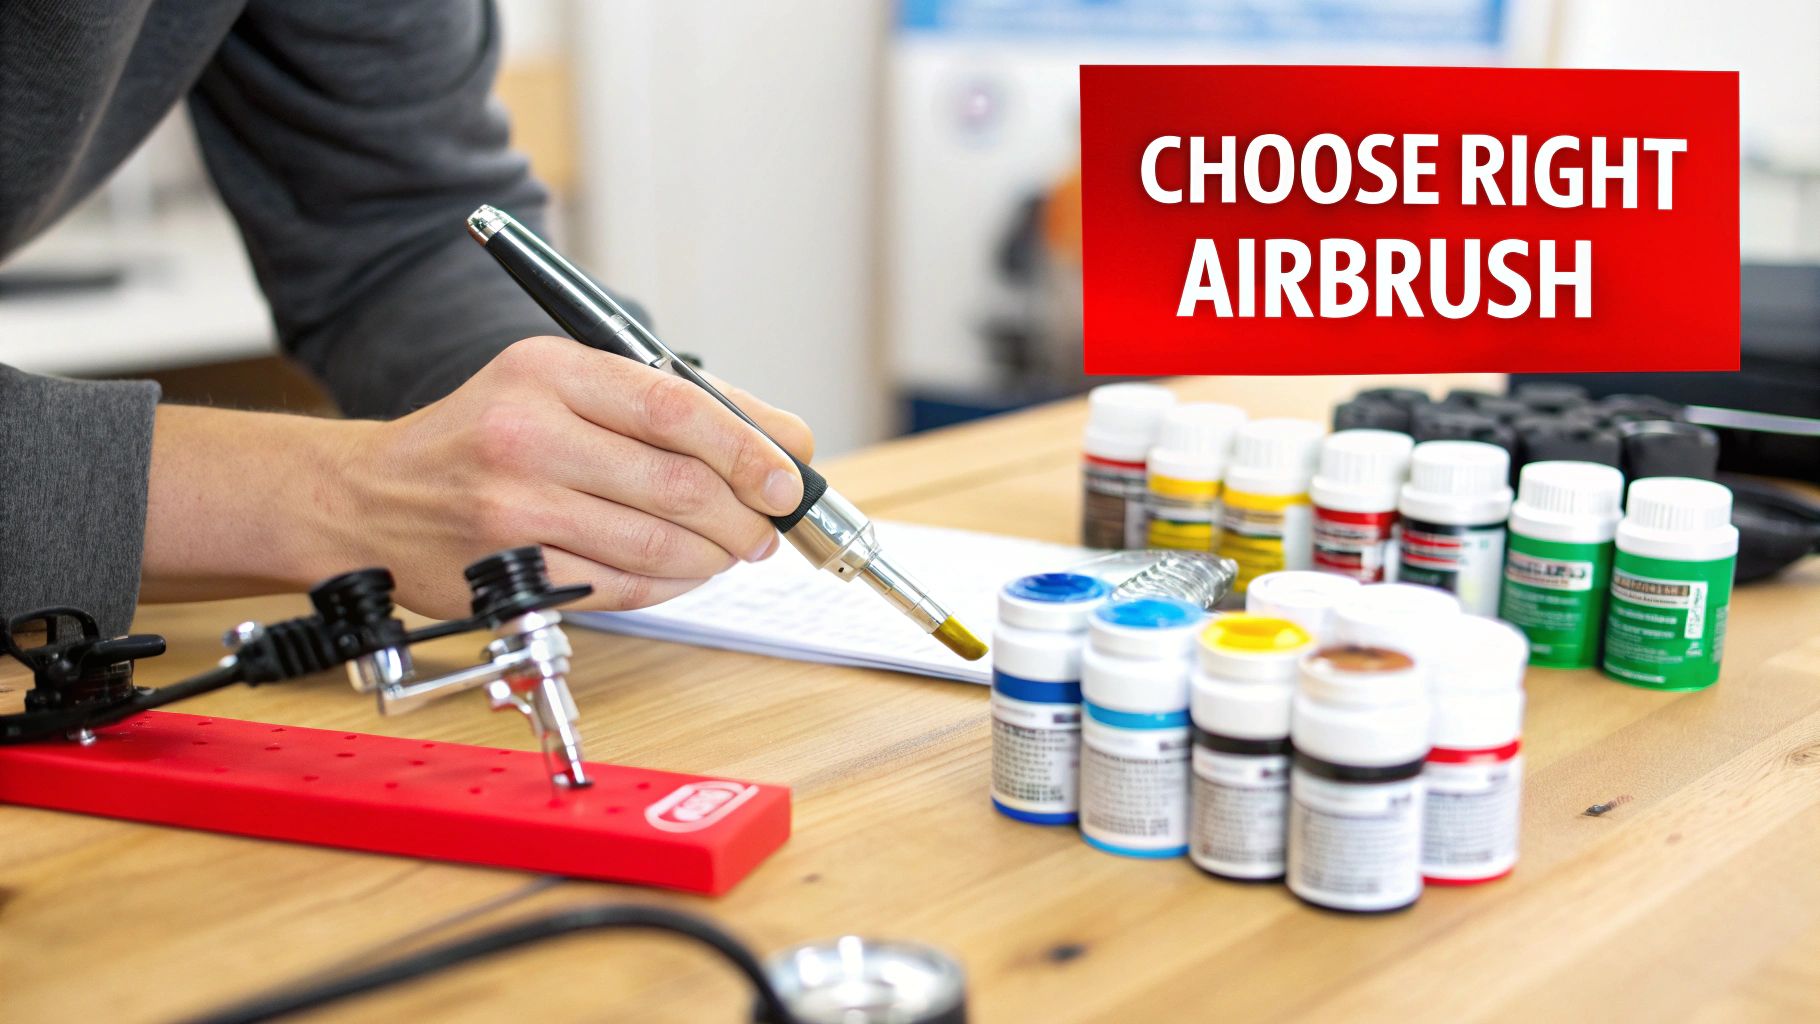
Picking the right airbrush can feel like a huge hurdle, but it doesn't have to be. The best tool is simply the one that fits what you're trying to do. Your ideal choice boils down to your skill level, your budget, and the kinds of models you build most often. Before getting lost in brand names, it helps to understand the core features that make one airbrush different from another.
Every airbrush is defined by two key characteristics. Get these right, and you're already halfway there.
- Feed Type (Gravity vs. Siphon): This is all about how paint gets from its cup or bottle to the nozzle. Gravity-feed models have a top-mounted cup, perfect for fine detail work where you only need a few drops of paint. Siphon-feed models pull paint from a bottle mounted underneath, making them better for covering large areas, like the hull of a ship or a big diorama base.
- Action Type (Dual vs. Single): This describes how you control the spray. A dual-action trigger gives you independent control over both air and paint—push down for air, pull back for paint. This offers maximum precision. A single-action trigger is simpler; pressing it releases a fixed ratio of air and paint.
This decision tree gives you a quick visual guide for picking an airbrush based on whether you need to paint tiny details or cover broad surfaces.
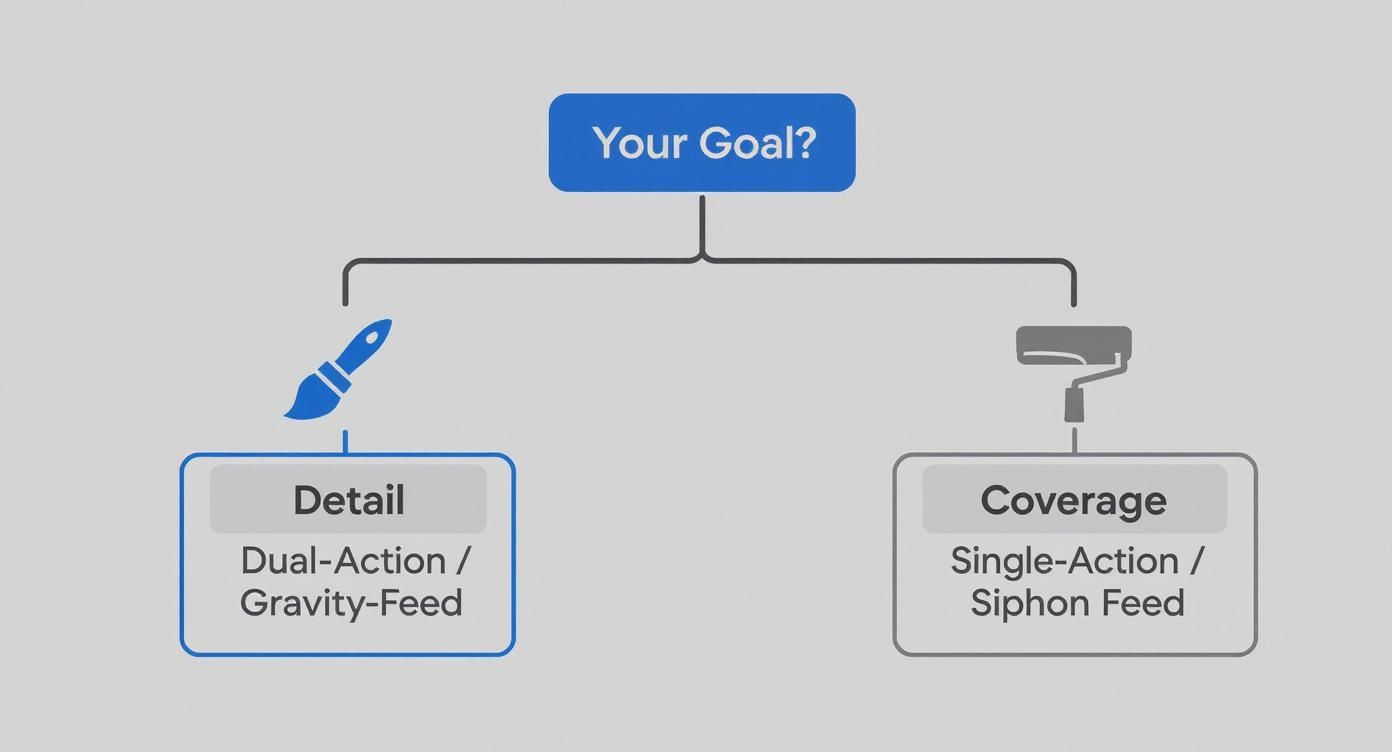
As the chart shows, if your focus is on intricate work like weathering, panel lines, or camouflage, a dual-action, gravity-feed airbrush is the way to go. The control is just unmatched.
Top Airbrush Picks for Every Scale Modeler
To make things even easier, here's a quick reference guide to our top-rated airbrushes. We've categorized them by skill level and the kind of modeling they excel at, whether you're just unboxing your first kit or you're a seasoned pro looking for an upgrade.
| Category | Recommended Model | Key Feature | Ideal For |
|---|---|---|---|
| Beginner | Master Airbrush G22 | All-inclusive kit, low cost | Learning the basics, priming, base coating |
| Intermediate | Iwata-Medea Eclipse CS | Excellent atomization, versatility | Detailed camouflage, weathering, all-around use |
| Professional | H&S Infinity CRplus | Unmatched precision, quick-set needle | Award-winning detail work, micro-painting |
Each recommendation hits a sweet spot of performance, reliability, and value for its category. This guide will dig deeper into these concepts and models, giving you the confidence to pick the perfect airbrush that will serve you well for years to come.
Understanding Core Airbrush Mechanics
To really nail your choice of airbrush, you need to look past the fancy packaging and brand names and get a feel for the tech inside. The mechanics are pretty straightforward, but each feature completely changes how the paint behaves, which directly impacts your results on a miniature scale.
Getting these core concepts down is the key to matching the right tool to your project, whether you're detailing a tiny aircraft cockpit or base-coating a massive diorama.
The two biggest decisions you'll make right out of the gate are the feed type and the action type. These aren't minor details—they define what the airbrush is built for. Everything from how efficiently paint flows to how fine you can get your lines is decided right here.
This kind of technical know-how is becoming more important than ever. The global airbrush market was valued at USD 34.16 million and is expected to hit USD 42.32 million by 2030. That growth is fueled by a growing community of enthusiasts like us who are investing in better tools for more detailed work. You can dig into more insights about the airbrush market growth on ResearchAndMarkets.com.
Gravity Feed vs Siphon Feed
The most obvious difference you’ll see between airbrushes is how they hold the paint. This design choice has a huge impact on efficiency and precision for different kinds of jobs.
Gravity-Feed Airbrushes
A gravity-feed airbrush has a small cup sitting right on top. As the name suggests, gravity gives the paint a helping hand, pulling it down into the airbrush body.
- Benefit: This design is incredibly efficient. It needs lower air pressure (PSI) to work and lets you use just a few drops of paint at a time.
- Best Use Case: This is the undisputed king of detail work. Think delicate camouflage patterns on a 1/72 scale Messerschmitt or weathering a small figure. This is where a gravity-feed airbrush shines, thanks to its precision and minimal paint waste.
Siphon-Feed Airbrushes
On the other hand, a siphon-feed model has a cup or bottle that attaches underneath. It works by creating a vacuum that literally siphons paint up into the airbrush.
- Benefit: These can hold way more paint, making them perfect for covering big areas without constantly stopping to refill.
- Best Use Case: When you need to lay down a smooth, uniform primer coat on a big 1/35 scale tank or apply a base color to a sprawling diorama, the siphon-feed is your workhorse.
For most scale modelers, a gravity-feed airbrush is the way to go. Its ability to handle fine lines and operate at low pressures gives you the control you need for the vast majority of modeling tasks.
Dual Action vs Single Action Triggers
The trigger is how you control the spray, and it’s probably the single most important feature for getting pro-level results.
A single-action airbrush is the simpler of the two. You press the trigger, and a pre-set mix of air and paint comes out. You can only control how much spray comes out, not the paint-to-air ratio on the fly. This makes it okay for basic, one-color jobs, but it's pretty limiting for any advanced techniques.
A dual-action airbrush, however, gives you independent control over both the air and the paint. It's a two-step process:
- Pressing Down: This releases only airflow. It's perfect for drying a spot on your model or just blowing dust off a surface before you paint.
- Pulling Back: This is what gradually releases paint into the airstream. The further you pull back, the more paint you spray.
This two-part control is what lets you create everything from pencil-thin panel lines to broader, feathered strokes for shading and weathering. Being able to start with air, introduce paint, and then end with air gives you clean, crisp lines without those annoying splatters at the start and end of your stroke.
For any serious modeler, a dual-action trigger is non-negotiable.
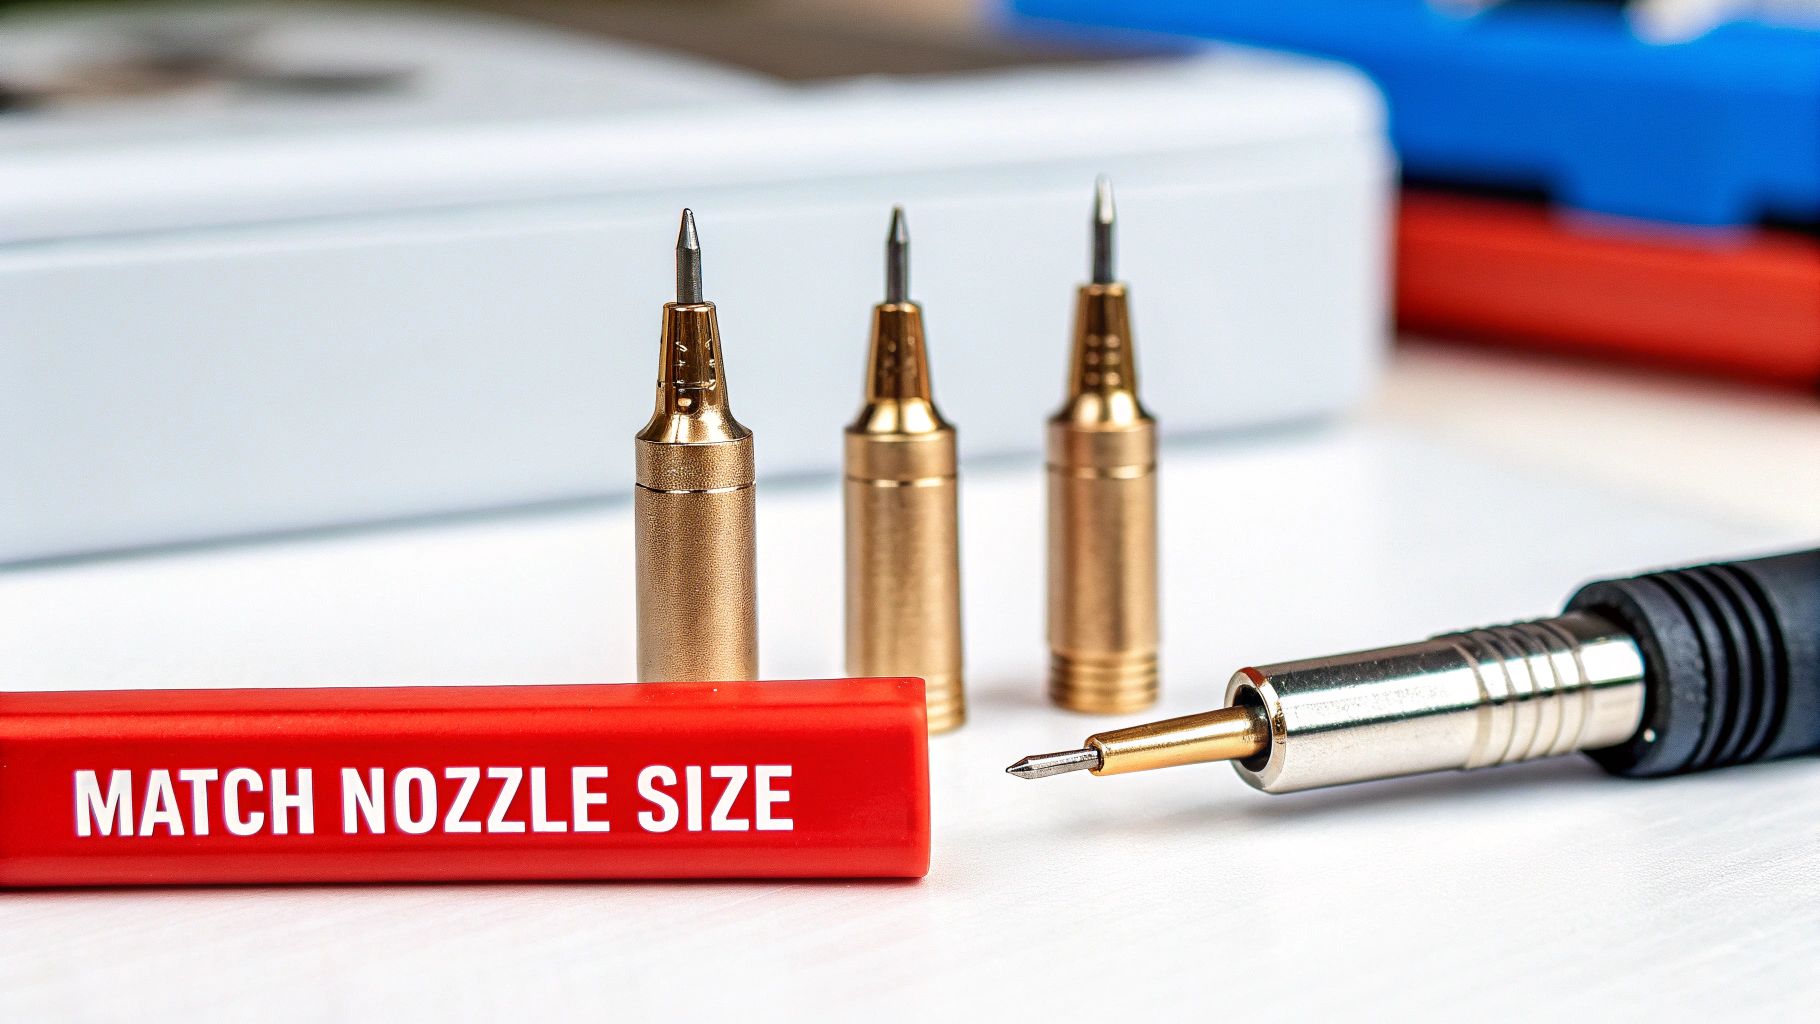
Matching Nozzle Size to Your Modeling Project
Beyond the trigger and feed style, the real secret to a perfect finish comes down to one tiny, often-overlooked part: the nozzle. The nozzle and needle combo is the heart of your airbrush, dictating the fineness of the spray pattern and how much paint flows through it. You wouldn't use a wide house-painting brush for tiny details on a miniature, and the exact same logic applies here.
Understanding the direct link between nozzle diameter and your final result is a game-changer. A smaller opening creates a tighter, more controlled spray, while a larger one pushes more paint for broader coverage. For scale modelers, this single choice impacts everything from laying down a primer coat to painting microscopic dials in a cockpit.
The Big Three Nozzle Sizes Explained
While nozzles come in a wide range of sizes, the scale modeling world pretty much runs on three core diameters: 0.2mm, 0.3mm, and 0.5mm. Each has a job it was born to do, and knowing when to use which one will seriously level up your results and cut down on frustration.
0.2mm Nozzle for Ultimate Precision
This is your scalpel. The 0.2mm nozzle is for the most delicate, precise work you can imagine. Its tiny opening atomizes paint into an incredibly fine mist, giving you hairline accuracy.
- Best Use Case: It's perfect for complex camouflage schemes on 1/72 scale aircraft, pre-shading panel lines, or adding subtle weathering like streaks and stains on a 1/48 scale tank. It's also the MVP for painting miniature figures where every detail counts.
- Paint Consistency: You must use heavily thinned paint—think skim milk consistency—to avoid constant clogging.
0.5mm Nozzle for Maximum Coverage
At the other end of the spectrum is the 0.5mm nozzle. Think of this as your paint roller. It’s the workhorse for jobs that require covering larger areas quickly and evenly.
- Best Use Case: It absolutely shines when applying primers, base coats, and clear varnishes across bigger models, like 1/35 scale armor or the broad wings of a 1/32 scale bomber. Its wide spray pattern lays down a smooth, consistent coat without needing a ton of passes.
- Paint Consistency: It can handle slightly thicker paints, but proper thinning is still your friend for getting the best results.
The All-Rounder: The 0.3mm Nozzle
When you're searching for the best airbrush for scale models, you’ll notice the 0.3mm nozzle is often called the 'gold standard,' and for good reason. It hits that sweet spot between precision and coverage, making it incredibly versatile for general painting. This is why it’s the most common size included with airbrushes, from budget-friendly starters to high-end models. For a great visual breakdown, check out this video guide on choosing the right airbrush for model painting.
This jack-of-all-trades can handle most jobs a modeler will throw at it. You can tighten the spray pattern for fairly detailed camo work or open it up to base coat a medium-sized model without breaking a sweat.
Key Insight: If you can only have one airbrush, get one with a 0.3mm nozzle. It’s the most versatile and forgiving option out there, letting you tackle a huge range of projects without needing to switch gear.
Airbrush Nozzle Size Application Guide for Scale Models
The final piece of this puzzle is making sure your paint consistency is perfectly matched to your nozzle. This is the #1 way to prevent clogs, sputtering, and a grainy finish. Get this wrong, and you're in for a world of frustration.
Here’s a quick-reference table to keep you on the right track:
| Nozzle Size | Primary Use Case | Ideal Scale/Task | Recommended Paint Consistency |
|---|---|---|---|
| 0.2mm | Fine detail, weathering, mottling | 1/72 aircraft camo, figure eyes | Very thin (like skim milk) |
| 0.3mm | General purpose, detailed coverage | All scales, base coats, camo | Thin (like whole milk) |
| 0.5mm | Priming, base coating, varnishing | Large areas, 1/35 armor, dioramas | Slightly thicker (like single cream) |
Just remember this practical tip: always test your spray pattern on a piece of scrap plastic or an old model part before you touch your actual project. This little step lets you dial in your air pressure and thinning ratio without putting your masterpiece at risk. Mastering the relationship between your nozzle, paint, and pressure is a fundamental skill that will take your finish from good to absolutely stunning.
Comparing the Best Airbrushes for Modelers
Picking the right airbrush involves more than just reading a spec sheet. It’s about how the tool feels in your hand after an hour of painting and how it performs when you’re laying down a delicate camouflage pattern. Instead of just listing features, let's look at some top-tier airbrushes through the lens of real-world modeling.
We'll break down leading models into three camps: Entry-Level, Mid-Range, and High-End. The goal is to compare how the smooth trigger of one model stacks up against the pinpoint accuracy of another, helping you find the right tool for your workbench.
Entry-Level Excellence for Beginners
When you're just starting, the ideal airbrush is forgiving, a breeze to clean, and affordable without feeling cheap. The biggest mistake newcomers make is grabbing a generic, low-quality kit that does nothing but clog and sputter, which is a fast track to frustration. A well-chosen starter airbrush, on the other hand, can give you years of solid service.
A fantastic example is the AK Interactive Basic Line Airbrush. This tool was clearly designed with beginners in mind, offering a simple but effective design that helps you get the hang of the fundamentals. Its 0.3mm nozzle is perfect for learning trigger control, laying down primers, and applying smooth base coats.
The build quality is impressive for its price, and maintenance is refreshingly simple. Taking it apart for cleaning is intuitive—a critical feature when you're just figuring out how to properly care for your gear. While it doesn’t have the hair-splitting precision of pricier models, it’s a dependable workhorse to get you started. For a great entry-level option, check out the AK Interactive Airbrush Basic Line 0.3.
The Mid-Range: The All-Around Performer
This is the sweet spot where most serious modelers find their "forever" airbrush. These tools are a huge leap in performance, build quality, and precision over the entry-level stuff. They’re built for versatility, capable of handling fine detail and broad coverage with equal skill.
The undisputed champ in this arena is the Iwata-Medea Eclipse CS. Its reputation is built on one simple truth: it just works, and it works incredibly well. The Eclipse features a unique drop-in nozzle that’s both tough and easy to clean, making it far more durable than the delicate, easy-to-break screw-in nozzles on other airbrushes.
The Iwata Eclipse CS is legendary for its fantastic paint atomization. Its 0.35mm nozzle creates an incredibly smooth, even spray pattern that cheaper airbrushes just can't match, giving you a flawless finish right out of the box.
Where the Eclipse truly shines is its trigger response. The action is buttery smooth, giving you incredible control for feathering soft-edge camouflage or building up subtle weathering effects. It has plenty of precision for most detail work while still being able to lay down primer and varnish efficiently. It's the ultimate generalist.
High-End Precision Instruments
When your goal is competition-level detail and absolute control, you step into the world of high-end airbrushes. These aren't just tools; they're precision instruments, engineered for artists who demand the very best. They boast superior materials, tighter tolerances, and innovative features for micro-fine control.
The Harder & Steenbeck Infinity CRplus is a perfect example of German engineering at its finest. It's designed for one thing: ultimate precision. The trigger action is insanely responsive, letting you create lines as fine as a pencil mark. This is the tool you grab to paint individual rivets on a 1/72 scale aircraft or the pupils on a 28mm figure.
Let's put it head-to-head with the Eclipse in a common modeling scenario.
- Task: Painting a complex "mottling" camouflage pattern on a German WWII fighter.
- Iwata Eclipse CS: It can absolutely get the job done. The smooth trigger lets you create soft, small dots of paint, but controlling their exact size and placement takes a lot of practice.
- H&S Infinity CRplus: This is where it leaves everything else in the dust. The Infinity has a quick-set needle limiter right on the handle. You can dial in the exact amount of trigger travel, guaranteeing that every single dot is precisely the same size. This feature delivers unmatched consistency for repetitive detail work.
On top of that, the Infinity is built for lightning-fast maintenance. The nozzle is a self-centering, drop-in piece that needs no tools to remove, and the entire head assembly can be swapped in seconds. It’s a serious investment, but for modelers pushing the boundaries of the hobby, the control it offers is indispensable.
Building Your Complete Airbrushing System
An airbrush is a precision instrument, but it’s only as good as the system supporting it. Getting a flawless finish on your scale models depends just as much on your air source and paint choice as it does on the airbrush itself. A complete, well-matched setup is what turns a good tool into a great one.
The single most important piece of companion gear is the air compressor. It’s the engine that drives your entire airbrushing process, and its performance directly impacts your final results. Inconsistent airflow is the enemy of a smooth paint job, leading to sputtering, uneven coverage, and endless frustration.
Choosing the Right Air Compressor
Not all compressors are created equal, especially for the nuanced work of scale modeling. The key is to find a model that delivers clean, dry, and pulse-free air at a consistent pressure.
Here are the non-negotiable features you should look for:
- Air Tank: A compressor with a storage tank is essential. The tank holds a reserve of compressed air, which eliminates the pulsing airflow common with tankless "diaphragm" compressors. This ensures a perfectly steady, uninterrupted stream of air.
- Regulator and Pressure Gauge: This lets you dial in the exact air pressure (PSI) you need. Adjusting from 15 PSI for fine weathering to 25 PSI for a base coat is a critical part of airbrushing, and a regulator gives you that control.
- Moisture Trap/Water Separator: As air is compressed, moisture from the atmosphere condenses into water. A moisture trap is a small filter that captures this water before it can travel down your hose and blast onto your model, ruining your paint job.
Pro Tip: Invest in a quiet "piston-style" compressor designed for hobby use. These are significantly quieter than general-purpose workshop compressors, making your painting sessions much more pleasant, especially in a shared living space.
Understanding Paints for Airbrushing
With your air supply sorted, the next crucial element is the paint. The three main types used in scale modeling—acrylics, enamels, and lacquers—each have unique properties that affect how they spray, dry, and adhere to your model.
- Acrylics (e.g., Vallejo, Tamiya): Water-based and fast-drying, acrylics are the most popular choice for modelers due to their low odor and easy cleanup with water or a dedicated acrylic cleaner. They are perfect for hand-brushing details and airbrushing alike.
- Enamels (e.g., Testors, Humbrol): These are solvent-based paints that offer excellent adhesion and a very durable, hard finish. They take longer to dry, which can be an advantage for techniques like blending, but require mineral spirits for thinning and cleanup.
- Lacquers (e.g., Mr. Color): Known for their incredibly fine pigments and rapid drying times, lacquers produce a very smooth, tough finish. They are thinned with lacquer thinner and require excellent ventilation due to their strong fumes.
The growth in specialized paints reflects their importance; the global airbrush paint market was valued at USD 84.9 million and is projected to reach USD 132 million by 2031. This demand is driven by hobbyists who require high-quality, airbrush-compatible paints from brands like Vallejo and Createx Colors. You can discover more insights about this growing market on YouTube.
The Art of Thinning Paint
Properly thinning your paint is arguably the most important skill in airbrushing. Paint straight from the bottle is almost always too thick to spray smoothly, leading to clogs and a rough, "orange peel" texture. The universal goal is to achieve the consistency of milk.
This consistency allows the paint to atomize correctly, creating a fine, even mist. Each paint brand and even different colors within the same brand may require slightly different thinning ratios. For instance, Tamiya acrylics work beautifully when thinned 1:1 with their proprietary thinner, while Vallejo Model Air is often ready to spray directly from the bottle. Experimenting and learning the nuances of your chosen paints is a foundational skill. For more detailed guidance, check out our guide on how to thin acrylic paint.
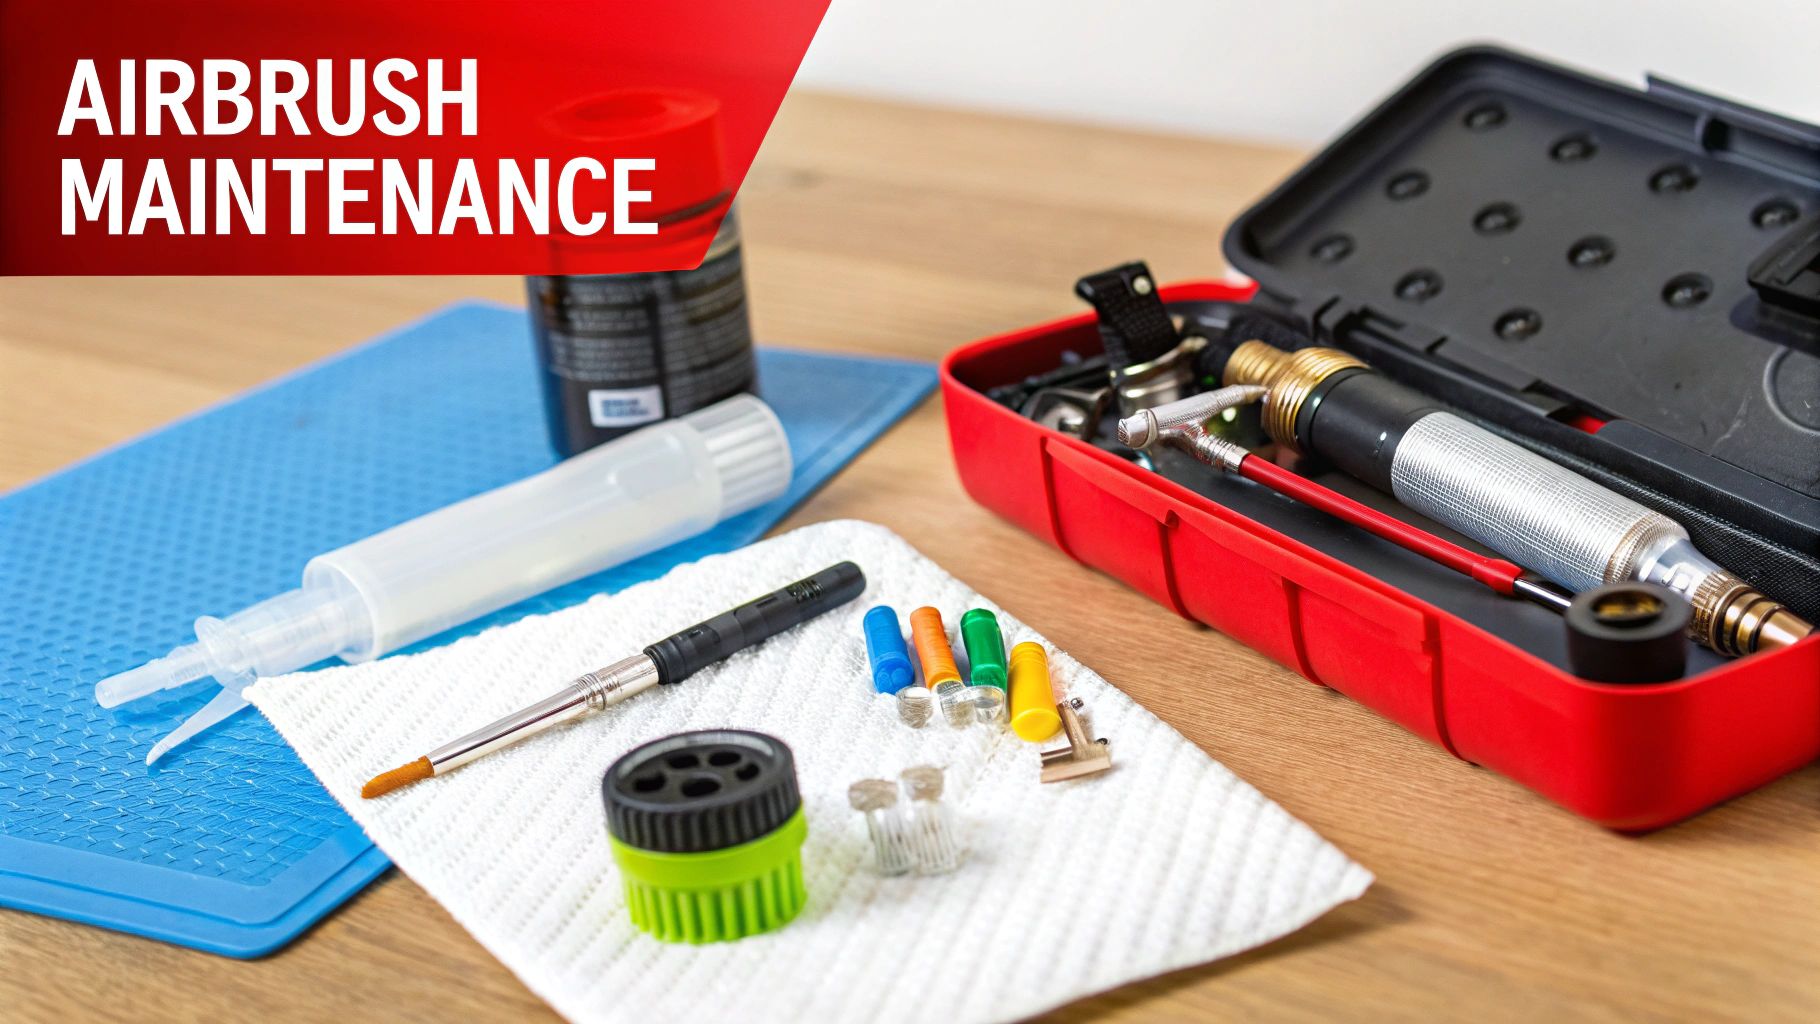
Essential Airbrush Maintenance and Troubleshooting
Let's be honest: even the most expensive, high-performance airbrush is just a fancy paperweight if it's gummed up with old paint. Getting into a consistent, disciplined maintenance habit is the single most important thing you can do to get flawless results and protect your investment.
Think of cleaning not as a chore you do after painting, but as part of the painting process itself. A few minutes of care after each session will save you hours of frustrating deep cleaning and repair work down the road. The goal is simple: don’t let paint dry inside the airbrush.
Daily and Periodic Cleaning Routines
Good maintenance really boils down to two levels of cleaning. First is the quick flush you do between colors and after every session. The second is a more involved deep clean you'll tackle periodically.
Daily Cleanup (After Every Session):
- Dump out any leftover paint from the cup.
- Add a few drops of airbrush cleaner and spray it through until the stream is perfectly clear.
- Wipe the inside of the color cup and the needle tip with a cotton swab or small brush dipped in cleaner.
- Give it one last blast of air to make sure the nozzle is clear.
That’s it. This simple routine takes less than two minutes but is the most effective way to stop paint from building up. For stubborn acrylics or lacquers, a specialized cleaner makes a huge difference. A powerful solvent like Alclad II Airbrush Cleaner is formulated to dissolve tough pigments that water or regular thinners just can't handle.
Periodic Deep Cleaning:
Every few weeks, or after a particularly long project, it’s time for a full teardown. This means carefully disassembling the airbrush—including removing the needle and nozzle. Soak the metal parts in cleaner and use micro-brushes to gently scrub away any caked-on residue, paying close attention to the inside of the nozzle and air cap.
A classic mistake is over-tightening the nozzle when you put it all back together. These are delicate brass components that can strip or crack easily. Tighten it gently until it’s just snug. No extra muscle needed.
Solving Common Airbrush Problems
Even with perfect cleaning habits, things will eventually go wrong. Here’s a quick guide to diagnosing and fixing the most common headaches.
Problem 1: Paint Bubbling in the Cup
This is the tell-tale sign of an air leak. 99% of the time, the cause is a loose nozzle or head cap. Gently tighten it and see if the bubbling stops. If it doesn’t, the nozzle’s O-ring or seal might be damaged and needs to be replaced.
Problem 2: Inconsistent or Pulsing Spray
If you have a tank compressor, this usually points to "tip dry." This is when paint starts drying on the very tip of the needle, messing with the airflow. To prevent it, keep a small brush dipped in cleaner handy and gently wipe the needle tip every few minutes while you're painting.
Problem 3: A Bent Needle Tip
A bent needle is a project-killer. It will make your airbrush spray off-center, sputter, or create a weird spiderweb pattern. Needles are incredibly delicate; dropping your airbrush just once can be enough to bend the tip. Inspect it closely. If it’s bent, don't try to straighten it—you’ll likely make it worse. Just replace it.
Frequently Asked Questions About Model Airbrushing
Jumping into airbrushing always brings up a few questions, especially when you're chasing that perfect, glass-smooth finish. Let's tackle some of the most common ones that modelers run into—the answers here should help you clear those hurdles and get back to building.
Do I Really Need a Compressor with a Tank?
You can get by with a tankless compressor, but having one with a tank is a game-changer for scale modeling. The tank acts as a reservoir, giving you a perfectly consistent, pulse-free stream of air. That's the secret to an ultra-smooth paint job.
It also means the motor doesn't have to run constantly, which makes for a quieter workspace and a much longer life for your compressor. For any kind of fine detail work, the steady pressure from a tank is a massive advantage.
What Is the Best Air Pressure for Scale Models?
There's no single magic number, since the ideal PSI really depends on your paint's consistency, your nozzle size, and what you're trying to do. That said, a great starting point for most thinned acrylics is somewhere in the 15-25 PSI range.
- For super fine lines or delicate weathering, you’ll want to dial it down to 10-15 PSI.
- When you're laying down primer or a clear coat over larger areas, you can bump it up to 25-30 PSI.
Always, always test your settings on a scrap piece of plastic or an old model first. It’s the only way to find the sweet spot for your particular setup.
Remember, air pressure is only half the battle. Your paint consistency is the other critical variable. Thinner, ink-like paint needs less pressure, while thicker fluids might need a bit more PSI to atomize correctly.
Can I Use One Airbrush for Everything?
Technically, yes, especially if you have a versatile workhorse with a 0.3mm to 0.5mm nozzle. The catch? You have to be absolutely religious about cleaning it between different types of paint.
Primers, for example, tend to be thicker and can be tough on the delicate internal parts of an airbrush. You can't just swish some cleaner through; you need a deep clean before switching to finely-thinned colors for detail work. It’s why so many seasoned modelers end up buying a cheaper, tougher airbrush just for priming and varnishing.
How Do I Stop My Airbrush from Clogging?
Clogs are the bane of every modeler's existence. They're almost always caused by one of two things: paint that's too thick, or "tip dry," which is when paint dries right on the needle tip and blocks the flow.
To prevent this, make sure your paint is thinned to the consistency of skim milk. Working in a well-ventilated but not-too-drafty area can also slow drying time. During long sessions, keep a small brush dipped in airbrush cleaner handy and gently wipe the needle tip every few minutes. But your best defense is a good offense: a thorough cleaning after every single use.
For all the tools, paints, and airbrushing supplies you need to bring your models to life, explore the massive selection at Fusion Scale Hobbies. Find everything from starter kits to professional-grade equipment at https://fusionscalehobbies.com.