


Every great model railroad starts with two make-or-break decisions: picking your scale and sketching out a track plan. These first moves are the foundation for everything that follows. They dictate how much space you’ll need, what your budget will look like, and what you can actually do with your trains.
Get these right, and you're setting yourself up for a rewarding project. Rush them, and you're headed for frustration.
Your First Decisions in Model Railroading
Before a single piece of track is laid or benchwork is built, your layout exists only as an idea. This is arguably the most critical phase—turning the vision in your head into a practical, buildable blueprint. Far too many beginners jump ahead, only to find their plan is too ambitious for their space or too simple to stay interesting.
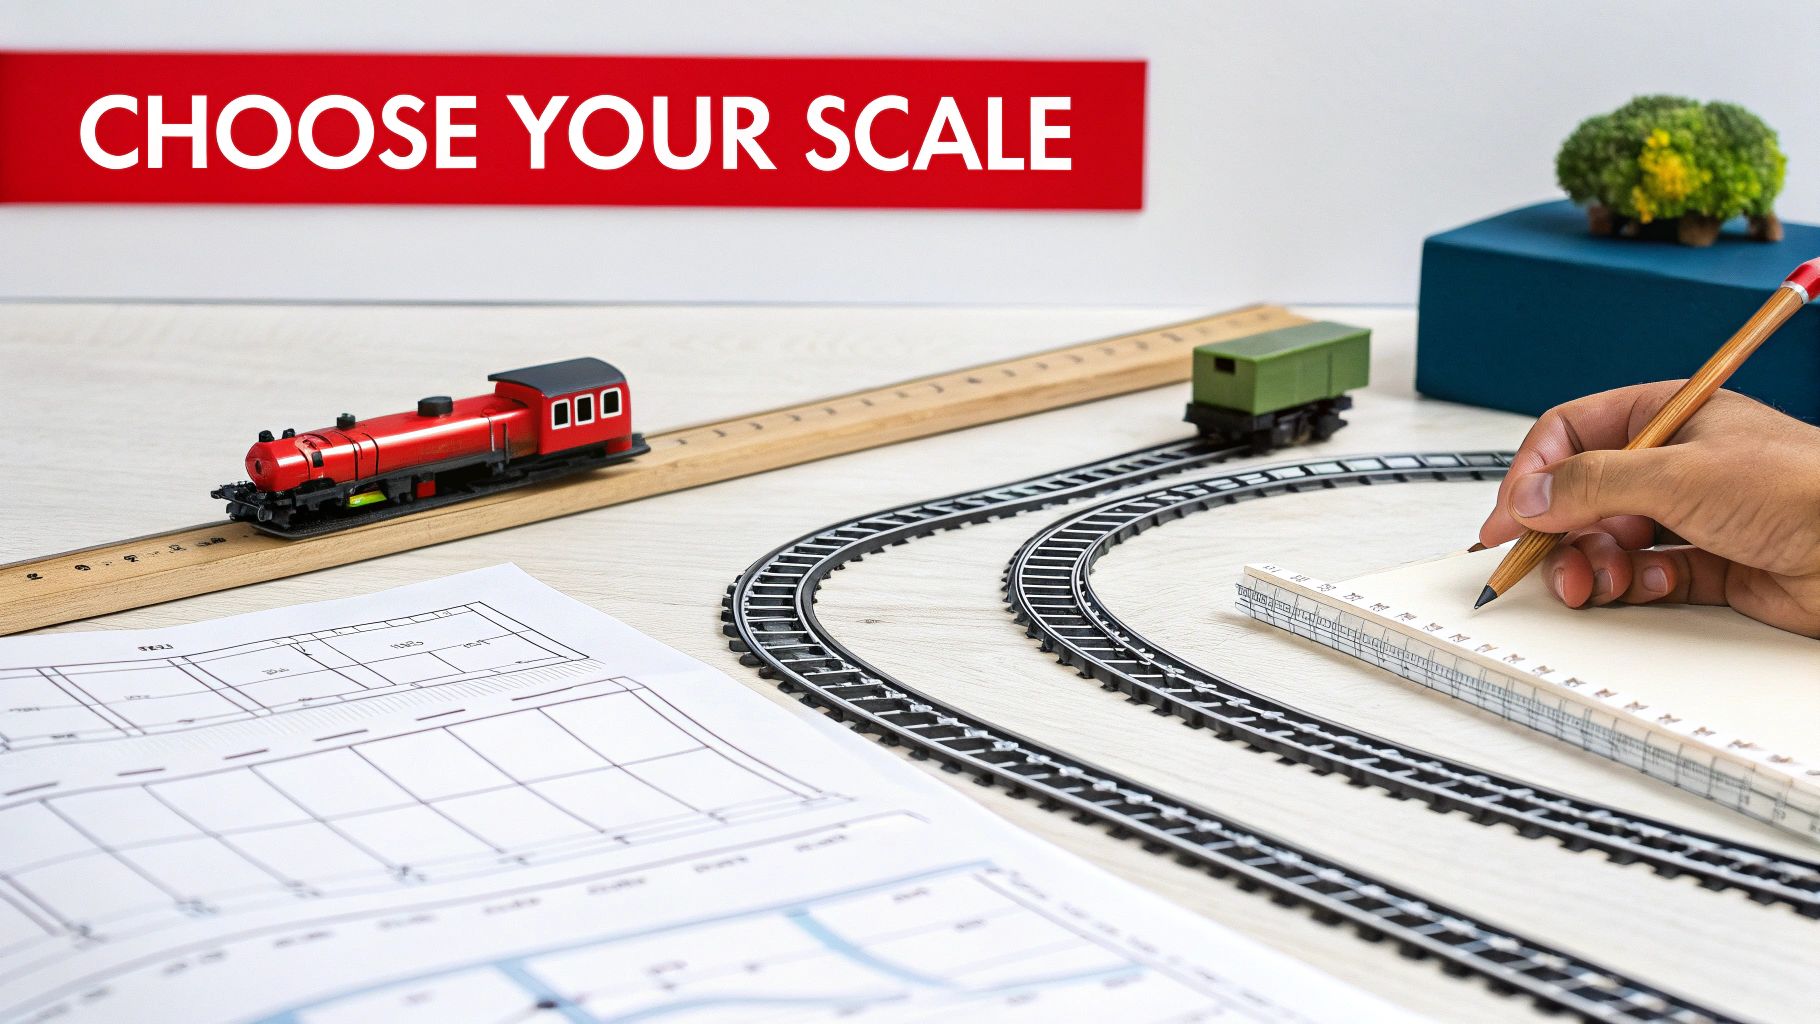
Your first big choice is scale, which is just the ratio of your model's size to its real-world counterpart. This one decision has a ripple effect on everything else, from the level of detail you can pack into a scene to the sheer amount of railroad you can fit in your room.
The amount of space you have is the biggest reality check here. Whether it's a spare bedroom, a corner of the basement, or just a single shelf, your layout's footprint has to match the scale you choose.
Choosing the Right Scale for Your Space
The most common scales each have their own personality and perks. HO scale (1:87) is the undisputed king for a reason. It's the "just right" option—big enough for great detail, but small enough to build a respectable layout in a modest space. Plus, it has the largest selection of trains, buildings, and accessories on the market, hands down.
If you're tight on space, N scale (1:160) is a fantastic choice. You can pack roughly twice the railroad into the same footprint as HO. This makes it perfect for modeling vast, sweeping landscapes or complex industrial yards that would be impossible in a larger scale.
On the other hand, if you've got the room and love big, hefty models with incredible detail, O scale (1:48) delivers an impressive presence that’s hard to ignore.
To help you visualize the differences, here’s a quick breakdown of the most popular scales.
Model Railroad Scale Comparison
This table compares the top scales to help you find the best fit for your space, budget, and modeling goals.
| Scale | Ratio | Best For | Space Requirement | Detail Level |
|---|---|---|---|---|
| HO | 1:87 | All-around versatility, widest product selection | Moderate | High |
| N | 1:160 | Expansive scenes, complex track plans in small areas | Small | Good |
| O | 1:48 | Maximum detail, impressive size, realistic operation | Large | Excellent |
| G | 1:22.5 | Garden railways, extreme durability, outdoor use | Very Large | Good |
| Z | 1:220 | "Briefcase" layouts, fitting a layout anywhere | Very Small | Fair |
Ultimately, the best scale is the one that fits your vision and your reality. Our in-depth guide can help you dig deeper into the nuances of model railway scales explained in more detail.
Don't just think about the layout you want now. Think about five years from now. If you might move or want room to expand, choosing a smaller scale or a modular design is a much smarter long-term play.
Designing a Track Plan That Works
With a scale chosen, it's time to design your track plan. This is your roadmap. It determines how your trains run, where industries are located, and how the whole scene flows together. A great track plan finds the sweet spot between operational fun, visual appeal, and something you can actually build.
Many newcomers start with a basic continuous loop. It's simple, and it's perfect for just watching the trains run. But trust me, the fun really starts when you add a few sidings for local industries, a small yard to shuffle cars, or a passing track to let another train go by.
Consider a few popular track plan concepts:
- Loop-to-Loop: Often called a "dog bone," this design gives you continuous running but breaks up the visual monotony of a simple oval.
- Point-to-Point: This style models a segment of a larger railroad, where trains travel from one designated spot (like a town or a staging yard) to another. It’s perfect for layouts focused on realistic operations.
- Shelf Layout: Ideal for narrow rooms, these layouts run along one or more walls. They are typically point-to-point and force you to focus on detailed, close-up scenery.
The best way to begin is by grabbing a pencil and paper and just sketching. Don't worry about perfection. Think about what you want to achieve. Are you modeling a real-life location you love, or are you creating a freelance world from your imagination? Answering that one question will give your design direction and make sure the final plan is one you’ll be excited to build.
Building a Stable Layout Foundation
Every great model railroad starts from the ground up, and that means building a rock-solid foundation. This stage, what we call benchwork, is literally the skeleton that supports your entire miniature world. A stable, level, and strong frame prevents all sorts of operational headaches later on, like track dips that cause derailments or structural sags that ruin your carefully crafted scenery.
Think of your benchwork as more than just a table; it's the first real piece of your landscape. This is where your track plan finally leaps off the page and into three-dimensional reality. Taking the time to build it right is one of the best investments you can make for the long-term enjoyment of your railroad.
You're getting into the hobby at a great time, especially in North America, where a massive community and retail presence make it easier than ever to get started. In fact, North America makes up roughly 50% or more of the entire global model train market. You can dig into more of the data on market trends in these model train industry insights and see just how vibrant the community you're joining really is.
Choosing Your Benchwork Style
When it comes to building that frame, two methods really dominate the hobby. Each has its own perks, and your choice will influence how you build scenery and how easily you can move or expand your layout down the road.
The classic approach is the open-grid frame. This method uses a lattice of 1x4 lumber to create a base that’s both strong and surprisingly lightweight. Instead of a flat table, you build your scenery up from the grid using risers and inclines. This makes it incredibly easy to create realistic, varied terrain like hills, valleys, and riverbeds. It's the go-to for layouts with complex topography.
The other popular option is modular benchwork. This style has become a favorite for modelers who might need to move or want to take their layout to shows. Each module is a self-contained box or frame, usually built to a standard size, that bolts securely to its neighbors. It’s perfect for building a layout in manageable sections and guarantees portability without having to tear anything apart.
Selecting Subroadbed Materials
Once your frame is built, the next layer is the subroadbed—the flat surface where your roadbed and track will ultimately sit. Your choice of material here impacts everything from sound deadening and track installation to how you shape your scenery.
Here are the most common players:
- Plywood: The old standby, typically 1/2-inch or 3/4-inch thick. It's strong, stable, and holds screws like a champ, making it perfect for mounting turnout motors and other hardware from underneath.
- Extruded Foam Insulation Board: This rigid foam is a game-changer. It's incredibly lightweight and ridiculously easy to carve. You can shape rivers, ditches, and other scenic contours directly into it, which is why it’s so popular with modelers who prioritize landscaping.
- Homasote: This is a dense, fibrous building material famous for its amazing sound-deadening qualities. It also holds track spikes incredibly well, a huge plus if you’re planning on hand-laying your track.
A fantastic and popular combination is to use a plywood base topped with a layer of extruded foam. This gives you the structural strength of wood and the scenic flexibility of foam—the best of both worlds.
From Blueprint to Benchwork
With your materials picked out, it's time to bring that track plan to life. A simple and effective way to start is by transferring your full-size plan right onto the subroadbed. You can draw a grid on your paper plan and a matching one on the benchwork, then copy the design square by square.
From there, you can start thinking about elevation. This is where risers—small blocks of wood or foam—come in. By attaching risers of different heights to your open-grid frame, you can create the gentle inclines and declines that make a railroad look and feel real.
A crucial rule of thumb is to keep your mainline grades below 2%. That translates to a two-inch rise over 100 inches of run. Anything steeper, and your locomotives will struggle to pull their trains. Getting this foundation right is the key to a reliable, visually stunning model railroad.
Laying Track and Wiring for Reliable Operation
Once your benchwork is built and ready, it's time for the really exciting part: bringing your railroad to life with track and power. This is where your paper plans start to look and feel like a real, functional railway.
The key to success here is all about patience and precision. I've seen countless modelers rush through this phase only to spend years chasing down derailments, dead spots, and electrical gremlins. Take your time now, and you’ll be rewarded with a layout that runs like a dream. Smooth trackwork and clean wiring are the bedrock of an enjoyable operating session.
This infographic gives you a great visual of how the foundational layers come together before the track even goes down.
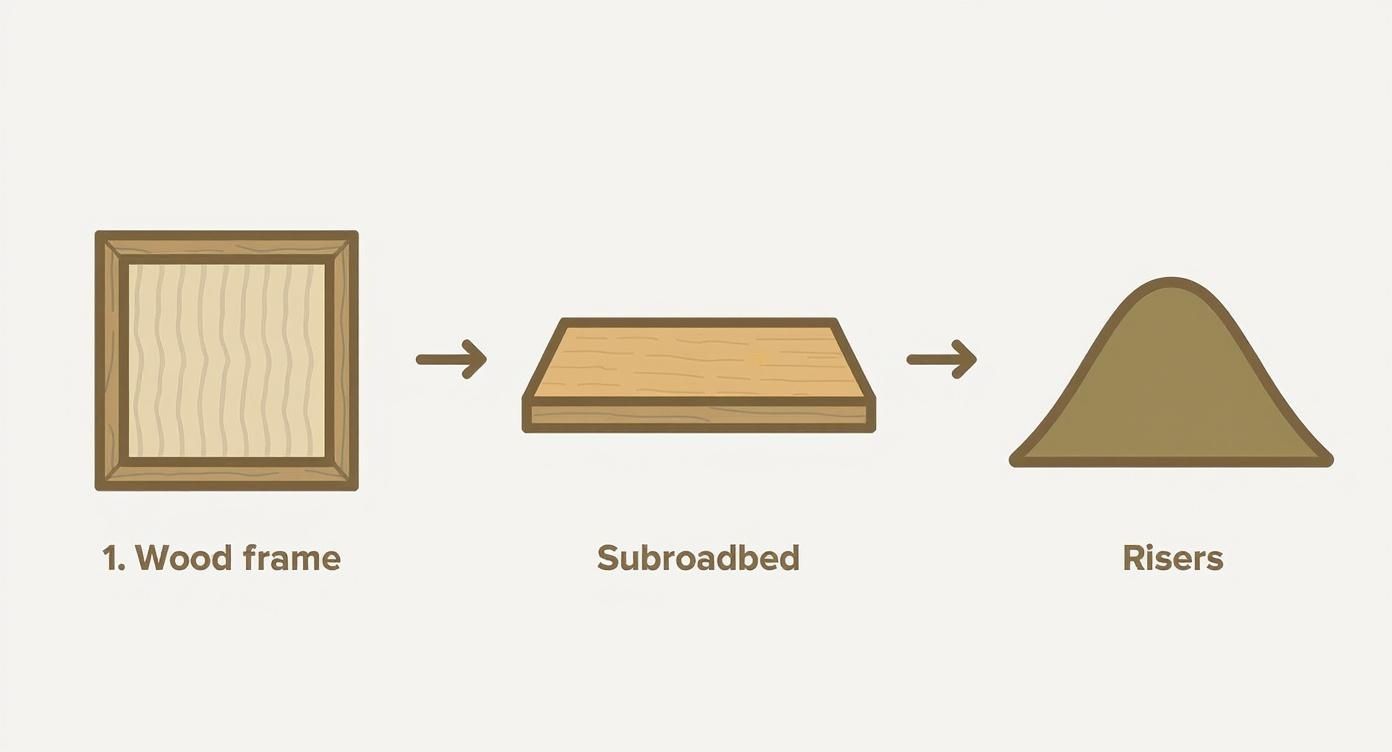
As you can see, the basic frame evolves into a contoured landscape, creating the perfect subroadbed for the track we're about to install.
Installing Track for Flawless Performance
Before you lay a single piece, you have to decide what kind of track you’re going to use. This choice affects both the look of your railroad and how you’ll install it.
- Sectional Track: This is the stuff that comes in pre-formed straight and curved pieces. It's fantastic for beginners or temporary holiday layouts because it just snaps together. The downside? All those joints can become electrical headaches down the road.
- Flex Track: This is the go-to for most serious modelers. It comes in long, flexible strips (usually three feet) that you can bend into beautiful, flowing curves. You get far fewer rail joints and a much more realistic appearance.
- Hand-Laid Track: For the ultimate in realism, some folks lay their own track by spiking individual rails to wooden ties. It offers unmatched control over your track geometry, but it’s a time-consuming craft best saved for when you have a few layouts under your belt.
For the vast majority of projects, flex track hits that sweet spot between realism and ease of use.
When you’re laying it, always focus on creating smooth easement curves. Think about it—real trains don't just snap from a straight line into a sharp turn. The track gradually transitions. If you mimic this on your layout, your trains will look far more realistic gliding through turns, and you'll virtually eliminate derailments caused by abrupt changes in direction.
A critical tip I learned the hard way: always check your work. Before permanently fastening any track, use a straightedge to check for kinks at the joints. Then, run your fingers along the tops of the rails. You’ll be surprised at the tiny bumps and misalignments you can feel, and catching them now saves a ton of frustration later.
Powering Your Railroad DC vs DCC
With track in place, you need a way to make the trains go. The electrical system is the central nervous system of your layout, and your choice here will define your entire operating experience.
The old-school method is Direct Current (DC), or analog, control. With a DC system, you control the train’s speed and direction by changing the voltage on the track. It’s simple, reliable, and affordable—a great starting point for many.
The modern standard is Digital Command Control (DCC). With DCC, you send full, constant power to the entire track. Every locomotive has a tiny computer chip, called a decoder, that listens for digital commands from your controller. This lets you control the speed, direction, lights, and sound of every single engine independently, even if they're on the same piece of track.
Choosing Your Control System DC vs DCC
Deciding between DC and DCC is a huge step. Each has its pros and cons, depending on your goals and budget. Here’s a quick breakdown to help you compare.
| Feature | DC Control (Analog) | DCC Control (Digital) |
|---|---|---|
| Train Control | One train per electrical block | Independent control of multiple trains on the same track |
| Wiring | Can get complex; requires isolated blocks for multiple trains | Generally simpler; a power bus feeds the whole layout |
| Features | Basic speed and direction control | Advanced control of lights, sound, and other functions |
| Cost | Lower initial investment | Higher initial cost for the system and locomotive decoders |
| Realism | Limited operational realism | High operational realism and flexibility |
Ultimately, DCC offers a level of control and realism that is hard to beat, allowing you to operate your layout much like a real railroad. DC is perfect for smaller layouts or for those who prefer straightforward, classic operation.
For a much deeper dive, you can explore the fundamentals in our complete guide on Digital Command Control for model trains, which really breaks down how the technology works.
Essential Wiring for a Healthy Layout
Whether you choose DC or DCC, good wiring practices are non-negotiable. I can't stress this enough: poor wiring is the number one source of problems on a model railroad. The whole goal is to deliver consistent, clean power to every single inch of your track.
The best way to do this is with a power bus. It’s pretty simple: run a pair of heavy-gauge wires (I recommend 14-gauge or 12-gauge) under your layout, following your track plan. From there, you connect smaller feeder wires (around 22-gauge) from the rails down to this main bus every three to six feet.
Soldering every connection is the only way to go for long-term reliability. This setup bypasses all those rail joiners, which can work their way loose over time and cause those maddening dead spots.
By building a solid electrical foundation and laying smooth, carefully aligned track, you're setting yourself up for success. You’ll create a railroad that is a genuine joy to operate, letting you focus on the fun of running trains instead of constantly troubleshooting.
Crafting a Believable Miniature World
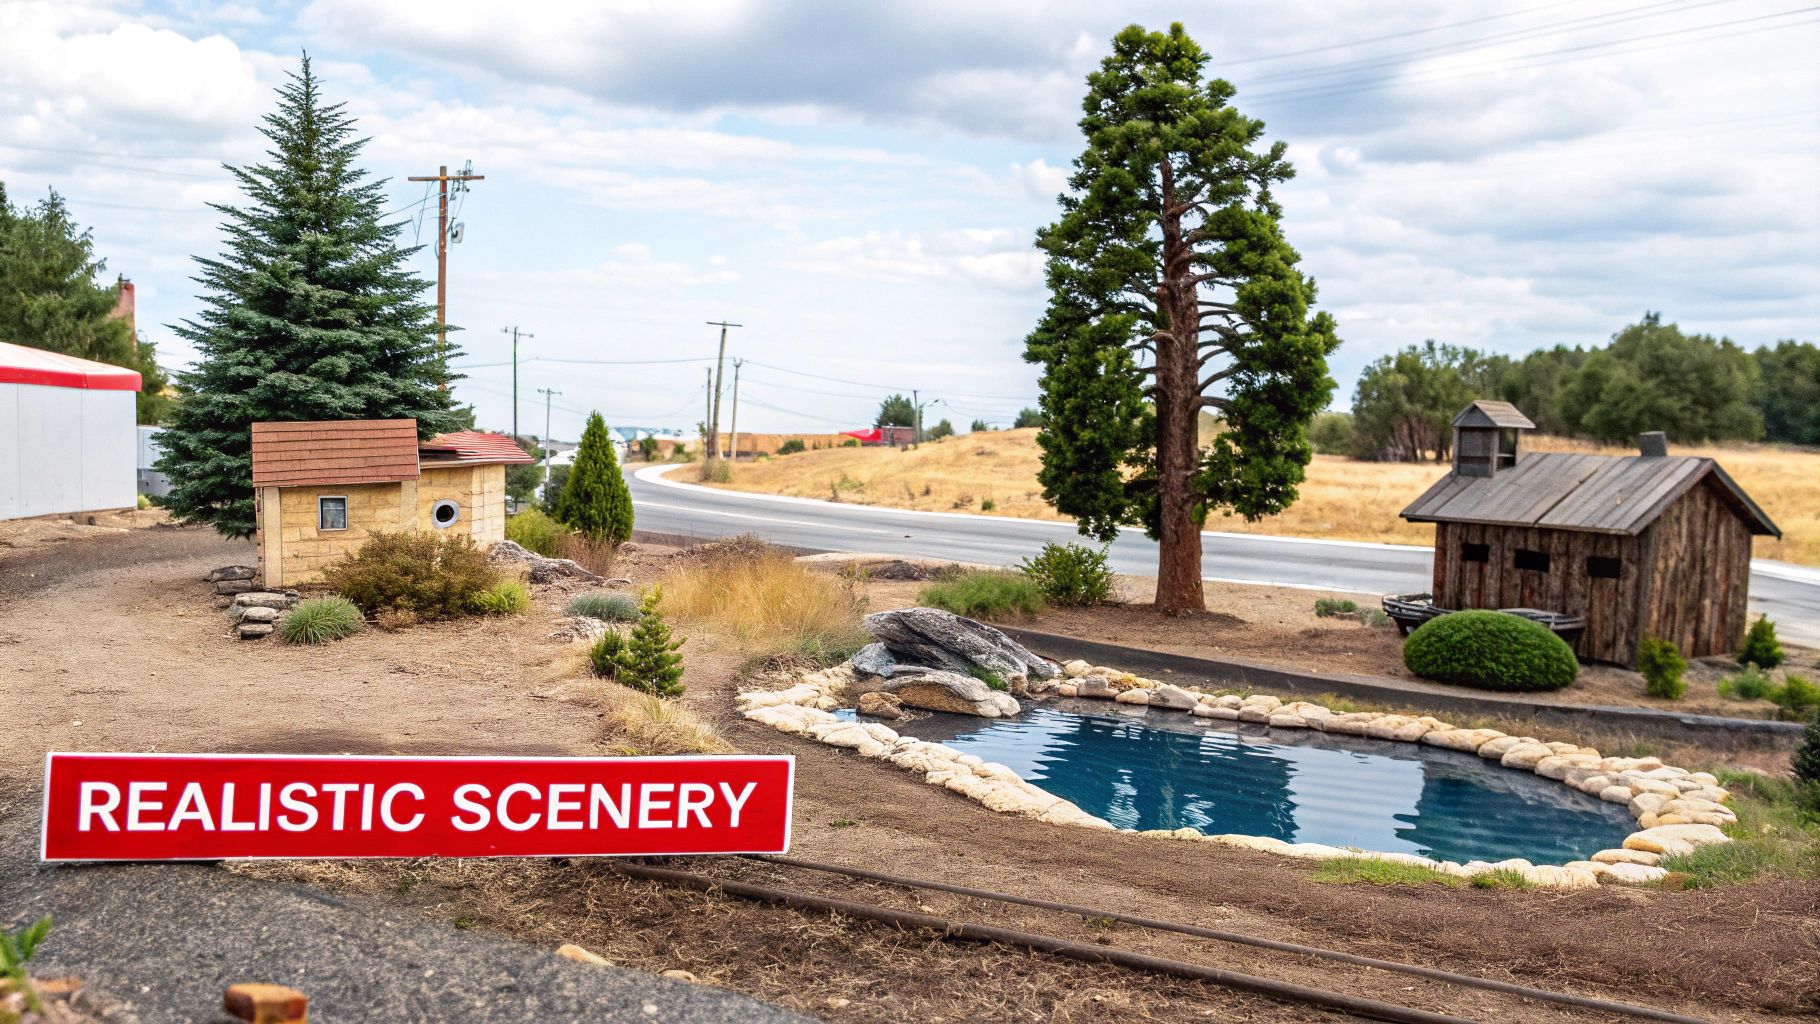
With a solid foundation and reliable trackwork in place, you’ve essentially built the stage. Now, it's time for the performance. Scenery is what elevates a layout from a loop of track on a board into a miniature world that breathes, lives, and tells a story.
This is where your inner artist finally gets to meet your inner engineer. The real goal here is to create a sense of place. Are you modeling the arid deserts of the Southwest or the dense, damp forests of the Pacific Northwest? Every single element, from the texture of the ground to the style of a building, helps build that narrative.
And don't worry, you don't need to be a professional artist to pull this off. Modern materials have made achieving absolutely stunning results easier than ever before.
Building Realistic Landforms
The first move in creating believable scenery is shaping the earth itself. The real world is rarely flat, and adding varied topography is the single fastest way to create visual interest. You're aiming to cover your open-grid benchwork or foam base with a hard, paintable "shell."
Two of the most popular methods for this are:
- Plaster Cloth: Think of this as medical-grade gauze that’s been impregnated with plaster. Just dip strips in water and lay them over a supporting structure—wadded-up newspaper or a web of cardboard strips works great—to create a surprisingly strong and lightweight landform.
- Sculpting Foam: Carving hills and rock faces directly from extruded foam insulation board gives you incredible control. You can use hot wire cutters, serrated knives, and shaping rasps to create just about any contour you can imagine.
Once your landforms are hard and locked in place, a base coat of earth-toned latex paint is all you need to prep the surface. I usually grab a flat, light tan or gray paint to use as a universal "dirt" color.
Applying Convincing Ground Cover
This is the stage where your landscape really springs to life. A simple application of ground cover can transform that barren plaster shell into a scene that feels real. I always start with a base layer of fine dirt or sand, locked down with some diluted white glue, before I even think about adding textures like grass and foliage.
A key to realism is thinking in layers. Real landscapes are messy and varied. Start with your base dirt color, then add different shades of ground foam, static grass, and small clumps of foliage to break up the uniformity.
For creating those picture-perfect fields and grassy areas, a static grass applicator is a game-changer. It’s a tool that uses a static charge to make tiny fibers stand straight up, perfectly mimicking individual blades of grass. It's a small investment that delivers truly professional-level results.
When you're ready to get serious about those fine details, our diorama supplies guide will give you a complete rundown of the essential materials for creating hyper-realistic textures and effects.
Adding Details That Tell a Story
With the basic landscape in place, the real fun begins. Details are what give your layout its soul and make a scene feel like it’s actually inhabited.
Here are a few elements that have a massive impact:
- Trees: Whether you make your own from twisted wire or use ready-made ones, trees are non-negotiable. Vary the height, color, and type to match your chosen region and season. A few highly detailed "hero" trees in the foreground can create a powerful illusion of a dense forest behind them.
- Water Features: Modeling a creek, river, or pond can quickly become a stunning focal point. Most modelers turn to a two-part epoxy resin, poured in thin layers to create a convincing illusion of depth. Adding ripples and painting the "riverbed" first will absolutely sell the effect.
- Roads and Ballast: Don't forget the infrastructure! Applying fine-grained ballast along your track and creating realistic asphalt or gravel roads grounds your railroad in a world people can recognize.
Integrating Structures and Buildings
Structures give your railroad a reason to exist. They are the destinations—the industries, towns, and depots—that justify your railroad’s entire operation. Whether you’re building from a plastic kit or scratch-building from raw materials, the trick is making them look like they belong there.
This is mostly achieved through two simple techniques:
- Painting: Even the best plastic kit looks like a toy straight out of the box. A careful paint job using flat, muted colors appropriate for your era is the essential first step.
- Weathering: Nothing in the real world is perfectly clean. Weathering is simply the art of making your models look used and abused by the elements. Applying subtle washes of thin, dark paint can bring out tiny details and simulate grime, while weathering powders can create incredibly realistic dust and rust effects.
For anyone passionate about historical accuracy, exploring things like the history of the Indian Pacific Railway and other real-world lines can provide fantastic inspiration. Understanding the types of structures and industries they served will bring an incredible layer of authenticity to your miniature world.
By layering all these scenic elements and sweating the small details, you'll elevate your project from a simple track on a board to a captivating, believable world that invites everyone to lean in for a closer look.
Choosing Trains and Operating Your Railroad
Now for the best part. After all the planning, building, and painting, it's finally time to bring your world to life with the stars of the show: the trains. Picking out your first locomotives and rolling stock is one of the most satisfying moments in the whole process. This is where your chosen era, theme, and location stop being abstract ideas and become tangible, moving pieces of your miniature empire.
https://www.youtube.com/embed/DCk2tBMQWNQ
The goal here isn’t just to collect cool-looking models. It's to assemble a fleet—a roster—that feels like it belongs on your layout. A massive, modern Union Pacific freight train hauling shipping containers would look completely out of place chugging through a 1950s Appalachian coal town. Building a cohesive roster that tells a consistent story is what elevates a layout from a simple collection of toys to a believable, functioning transportation system.
Assembling Your Roster
When you're starting out, the sheer variety of available models can feel pretty overwhelming. The best way to cut through the noise is to go back to the core decisions you made during the planning phase. What railroad are you modeling? What year is it? What kinds of industries does your railroad serve?
Answering those questions gives you a clear shopping list. For instance, if you're modeling a sleepy 1970s branch line in the Midwest, your focus will naturally narrow down to things like four-axle diesel locomotives, 40-foot boxcars, and covered hoppers for hauling grain. That's a much more manageable starting point than just browsing for anything that catches your eye.
As you look at models, keep a few things in mind:
- Quality and Detail: Models are generally sold "ready-to-run" but come in different tiers of detail. Some have incredibly fine, separately applied grab irons and see-through walkway grating, while others are more basic and durable.
- DCC Compatibility: If you went with a DCC system, look for models labeled as either "DCC-equipped" (meaning a decoder is already installed) or "DCC-ready" (which means it has a simple plug-and-play socket to add your own decoder later).
- Era Appropriateness: This is a big one. Pay close attention to the paint schemes and lettering. A locomotive's paint job can place it in a very specific timeframe, sometimes down to a single year or two.
Keeping Your Fleet in Top Condition
Just like their full-sized cousins, model trains need a little tune-up now and then to run their best. A bit of proactive care goes a long way and will save you from a lot of frustrating operating problems down the road.
The two most common maintenance tasks are cleaning your wheels and lubricating the moving parts. Locomotive wheels constantly pick up tiny bits of dust, oil, and grime from the track, which can mess with electrical pickup and cause stuttering, jerky operation. A quick wipe with a cotton swab and a little isopropyl alcohol is usually all it takes to fix it.
Every locomotive manufacturer includes a diagram showing exactly where to apply tiny amounts of hobby-specific lubricant. Fight the urge to over-oil; one misplaced drop can attract a ton of dirt and cause more problems than it solves.
Of course, track cleaning is just as crucial for reliable electrical contact. There are lots of ways to do this, from abrasive cleaning blocks (use these sparingly, as they can scratch your rails) to special track-cleaning cars that you can run as part of a regular train to keep things pristine.
Beyond Running in Circles
Watching a train loop around the track is fun for a little while, but the real, lasting enjoyment of this hobby comes from purposeful operation. Simulating the actual work of a real railroad transforms your layout from a static diorama into a dynamic, living puzzle. This is where you stop being a spectator and truly become part of the world you’ve built.
You're no longer just watching a train go by—you're the engineer, the dispatcher, and the yardmaster, all rolled into one.
Simulating Real Railroad Work
The most popular way to add purpose and realism to your operations is with a car card and waybill system. It sounds more complicated than it is. At its core, the concept is simple: every piece of rolling stock gets a "car card," which is like its vehicle registration. This card slides into a little sleeve along with a "waybill"—a slip of paper that gives the car its orders.
A waybill for a boxcar might read:
- Load: Pick up this car at the warehouse siding.
- Move: Haul it over to the plastics factory in the next town.
- Unload: Spot the car at the factory's loading dock.
- Return: Move the now-empty car back to the classification yard for its next assignment.
This simple system creates a genuine reason for every move a train makes. You're no longer just running in a circle; you're delivering goods, serving industries, and managing your fleet. It turns a quick ten-minute joyride into an engaging, hour-long operating session filled with switching challenges and strategic thinking, making the whole process of building a model railroad feel truly complete.
Got Questions? We've Got Answers for New Model Railroaders
Jumping into any new hobby feels like learning a new language, and model railroading is no different. You're bound to have questions, from "How much is this really going to cost me?" to "Why does my train keep jumping the track right there?"
Getting straight, honest answers can mean the difference between a rewarding hobby and a pile of frustration in the corner of your basement. Let's tackle some of the most common questions we hear from folks just starting their model railroad journey.
What Does a Starter Layout Really Cost?
This is the big one, isn't it? The honest-to-goodness answer is: it's completely up to you. You can absolutely get your start with a simple, ready-to-run train set on a 4x8 sheet of plywood for as little as $300 to $500. That usually gets you a locomotive, a few cars, a basic oval of track, and a power pack.
But if you're aiming for a more permanent layout with better track, modern DCC control, and the first hints of scenery, you should probably budget closer to $800 to $1,500. That figure gives you room for benchwork lumber, a solid DCC starter system, higher-quality rolling stock, and your initial scenery materials. Just remember, this is a hobby you can grow over years—you don't need everything on day one.
The Bottom Line: You're in control of the cost. Start with a quality train set and a solid plan. You can always upgrade your control system or track down the road as your skills and budget expand.
How Do I Stop My Trains from Derailing?
Bad trackwork is the number one fun-killer in this hobby. Derailments, stalls, and power interruptions almost always trace back to a handful of common mistakes that are surprisingly easy to avoid with a bit of patience.
Here are a few pointers to make your trackwork bulletproof from the get-go:
- Smooth Out Those Curves. Never try to force flex track into a sharp bend. Your goal is a smooth, gentle arc. Any abrupt kinks or sudden transitions are practically guaranteed to send your cars flying.
- Keep Your Joints Level. Where two pieces of track meet, the railheads must be perfectly level. Run your finger over the joint—if you feel a bump or a dip, your trains will feel it too. A little filing can work wonders here.
- Solder Your Feeder Wires. Rail joiners are great for alignment, but they are notoriously bad at conducting electricity reliably over the long term. For rock-solid power, solder feeder wires directly to the rails every three to six feet.
What’s the Smartest Way to Plan for a Bigger Layout?
Thinking about future expansion right from the beginning is one of the best decisions you can make. The most flexible and effective way to do this is to build your layout in modules.
A modular design means your layout is built in smaller, self-contained sections that simply bolt together. This approach lets you build your railroad in manageable chunks, one piece at a time. When you're ready to add on, you just build a new module and attach it. It also makes moving a layout a thousand times easier—just unbolt the sections and go, without destroying all your hard work. By planning for growth, you build a layout that can evolve right along with you.
At Fusion Scale Hobbies, we carry everything you need to get started and keep growing in this amazing hobby. From your first locomotive to advanced weathering supplies, explore our massive selection at https://fusionscalehobbies.com.