


Before a single drop of paint touches plastic, you’ve already laid the groundwork for a stunning custom Gunpla. It all comes down to the tools you choose. Having the right arsenal isn’t about buying the most expensive gear; it’s about picking reliable, effective tools that save you from frustration and set you up for a flawless finish.
A truly great paint job starts long before you even think about cracking open a paint pot.
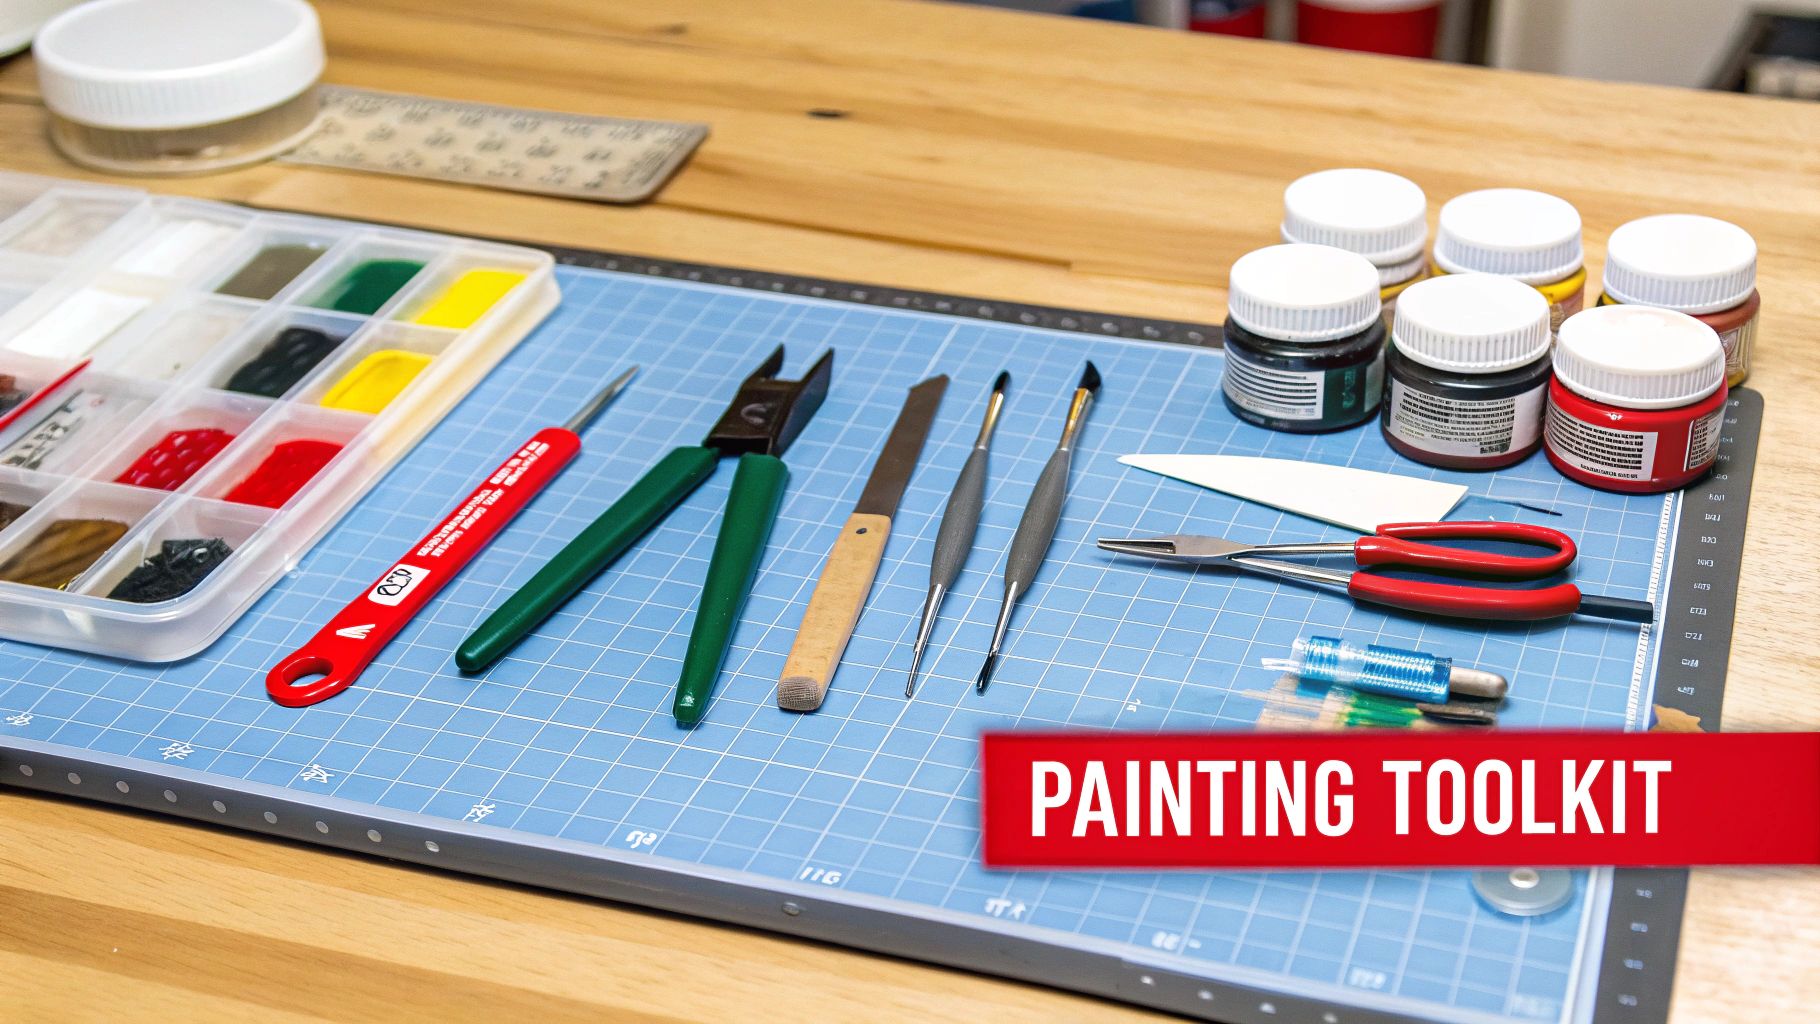
Building Your Gunpla Painting Toolkit
Jumping into Gunpla customization connects you with a massive global community. It's a hobby with serious staying power—the market value is estimated to hit $800 million globally in 2025. That number reflects a passion that keeps growing, fueled by awesome new anime and constant innovation in kit engineering.
Your journey starts by gathering a core set of supplies. Think of it as building a foundation. Every tool has a specific job that contributes to the final look of your model. Rushing this step is a classic rookie mistake that leads to ugly nub marks, poor paint adhesion, and a finish that just doesn't look professional.
To help you get started, here's a quick look at the essential supplies you'll want to have on hand.
Essential Gunpla Painting Supplies Breakdown
| Category | Essential Items | Purpose |
|---|---|---|
| Assembly & Prep | Hobby Nippers, Hobby Knife, Sanding Sticks/Sponges | Cleanly remove parts from runners and create a perfectly smooth surface for painting. |
| Paints & Thinners | Acrylics, Enamels, or Lacquers; Appropriate Thinner | The medium for coloring your model; each type has unique properties and uses. |
| Application Tools | Airbrush or Hand Brushes (various sizes) | Apply paint smoothly and evenly, from broad base coats to tiny, intricate details. |
| Detailing & Finishing | Primer, Masking Tape, Panel Liner, Decals, Top Coat | Prepare surfaces, create clean color separation, add depth, and protect the final work. |
This table covers the basics, but each category has a ton of depth. Let's dig into what you really need.
Core Tools for Assembly and Preparation
Before you even think about which color scheme to go with, you need to master the art of a clean build. This is where your model goes from a collection of plastic runners to a perfectly smooth canvas, ready for anything you can dream up.
- Hobby Nippers: This is your number one tool for cutting parts from the runner. A sharp, single-blade nipper made for plastic models is a game-changer. It makes a clean cut, minimizing those ugly stress marks and saving you a ton of cleanup work later.
- Hobby Knife: Absolutely essential for shaving off what’s left of the gate (the "nub") after using your nippers. A fresh, sharp blade gives you precise control to slice away that excess plastic without gouging the part.
- Sanding Tools: To get a surface that’s glass-smooth, you'll need sanding sticks, sponges, or files. I like to start with a lower grit (around 400-600) to knock down the bulk of the nub, then move to higher grits (800-1200+) to polish the surface until it’s seamless.
Pro Tip: When sanding, use gentle circular or back-and-forth motions. The goal isn't to reshape the part, but to blend the area where the nub was. A perfectly smooth surface at this stage is non-negotiable for a slick paint finish.
The Right Paints for Your Project
Choosing your paint is one of the biggest decisions you'll make. The three main types—acrylic, enamel, and lacquer—each have their own personality. Your choice will really depend on your workspace, your experience level, and the kind of finish you're chasing.
Acrylics are water-based, which makes them low-odor and super easy to clean up with just water or acrylic thinner. They're a fantastic starting point for beginners, especially if you plan on hand painting.
Enamels are oil-based and known for their durability and smooth, self-leveling finish when you brush them on. They take longer to dry, which can be great for blending colors, but you'll need mineral spirits for cleanup.
Lacquers are the top choice for airbrushing. They offer the fastest drying times and the toughest finish. But be warned: they have strong fumes and require a dedicated lacquer thinner. You'll absolutely need a well-ventilated space and a respirator to use them safely.
Essential Finishing and Detailing Supplies
With your main tools and paints sorted, a few more items are needed to tie it all together. These are the unsung heroes that take a build from good to great.
You'll need a good primer to make sure your paint sticks properly, masking tape for creating crisp, clean color separations, and a variety of brushes. For those tiny details, a high-quality brush like an Abteilung 502 Size 00 Round Paint Brush gives you the precision you need for small vents and mechanical bits.
Finally, a top coat seals all your hard work, protecting it from handling and giving the entire model a uniform matte, satin, or gloss finish. It’s the final step that makes everything pop.
Preparing Your Gundam for a Perfect Paint Job
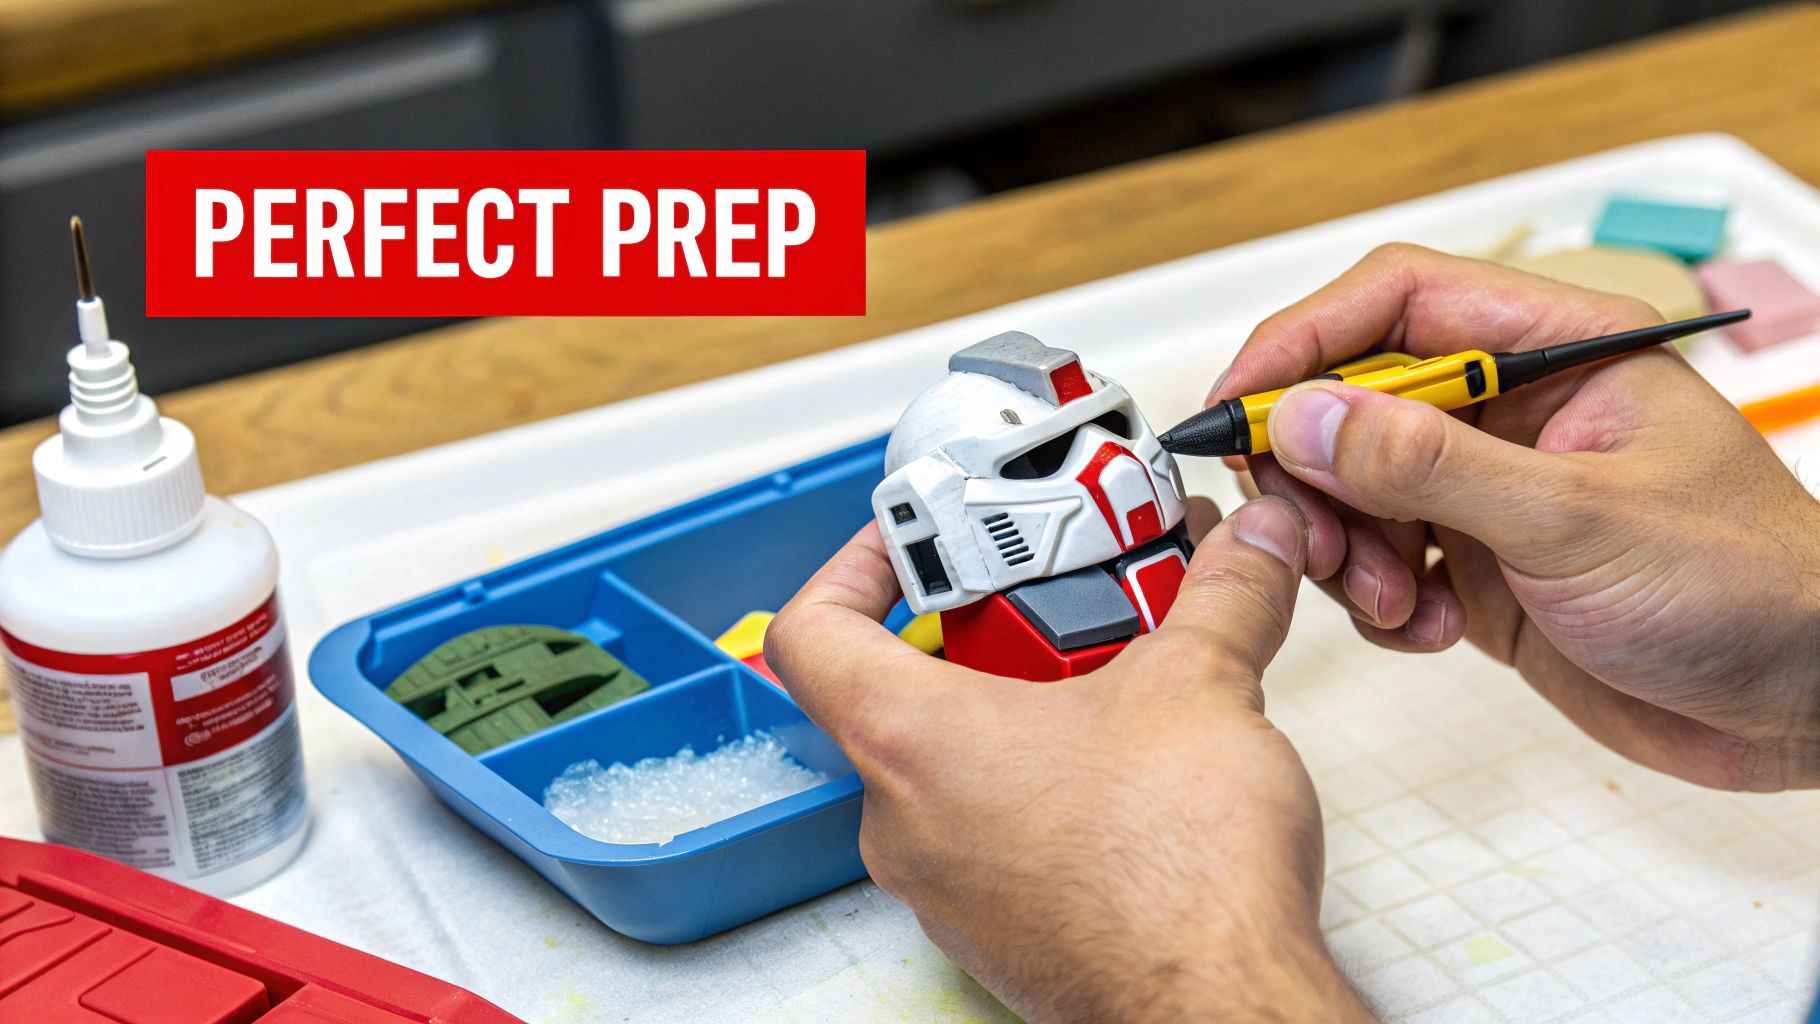
Here’s a secret that every seasoned builder knows: a jaw-dropping custom paint job has almost nothing to do with a fancy airbrush or exotic paint. The real magic happens long before any color touches the plastic. This prep stage is what separates a good build from a truly professional one, and skipping it is a recipe for frustration.
Think of it like this: you wouldn't paint a wall without spackling the holes and wiping it down first. We're going to apply that exact same mindset to every piece of your Gundam. It’s all about creating the perfect canvas.
The Gunpla community is massive and incredibly passionate about customization. Since Bandai kicked things off in 1980, they've sold over 714 million kits as of March 2021. That massive number has built a rich culture where unique paint schemes are a builder's badge of honor. You can explore the history and sales of these amazing kits to see just how big this hobby has become.
Mastering Nub Mark Removal
First up is the most tedious—but most critical—task: dealing with nub marks. These are the tiny bits of plastic left over after you snip a part from the runner. If you leave them, they’ll scream for attention under a coat of paint and completely ruin the illusion of a solid piece of armor.
Getting rid of them takes patience and a few simple steps.
- The First Cut: Grab your hobby nippers and cut the part from the runner, but don't cut flush against the piece. Leave a little bit of the gate attached. Cutting too close is a classic rookie mistake that can cause ugly stress marks or even gouge the plastic.
- The Precision Slice: Now, take a sharp hobby knife and carefully slice away the rest of the nub. The goal is to get it as flush as you possibly can. Always, always cut away from your body for safety.
- The Sanding Sequence: This is where you achieve that perfectly smooth finish. Start with a medium-grit sanding stick (something around 400 grit) to knock down the last of the nub. Then, work your way up to finer grits—like 800, and then 1200—to polish the plastic until it blends seamlessly with the surface around it.
A common mistake is pressing too hard when sanding. You have to let the sandpaper do the work. Use gentle, even strokes. Your goal is to erase the nub, not reshape the part.
The Essential Wash Down
Every single Gunpla part has an invisible layer of mold release agent on it from the factory. This oily residue helps the plastic pop out of the molds, but it's paint's worst enemy. Paint simply won't stick to it, leading to chipping, peeling, and a splotchy finish later on.
Washing your parts is non-negotiable.
- Get a container and submerge all your plastic parts in warm, soapy water. A gentle dish soap is perfect for this.
- Use a soft brush (an old toothbrush is ideal) to lightly scrub each piece. Make sure you get into all the little recessed areas and panel lines.
- Rinse every part thoroughly with clean water and let them air dry completely on a clean towel. Don't rush this! Any lingering moisture will cause problems.
Working Smarter with Sub-Assemblies
Once your parts are clean, smooth, and dry, it's tempting to start gluing everything together into a finished model. Fight that urge. Instead, think in terms of sub-assemblies.
This just means grouping parts into logical sections—like the head, the torso, each arm, each leg, and the weapons—without fully assembling the entire Gundam.
This approach gives you a huge advantage. It lets you easily reach every angle, every inner joint, and every nook and cranny with your primer and paint. You won't have to deal with those awkward unpainted spots you'd get on a fully built kit. Painting a separate arm, for instance, is way easier than trying to snake an airbrush into the tight armpit of an assembled torso.
Organizing your kit this way transforms the painting process from a frustrating puzzle into a smooth, manageable workflow.
Applying Primer and Base Coats Like a Pro
With your parts all prepped and patiently waiting on their skewers, the real magic is about to happen. This is where your Gunpla starts to shed its plastic skin and take on a whole new personality, all defined by the foundational layers of color you’re about to apply.
Laying down primer and a solid base coat is more than just slapping on some paint. It’s a crucial process that sets the stage for a smooth, vibrant, and durable finish.
A lot of builders get impatient and skip the primer. Don't be one of them. A good primer is the unsung hero of any great paint job, giving the paint a consistent, uniform surface to grab onto. This grip is essential for preventing chipping later on. It also completely neutralizes the color of the plastic, so your chosen colors look exactly how they're supposed to. A bright yellow painted over dark gray plastic will always look dull and greenish without a good primer to block that underlying color.
The Critical Role of Primer
Think of primer as the ultimate handshake between the bare plastic and your paint. It lightly etches the surface, creating a microscopic texture that paint can mechanically bond with—a bond far stronger than paint could ever achieve on slick, glossy plastic. If you want a finish that lasts, this step is non-negotiable.
Whether you're using a spray can or an airbrush, the golden rule for primer is this: thin coats are king. A single, heavy coat is a recipe for disaster, as it will quickly flood and obscure all those crisp panel lines and delicate details you worked so hard to preserve. The goal is to build up coverage with two or three light, misty coats.
- Hold your spray can or airbrush about 6-8 inches from the part.
- Use smooth, sweeping motions. Start spraying just before the part and stop just after you've passed it.
- Let each coat dry until it's "tack-free" (usually around 15-20 minutes) before hitting it with the next one. This method builds up a solid, even layer without any ugly drips or pools.
Choosing Your Base Coat Method
Once your primer has had plenty of time to fully cure—give it at least 24 hours to be safe—it’s time for the main event: the base coat. This is your primary color layer, and you’ve got two main ways to get it on there: with an airbrush or by hand with a brush. Each has its place, and the best choice often comes down to the finish you’re after and the tools you have.
Airbrushing vs Hand Brushing Comparison
To help you figure out which path is right for your project, here’s a quick breakdown of the two main base coating methods.
| Technique | Pros | Cons | Best For |
|---|---|---|---|
| Airbrushing | Produces an ultra-smooth, factory-like finish with zero brush strokes. | Requires a higher initial investment and a dedicated, well-ventilated workspace. | Achieving flawless, even coats on large armor pieces and a professional look. |
| Hand Brushing | Low startup cost, quiet, and requires very little space. | Can leave visible brush strokes if you're not careful with your technique. | Painting small details, working in an apartment, or for beginners on a budget. |
Both methods can yield fantastic results. The key is to understand their strengths and play to them. Many pro builders use a combination of both—airbrushing for large surfaces and hand brushing for the tiny, intricate details.
Airbrushing for a Flawless Finish
For that signature smooth, professional Gunpla look, an airbrush is your best friend. It takes some practice, but mastering it comes down to three things: thinning your paint, setting your air pressure, and finessing the trigger.
Thinning your paint correctly is 90% of the battle. Most hobby paints are too thick to spray straight out of the bottle and need to be thinned down to the consistency of skim milk. A 1:1 paint-to-thinner ratio is a common starting point, but this can vary wildly between brands and even different colors within the same line. Always test your mix on a plastic spoon before you start spraying your precious parts.
Next up is air pressure, measured in PSI (pounds per square inch). For general base coating, a pressure between 15-20 PSI is the sweet spot. Too high, and the paint can start to dry mid-air, landing on your model with a rough, sandy texture. Too low, and the airbrush might sputter and spit out ugly blobs.
Finally, get comfortable with the dual-action trigger. Pressing down controls the airflow, while pulling back controls the amount of paint. Always start the airflow first by pressing down, then gently pull back to release the paint as you move across the part. To end the pass, push the trigger forward to stop the paint flow before you release the airflow. This simple habit prevents those messy splatters that can ruin a perfect coat.
The secret to a perfect airbrushed coat is patience. Build up your color in several thin, semi-transparent layers rather than trying to blast on full coverage in one go. This technique ensures a silky-smooth finish without burying a single detail.
Hand Brushing Without the Strokes
If you're painting by hand, your main enemy is the dreaded brush stroke. But you can win this fight. The secret weapons? Thin your paints and build up layers with patience.
Just like with an airbrush, you'll want to thin your acrylic paint to a milky consistency. A wet palette is an absolute game-changer here, as it keeps your thinned paint at the perfect working consistency for much longer.
When you load your brush, don't drown it. You want just enough paint to flow smoothly without pooling up on the part. Apply the paint in thin, even layers, always brushing in the same direction. Let each layer dry completely—which might only take a few minutes for well-thinned acrylics—before you add the next one. It might take 3-5 thin coats to achieve a solid, opaque color, but the beautifully smooth finish is more than worth the extra time.
Adding Depth with Masking and Panel Lines
Getting a solid base coat down is a huge milestone. Seriously, pat yourself on the back. But the next steps—masking and panel lining—are what really start to transform your painted Gundam from a cool toy into a detailed scale model. These techniques are all about adding sharpness and definition, making your Gunpla look less like a single piece of plastic and more like a complex, real-world machine.
Mastering these skills takes some patience, no doubt about it. But the payoff is immense. You'll be able to pull off intricate color schemes and make every single molded detail pop, adding a profound sense of realism to your work.
This handy visual breaks down the core workflow of prep, priming, and painting that leads to these advanced steps.
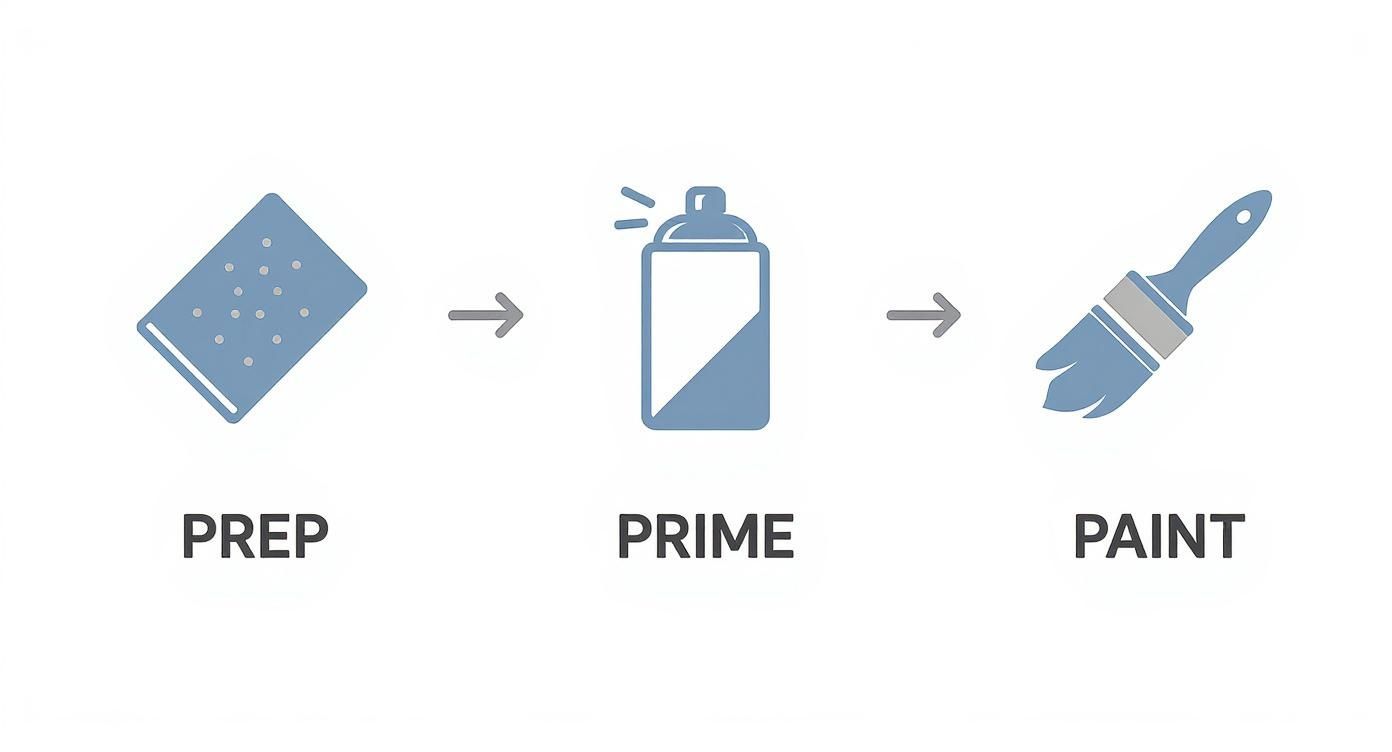
This workflow is the foundation for everything that comes next. A solid foundation ensures that advanced techniques like masking have a smooth, durable surface to stick to.
Creating Crisp Color Separations with Masking
Masking is essentially the art of using tape to protect a painted area while you spray another color right next to it. It’s the secret behind those slick two-tone shields, custom camouflage patterns, or any design that demands a sharp, clean line between colors.
Your best friend here is high-quality hobby masking tape. It’s specifically designed to have just the right amount of tack—strong enough to stop paint from bleeding underneath but gentle enough that it won’t lift the paint you’ve already worked so hard on.
Here’s a practical way to approach masking:
- Let it Cure: Never, ever apply masking tape to paint that isn't fully cured. I recommend waiting at least 24 hours after your base coat feels dry to the touch before you even think about putting tape on it.
- Cut to Shape: For straight lines, you can apply the tape directly from the roll. But for curves and complex shapes, place a piece on a self-healing cutting mat and use a sharp hobby knife to cut the exact patterns you need.
- Burnish the Edges: Once you've applied the tape, run a toothpick or a plastic modeling tool firmly along the edge. This is called burnishing, and it's a critical step that seals the edge to prevent any paint from seeping underneath.
A common mistake is laying down a heavy, wet coat of paint right up against a masked edge. This is asking for trouble. Instead, build up the color with several light, misty coats, spraying at a 90-degree angle to the tape line. This dramatically minimizes the risk of paint bleed.
Bringing Details to Life with Panel Lining
Panel lining is the simple but powerful technique of applying a dark wash or ink into the recessed lines on a Gundam’s armor. It instantly creates contrast, making individual armor plates stand out and giving the model a much greater sense of scale and mechanical depth.
There are a few popular ways to get this done, and each has its own pros and cons.
- Panel Line Pens: This is the easiest entry point for beginners. These fine-tipped markers are perfect for quickly and cleanly filling in lines. Just trace the line, and if you make a mistake, wipe it away with a cotton swab or your finger.
- Tamiya Panel Line Accent Color: This stuff is like magic in a bottle. It's a pre-thinned enamel wash that flows into panel lines through capillary action. You just touch the tip of the applicator brush to a line, and the wash zips right along the channel on its own.
- DIY Enamel Washes: For total control, you can mix your own wash. Just thin some enamel paint with a product like Zippo lighter fluid or mineral spirits. This lets you create custom colors for different effects—a dark grey on white armor, for example, often looks more subtle and realistic than pure black.
Here’s a non-negotiable rule for panel lining: always apply a gloss top coat first. Applying an enamel wash directly over a matte acrylic or lacquer base can permanently stain the paint or, worse, make the plastic brittle and prone to cracking. A gloss coat creates a smooth, non-porous barrier that lets the wash flow perfectly and makes cleanup a total breeze.
For a reliable, no-fuss option, a product designed specifically for the job is your best bet. An AK Interactive Panel Liner offers fantastic flow and is pre-thinned to the perfect consistency right out of the bottle. Just apply it over your gloss coat, let it dry for 15-20 minutes, then clean up the excess with a cotton swab lightly dampened with enamel thinner. The result is perfectly defined detail that makes your whole build look sharper.
Bringing Your Model to Life with Decals and Weathering
Your Gundam has a perfect, factory-fresh paint job, but the story isn’t finished yet. This is where you elevate your build from a well-painted model to a realistic machine with a history and character of its own. The two key elements for this transformation are decals and weathering—the final touches that add layers of authenticity and make your Gunpla truly come alive.
First, let's talk about decals. Most Gunpla kits come with basic sticker sheets, which are fine for a quick build. But their thick, visible edges can really cheapen the look of a custom paint job.
For a truly professional finish, you need to step up to waterslide decals. These are incredibly thin markings printed on special backing paper. When soaked in water, the decal slides off, allowing it to sit completely flush against the model’s surface.
Applying Waterslide Decals for a Seamless Look
Working with waterslide decals requires a bit more patience than stickers, but the results are worlds better. When done right, they look like they were painted on from the start. The key is using the right solutions to help them conform perfectly to any surface, whether it's flat armor or a curved shoulder piece.
The process is pretty straightforward:
- Prepare the Surface: Just like with panel lining, always apply waterslide decals over a smooth gloss top coat. This prevents the decal from trapping air bubbles underneath—a frustrating effect known as "silvering"—and allows you to slide it into the perfect position without it grabbing onto the paint.
- Cut and Soak: Use a sharp hobby knife to cut the decal you want from the sheet. Grab it with a pair of fine-tipped tweezers and submerge it in a small dish of lukewarm water for about 10-20 seconds.
- Slide and Position: Once the decal easily slides around on its backing paper, it's ready. Use a soft brush to add a drop of water to the model where the decal will go. Gently slide the decal from the paper onto the model and use the brush to nudge it into its final spot.
Using Decal Solutions for Perfect Adhesion
This is where the real magic happens. To make the decal melt into the surface and hug every curve and panel line, you'll need a decal setter and a decal softener. A setter helps the decal adhere better, while a softener (the more aggressive of the two) actually softens the decal film, making it pliable enough to settle into panel lines.
Pro Tip: Apply a small amount of decal setting solution to the model's surface right before you slide the decal on. After positioning it, gently wick away excess water with a cotton swab, then apply a thin layer of decal softener over the top. The most important part? Don't touch it after this—let it dry completely as it works its magic.
For a great all-in-one product, consider a decal solution that both improves adhesion and helps the decal conform to irregular surfaces. You can learn more about how an AK Interactive Decal Adapter Solution can streamline this process for you.
Adding Realism with Weathering Techniques
With your decals sealed under another thin gloss coat, it's time to add the story. Weathering is the art of making your Gunpla look like it has seen action. It's about simulating wear and tear, from subtle paint chipping to the grime accumulated on the battlefield.
A few simple techniques can produce dramatic results.
- Dry Brushing: This is a fantastic way to highlight raised edges and create the look of worn, scuffed paint. Dip a flat brush into a metallic paint (like silver or gunmetal), then wipe almost all of it off on a paper towel. Lightly flick the nearly dry brush across the edges of the armor to catch the raised details.
- Chipping: To create a more deliberate, battle-scarred look, use a small piece of sponge or a fine-tipped brush. Dip it into a dark color (like a dark gray or brown) and lightly dab it along edges where damage would naturally occur, such as on feet, shield edges, and thrusters. For a deeper effect, add a tiny speck of metallic paint in the center of the larger chips to simulate exposed metal underneath.
- Washes and Streaks: Applying a wash of thinned enamel or oil paint can simulate accumulated dirt, grime, and fluid leaks. Apply a dark brown or black wash into recessed areas and around bolts. To create streaks, paint a small dot of oil paint where a leak might start, then use a brush dampened with thinner to pull it downwards in a faint, vertical line. This technique adds an incredible amount of realism, suggesting a machine that has been hard at work.
Sealing Your Work with a Final Top Coat
You’ve poured hours into sanding, painting, masking, and painstakingly applying those tiny decals. Now for the final, most crucial step that protects all that hard work: the top coat.
This isn't just about protection; a top coat is what unifies your entire model, pulling every element together for a consistent, intentional finish. It’s the step that elevates a collection of painted parts into a cohesive, professional-looking machine. Applying a top coat locks in delicate decals and weathering effects so they won’t rub off, while also controlling the final sheen of your entire build.
Choosing Your Finish: Matte, Satin, or Gloss
The type of top coat you choose has a massive impact on the final vibe of your Gundam. Each finish tells a different story.
- Matte Finish: This is, by far, the most popular choice for military-style or "realistic" builds. A matte top coat kills all shine, giving the armor a flat, non-reflective surface that looks fantastic under any light. It's perfect for creating that rugged, utilitarian look.
- Gloss Finish: A gloss coat delivers a high-shine, reflective surface, almost like a brand-new car. This is often used for specific mobile suits designed to look polished, or as a critical intermediate step before applying panel liners and decals, as it gives them a smooth surface to flow into.
- Satin (or Semi-Gloss) Finish: Offering a beautiful middle ground, a satin coat provides a subtle, slight sheen. It isn't completely flat, but it avoids the mirror-like reflection of a full gloss. It’s a versatile choice that adds a touch of realism without looking dull.
The most common workflow among experienced builders is to use a gloss coat to protect the base paint and prepare for decals/panel lining, then finish with a matte or satin top coat to seal everything and achieve the final desired look.
Whether you're using a spray can or an airbrush, applying the top coat follows the same golden rule as priming: multiple thin coats are always better than one thick one.
Hold the can or airbrush about 6-8 inches from the part and use light, sweeping passes. Make sure to overlap each pass by about 50% to ensure you get even coverage without causing drips or runs. Let each coat dry for at least 20-30 minutes before hitting it with the next one. This patient approach is key to preventing fogging or pooling, giving you a durable, flawless final seal.
Your Top Gundam Painting Questions, Answered
Even the most detailed guide can't cover every single question that pops up during a build. Let's tackle some of the most common hurdles modelers face, with some straight-to-the-point advice to keep your project on track.
What's the Best Paint for a Beginner?
If you're just starting out, grab some water-based acrylics. Hands down, they are the easiest to learn with.
They're low-odor, which is a huge plus for indoor hobby spaces, and cleanup is as simple as using water. While lacquers and enamels give you a super durable finish, they come with heavy fumes that require a respirator and a serious ventilation setup. My advice? Master the basics of thinning and application with acrylics before you even think about moving on to the heavy stuff.
Is an Airbrush Absolutely Necessary?
Not at all. While an airbrush delivers that flawlessly smooth, almost factory-like finish, you can get incredible results with a good old-fashioned paintbrush.
The secret is patience. You have to thin your paints correctly and, most importantly, apply multiple thin coats instead of one thick one. This is how you eliminate those pesky brush strokes. I’ve seen plenty of award-winning models where all the fine details were done entirely by hand.
How Do I Fix Common Painting Mistakes?
Mistakes are part of the process, but they're almost always fixable. Here’s how to handle two of the most frequent slip-ups:
- Dealing with a Paint Run: If the paint is still wet, just wick away the excess with the corner of a paper towel and you're good. If it has already dried, let it cure completely for a day or so. Then, gently sand the drip smooth with a high-grit sandpaper (1200+) and lightly re-spray the area to blend it in.
- Saving a Smudged Decal: A messed-up waterslide decal feels like a disaster, but it's often salvageable. Douse the area with a decal softener. This will loosen the decal's adhesive, giving you a window to gently nudge it back into position with a soft brush before it sets for good.
Once you get comfortable with your painting skills, you might even want to share them. Checking out different how-to video ideas can be a great way to inspire your own tutorials.
Find all the paints, tools, and supplies you need to bring your vision to life at Fusion Scale Hobbies. We have everything from beginner-friendly acrylics to professional-grade airbrush equipment. Shop our complete collection today at https://fusionscalehobbies.com